 Kia Sorento: Interior Trim Replacement
Door Scuff Trim Replacement
| ŌĆó
|
Put on gloves to protect your hands.
|
| ŌĆó
|
When prying with a flat-tip screwdriver, wrap it with
protective tape to prevent damage.
|
| ŌĆó
|
Take care not to bend or scratch the trim and panels.
|
|
|
1. |
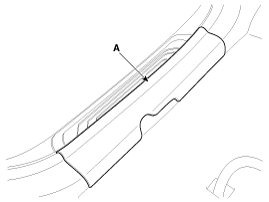
Using a screwdriver or remover, remove the front door scuff tirm
(A).
[Front]
|
|
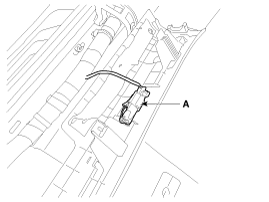
2. |
Disconnect the connector (A).
|
|
3. |
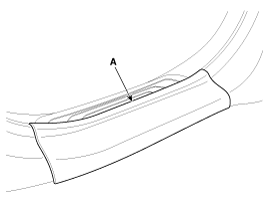
Using a screwdriver or remover, remove the rear door scuff tirm
(A).
[Rear]
|
|
4. |
Install in the reverse order of removal.
|
ŌĆó |
Make sure the connector is connected properly.
|
|
|
Front Pillar Trim Replacement
| ŌĆó
|
Put on gloves to protect your hands.
|
| ŌĆó
|
When prying with a flat-tip screwdriver, wrap it with
protective tape to prevent damage.
|
| ŌĆó
|
Take care not to bend or scratch the trim and panels.
|
|
|
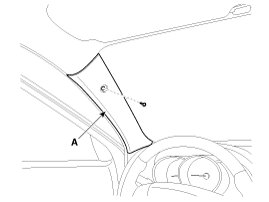
1. |
After loosening the screw, then remove the front pillar trim (A).
|
|
2. |
Install in the reverse order of removal.
|
ŌĆó |
Replace any damage clips.
|
|
|
Cowl Side Trim Replacement
| ŌĆó
|
Put on gloves to protect your hands.
|
| ŌĆó
|
When prying with a flat-tip screwdriver, wrap it with
protective tape to prevent damage.
|
| ŌĆó
|
Take care not to bend or scratch the trim and panels.
|
|
|
1. |
Remove the front door scuff trim.
|
|
2. |
Remove the hood latch release handle.
|
|
3. |
Using a screwdriver or remover, remove the cowl side trim (A).
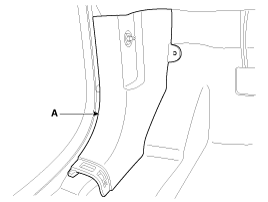
|
|
4. |
Install in the reverse order of removal.
|
ŌĆó |
Replace any damage clips.
|
|
|
Center Pillar Trim Replacement
| ŌĆó
|
Pry the trim off using a plastic trim tool and apply protective
tape around the related parts, to prevent damage.
|
| ŌĆó
|
Put on gloves to protect your hands.
|
| ŌĆó
|
Take care not to scratch the body surface.
|
|
|
1. |
Remove the front door scuff trim.
|
|
2. |
Remove the rear door scuff trim.
|
|
3. |
Remove the front seat belt anchor pertensioner cover pad (A).
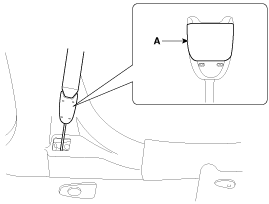
|
|
4. |
Remove the front seat belt anchor pertensioner after pushing the
lock pin with a fiat-tip screwdriver (B).
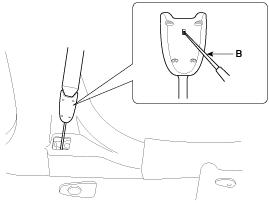
|
|
5. |
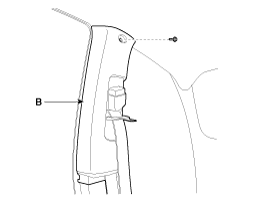
Using a screwdriver or remover, remove the center pillar lower
trim (A).
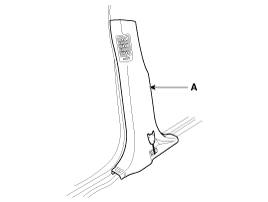
|
|
6. |
After loosening the mounting bolt, then remove the center pillar
upper trim (B).
|
|
7. |
Install in the reverse order of removal.
|
ŌĆó |
Replace any damage clips.
|
|
|
Luggage Side Trim Replacement
| ŌĆó
|
Pry the trim off using a plastic trim tool and apply protective
tape around the related parts, to prevent damage.
|
| ŌĆó
|
Put on gloves to protect your hands.
|
| ŌĆó
|
Take care not to scratch the body surface.
|
|
|
1. |
Remove the rear door scuff trim.
|
|
2. |
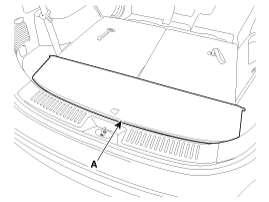
Remove the luggage box trim (A).
|
|
3. |
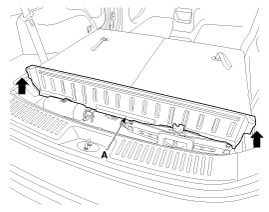
Remove the luggage box partition trim (A).
|
|
4. |
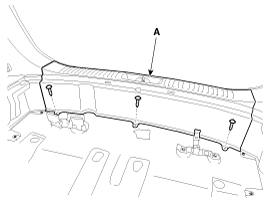
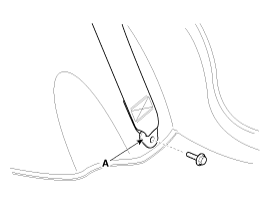
After loosening the mounting screws, then remove the rear transverse
trim (A).
|
|
5. |
After loosening the mounting bolt, then remove the second row
seat belt lower anchor (A).
Tightening torque :
39.2 ~ 53.9 N.m (4.0 ~ 5.5 kgf.m, 28.8 ~ 39.8 lb-ft)
|
|
|
6. |
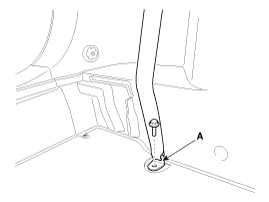
After loosening the mounting bolt, then remove the third row seat
belt lower anchor (A).
Tightening torque :
39.2 ~ 53.9 N.m (4.0 ~ 5.5 kgf.m, 28.8 ~ 39.8 lb-ft)
|
|
|
7. |
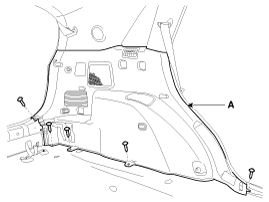
After loosening the mounting screws, then remove the luggage side
trim (A).
|
|
8. |
Install in the reverse order of removal.
|
ŌĆó |
Replace any damage clips.
|
|
|
C Pillar Trim Replacement
| ŌĆó
|
Pry the trim off using a plastic trim tool and apply protective
tape around the related parts, to prevent damage.
|
| ŌĆó
|
Put on gloves to protect your hands.
|
| ŌĆó
|
Take care not to scratch the body surface.
|
|
|
1. |
Remove the luggage side trim.
|
|
2. |
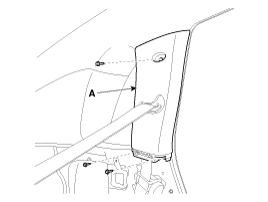
After loosening the mounting bolt, then remove the C pillar trim
(A).
|
|
3. |
Install in the reverse order of removal.
|
ŌĆó |
Replace any damaged clips.
|
|
|
Rear Pillar Trim Replacement
| ŌĆó
|
Pry the trim off using a plastic trim tool and apply protective
tape around the related parts, to prevent damage.
|
| ŌĆó
|
Put on gloves to protect your hands.
|
| ŌĆó
|
Take care not to scratch the body surface.
|
|
|
1. |
Remove the luggage side trim.
|
|
2. |
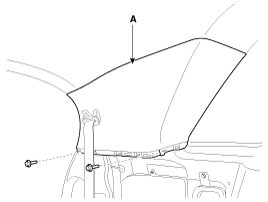
After loosening the mounting bolt, then remove the rear pillar
trim (A).
|
|
3. |
Install in the reverse order of removal.
|
ŌĆó |
Replace any damaged clips.
|
|
|
1. Front pillar trim
2. Center pillar lower trim
3. Center pillar upper trim
4. Front door scuff trim
5. Rear door scuff trim
6. Cowlside trim
7. Rear pillar trim
8 ...
Luggage Side Trim Replacement [7 seats]
ŌĆó
Put on gloves to protect your hands.
...
See also:
TJ Joint Inspection
1.
Check the spider assembly for roller rotation, wear or corrosion.
2.
Check the groove inside the joint case for wear or corrosion
...
Specification
Pressure
[kPa (kgf/cm², in H2O)
Output Voltage (V)
-3.75 (-0.038, -15.05)
4.5
0
1.5
+1.25 (0.013, 5.02)
0.5
...
Removal
1.
Turn the ignition switch OFF and disconnect the battery negative
(-) cable.
2.
Release the residual pressure in fuel line.
(Refe ...
 Kia Sorento: Interior Trim Replacement
 Interior Trim Components
 Trunk Trim Replacement


