 Kia Sorento: Blower Unit Replacement
Second Generation XM (2011-2025) / Kia Sorento XM 2011-2025 Service Manual / Heating,Ventilation And Air Conditioning / Blower / Blower Unit Replacement
| 1. |
Disconnect the negative (-) battery terminal.
|
| 2. |
Recover the refrigerant with a recovery/recycling/charging station.
|
| 3. |
When the engine is cool, drain the engine coolant from the radiator.
(Refer to Engine Mechanical System - ŌĆ£CoolantŌĆØ)
|
| 4. |
Remove the expansion valve cover (A).
|
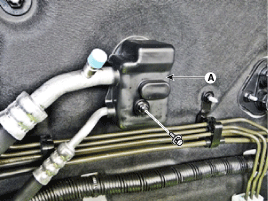
| 5. |
Remove the expansion valve (A) from the evaporator core.
|
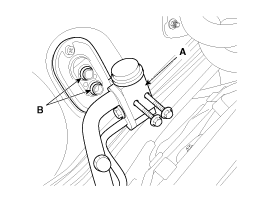

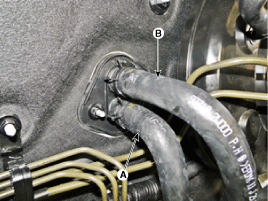
| 6. |
Disconnect the inlet (A) and outlet (B) heater hoses from the
heater unit.
|

| 7. |
Remove the cowl top cover.
(Refer to Body - "Cowl Top Cover")
|
| 8. |
Remove the front pillar trim.
(Refer to Body - "Interior Trim")
|
| 9. |
Remove the front seat assembly.
(Refer to Body - "Front Seat")
|
| 10. |
Remove the console assembly.
(Refer to Body - "Console")
|
| 11. |
Remove the shift lever assembly.
(Refer to Automatic Transaxle Control System - "Shift lever")
|
| 12. |
Remove the cowl side trim.
(Refer to Body - "Interior Trim")
|
| 13. |
Remove the crash pad lower panel.
(Refer to Body - "Crash Pad")
|
| 14. |
Remove the steering column shroud panel.
(Refer to Body - "Steering Column Shroud Panel")
|
| 15. |
Lower the steering column after loosening the mounting bolts.
(Refer to Steering System - "Steering Column and Shaft")
|
| 16. |
Remove the glove box housing.
(Refer to Body - "Crash Pad")
|
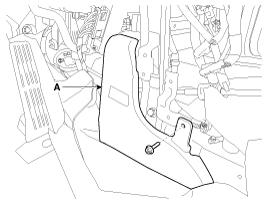
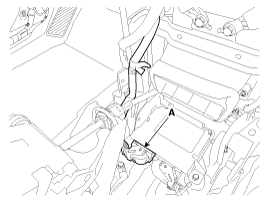
| 17. |
After loosening the mounting bolt, then remove the rear airduct
(A).
[LH]
[RH]
|
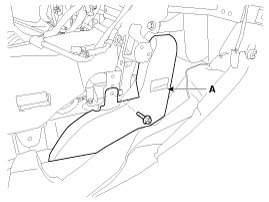
| 18. |
Disconnect the airbag control module (SRSCM) connector (A).
|
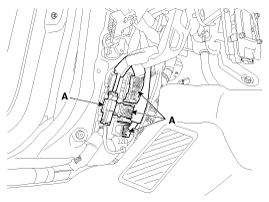
| 19. |
Disconnect the passenger compartment junction box connectors (A).
|

| 20. |
Disconnect the multi box connectors (A).
[Driver's side]
[Passenger's side]
|
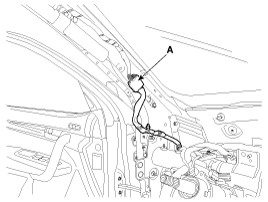
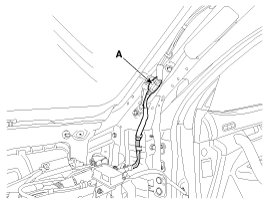
| 21. |
Disconnect the connector (A) and the mounting clips in the front
pillar.
[Driver's side]
[Passenger's side]
|
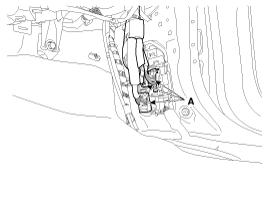
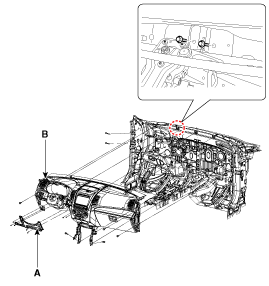
| 22. |
After loosening the mounting bolts, remove the reinforce panel
(A).
|
| 23. |
After loosening the nuts and bolts remove the main crash pad (B)
and cowl cross bar assembly (B) together.
|
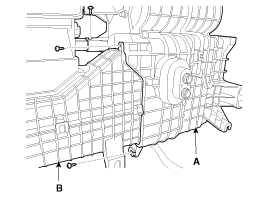
| 24. |
Loosen the drain hose fixing clip under the vehicle.
|
| 25. |
Disconnect the heater unit connectors.
|
| 26. |
Remove the heater and blower unit from the crash pad after loosening
the mounting nuts.
|
| 27. |
Separate the blower unit from the heater unit after loosening
the screws.
|
| 28. |
Install in the reverse order of removal.
|
 Blower Unit Components
1. Intake Case (LH)
2. Intake Case (RH)
3. Intake Door
4. Cowl Seal
5. NVH Seal
6. Blower Upper Case
7. Cluster Ionizer
8. Blower Lower Case
9. Power Mosfet (DAT ...
 Blower Motor Inspection
1.
Connect the battery voltage and check the blower motor rotation.
2.
If the blower motor does not operate well, substitute with a know ...
See also:
Starter Disassembly
1.
Disconnect the M-terminal (A) on the magnet switch assembly (B).
2.
After loosening the screws (A), detach the magnet switch assembly ...
Occupant Detection system (ODS) Installation
1.
Install the ODS equipped seat cushion assembly. (Refer to the
Body group- Seat)
2.
Install the front passenger seat assembly.
( ...
Maintenance under severe usage conditions
The following items must be serviced more frequently on cars normally used under
severe driving conditions. Refer to the chart below for the appropriate maintenance
intervals.
R : Replace
I : Ins ...
Categories
- Home
- First Generation
- Second Generation
- Kia Sorento XM 2011-2025 Owners Manual
- Kia Sorento XM 2011-2025 Service Manual

Copyright ® www.ksmanual.com 2014-2025