 Kia Sorento: Hood Replacement
Hood Assembly Replacement
| ŌĆó
|
When removing and installing the hood, an assistant is
necessary.
|
| ŌĆó
|
Take care not to damaged the hood and body.
|
| ŌĆó
|
When removing the clips, use a clip remover.
|
|
|
1. |
Using a screwdriver, lift the socket clips (A) up slightly on
both ends of the lifter (B).
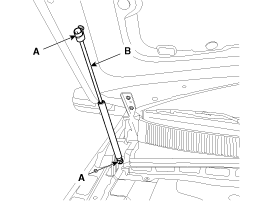
|
|
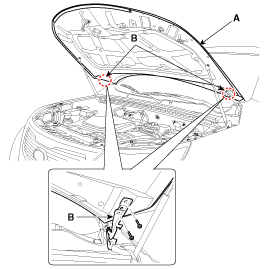
2. |
After loosening the hood hinge (B) mounting bolts, remove the
hood assembly (A).
Tightening torque :
21.6 ~ 26.5 N.m (2.2 ~ 2.7 kgf.m, 15.9 ~ 19.5 lb-ft)
|
|
|
3. |
Install in the reverse order of removal.
|
ŌĆó |
Make sure the hood opens properly and locks securely.
|
|
ŌĆó |
Adjust the hood alignment.
|
|
|
Hood Insulator Pad Replacement
| ŌĆó
|
Take care not to scratch the hood panel.
|
|
|
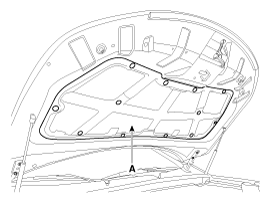
1. |
Using a clip remover, detach the clips, and remove the hood insulator
pad (A).
|
|
2. |
Install in the reverse order of removal.
|
ŌĆó |
Replace any damaged clips.
|
|
|
Hood Seal Weatherstrip Replacement
|
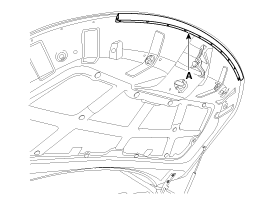
1. |
Detach the clips, then remove the hood weatherstrip(A).
|
ŌĆó |
Take care not to scratch the hood seal weatherstrip.
|
|
|
|
2. |
Install in the reverse order of removal.
|
ŌĆó |
Replace any damaged clips.
|
|
|
Hood Weatherstrip Replacement
|
1. |
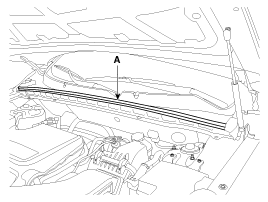
Remove the hood weatherstrip (A).
|
ŌĆó |
Be careful not to scratch the hood weatherstrip.
|
|
|
|
2. |
Install in the reverse order of removal.
|
Hood Latch Release Handle Replacement
|
1. |
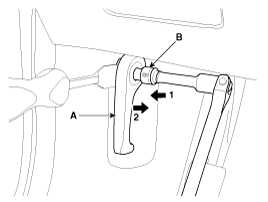
Using a socket (B), remove the hood release handle (A).
|
|
2. |
Install in the reverse order of removal.
|
ŌĆó |
Make sure the hood latch release cable is connected
properly.
|
|
ŌĆó |
Make sure the opens securely
|
|
|
Hood Latch Replacement
|
1. |
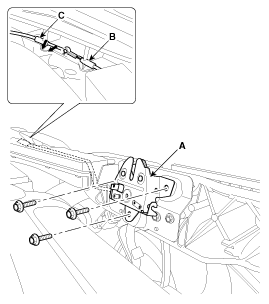
Loosen the hood latch (A) mounting bolts.
|
|
2. |
Disconnect the hood latch cable (B) and release cable (C).
Tightening torque :
7.8~11.8 N.m (0.8~1.2 kgf.m, 5.8~8.7 lb-ft)
|
|
|
3. |
Install in the reverse order of removal.
|
ŌĆó |
Make sure the hood latch release cable is connected
properly.
|
|
ŌĆó |
Make sure the hood locks securely.
|
|
ŌĆó |
Adjust the latch alignment.
|
|
|
Hood Lift Replacement
| ŌĆó
|
When removing and installing the hood lifter, an assistant
is necessary.
|
| ŌĆó
|
When removing the clips, use a clip remover.
|
|
|
1. |
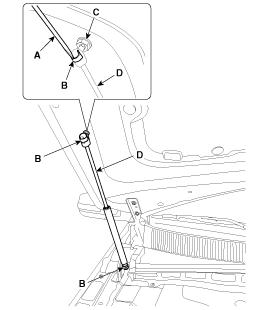
Using a screwdriver (A), lift the socket clip (B) up slightly
on both ends of the lifter (D), and then remove the lifter from the
bracket (C).
|
|
2. |
Push the socket of the lifter into the bracket for installation.
|
ŌĆó |
Make sure the hood locks/unlocks and opens/closes
properly.
|
|
|
ŌĆó
When removing and installing the hood, an assistant is
necessary.
...
Adjust Hood
1.
After loosening the hinge (A) mounting bolt, adjust the hood (B)
by moving it up or down, or right or left.
2.
Adjust th ...
See also:
High Pressure Fuel Pump Installation
ŌĆó
Be sure to check the low pressure fuel hose quick-connector
(A) is completely connec ...
Blade inspection
✽ NOTICE
Commercial hot waxes applied by automatic vehicle washes have been known to
make the windshield difficult to clean.
Contamination of either the windshield or the wiper blades with ...
Catalytic Converter Description
The catalytic converter of the gasoline engine is a three way catalyst.
It oxidizes carbon monoxide and hydrocarbons (HC), and separates oxygen from
the oxides of nitrogen (NOx).
[WCC]
...
 Kia Sorento: Hood Replacement
 Fender Replacement
 Hood Adjustment


