 Kia Sorento: Rear Driveshaft Reassembly
Second Generation XM (2011-2026) / Kia Sorento XM 2011-2026 Service Manual / Driveshaft and axle / Rear Driveshaft Assembly / Rear Driveshaft Reassembly
| 1. |
Wrap tape around the driveshaft splines (TJ side ) to prevent
damage to the boots.
|
| 2. |
Apply grease to the driveshaft and install the boots.
|
| 3. |
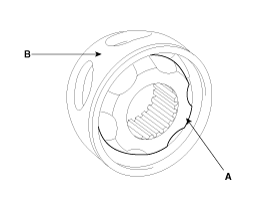
Apply the specified grease to the inner race (A) and cage (B).
Install the cage (B) so that it is offset on the race as shown.
|
| 4. |
Apply the specified grease to the cage and fit the balls into
the cage.
|
| 5. |
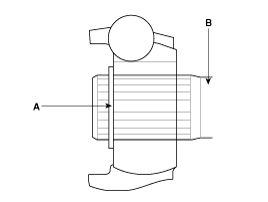
Position the chamfered side (A) as shown in the illustration.
Install the inner race on the driveshaft(B), and then the snap ring.
|
| 6. |
Apply the specified grease to the outer race and install the BJ
outer race onto the driveshaft.
|
| 7. |
Apply the specified grease into the TJ boot and install the boot
with a clip.
|
| 8. |
Tighten the TJ boot bands.
|
| 9. |
Add the specified grease to the BJ as much as wiped away at inspection.
|
| 10. |
Install the boots.
|
| 11. |
Tighten the BJ boot bands.
|
| 12. |
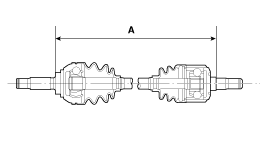
To control the air in the TJ boot, keep the specified distance
between the boot bands when they are tightened.
|

 Rear Driveshaft Disassembly
ŌĆó
Do not disassemble the BJ assembly.
ŌĆó
...
See also:
Troubleshooting
Symptom
Possible cause
Remedy
Speedometer does not operate
Cluster fuse (10A) blown
Check for short and replace fuse
Speedometer faulty
...
Installation
ŌĆó
Install the component with the specified torques.
ŌĆó
...
Component Location
1. Cluster assembly
2. Seat belt switch
3. Vehicle speed sensor
4. Engine coolant temperature sender
5. Oil pressure switch
6. Brake fluid level warning switch
7. Parking ...
Copyright ® www.ksmanual.com 2014-2026


