 Kia Sorento: Piston and Connecting Rod Repair procedures
|
•
|
Use fender covers to avoid damaging painted surfaces.
|
|
•
|
Wait until the engine cools down to room temperature to avoid damaging the cylinder head before
removing.
|
|
•
|
When handling the metal gasket, be careful not to fold or damage the surface.
|
|
•
|
To avoid damage, disconnect the wiring connectors carefully.
|
|
|
•
|
Mark all wirings and hoses to avoid misconnection.
|
|
•
|
Turn the crankshaft pulley so that the piston of No.1 cylinder is positioned at the top dead center
(TDC).
|
|
| 1. |
Remove the engine and transaxle assembly from a vehicle.
(Refer to Engine And Transaxle Assembly - "Engine And Transaxle
Assembly")
|
| 2. |
Remove the automatic transaxle.
(Refer to Automatic Transaxle System - "Automatic
Transaxle")
|
| 3. |
Remove the drive plate.
(Refer to Cylinder Block - "Drive Plate")
|
| 4. |
Remove the rear oil seal.
(Refer to Cylinder Block - "Rear Oil Seal")
|
| 5. |
Install the engine to engine stand for disassembly.
|
| 6. |
Remove the cylinder head cover.
(Refer to Cylinder Head Assembly - "Cylinder Head Cover")
|
| 7. |
Remove the oil pan.
(Refer to Lubrication System - "Oil Pan")
|
| 8. |
Remove the timing chain cover.
(Refer to Timing System - “Timing Chain Cover”)
|
| 9. |
Remove the timing chain.
(Refer to Timing System - “Timing Chain”)
|
| 10. |
Remove the integrated thermal management module (ITM).
(Refer to Cooling System - "Integrated Thermal Management Module
(ITM)")
|
| 11. |
Remove the intake/exhaust CVVT and camshaft assembly.
(Refer to Cylinder Head Assembly - "CVVT & Camshaft")
|
| 12. |
Remove the intake manifold.
(Refer to Intake And Exhaust System - "Intake Manifold")
|
| 13. |
Remove the exhaust manifold.
(Refer to Intake And Exhaust System - "Exhaust Manifold")
|
| 14. |
Remove the EGR cooler.
(Refer to Intake And Exhaust System - "EGR cooler")
|
| 15. |
Remove the cylinder head.
(Refer to Cylinder Head Assembly - "Cylinder Head")
|
| 16. |
Remove the oil pump.
(Refer to Lubrication System - "Oil Pump")
|
| 17. |
Remove the balance shaft assembly.
(Refer to Lubrication System - "Balance Shaft Assembly")
|
| 18. |
Remove the piston and connecting rod assembly.
| (1)
|
Remove the carbon deposits on the top of cylinder.
|
| (2)
|
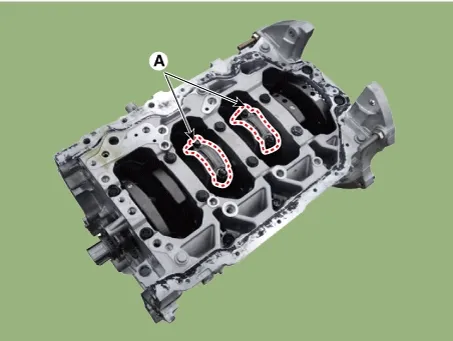
Remove the connecting rod bearing caps (A).
|
Mark the cylinder No. on the connecting rod and cap for correct installation when
reinstalling.
|
|
| (3)
|
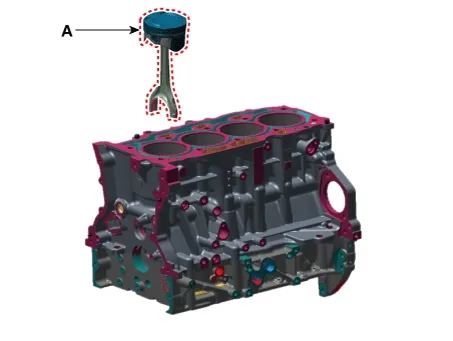
Push the piston and connecting rod assembly (A) together with the upper bearing through the top of
the cylinder block.
|
•
|
Keep the connecting rod and cap with the bearing assembled
|
|
•
|
Arrange the piston and connecting rod assemblies in the correct order.
|
|
•
|
Mark the cylinder No. so that the piston and connecting rod assembly removed from
each cylinder can be installed to original positon.
|
|
|
|
| 19. |
Measure the clearance between the piston and piston pin. Try to move the piston back and forth on the
piston pin.
If any movement is felt, replace the piston and piston pin as a set.
|
| 20. |
Remove piston rings.
| (1)
|
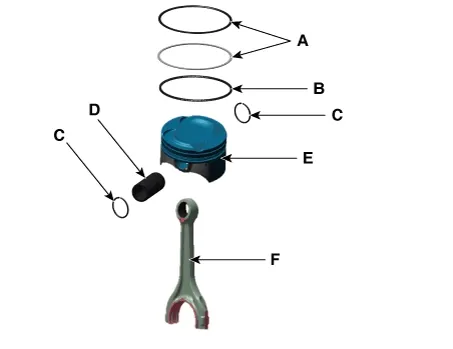
Remove the 2 piston rings (A) using a piston ring expander.
|
| (2)
|
Remove the oil ring (B) with hand.
|
When removing the oil ring, be careful not to excessively widen the both ends of oil ring.
Otherwise, oil ring can be broken.
|
|
Arrange the piston rings in the correct order.
|
|
|
| 21. |
Separate the piston and connecting rod.
| (1)
|
Remove the snap ring (C).
|
| (2)
|
Remove the piston pin (D) from the piston.
|
| (3)
|
Separate the piston (E) and connecting rod (F).
|
|
Connecting Rod
| 1. |
Inspect the side clearance of connecting rod.
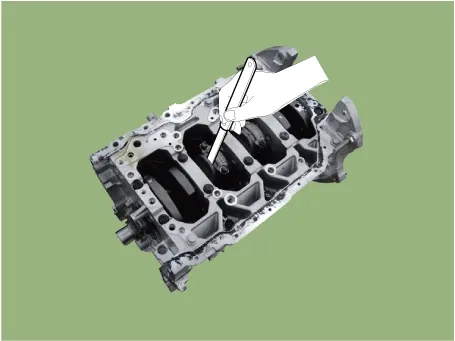
Measure the side clearance of connecting rod big end using a feeler gauge.
Specified value: 0.1 - 0.25 mm (0.00394 - 0.00984 in.)
Limit value: 0.35 mm (0.01378 in.)
|
|
•
|
If the side clearance is out of the limit value, replace the connecting rod.
|
|
•
|
If the side clearance is still out of the limit value even after replacing the connecting rod,
replace the crankshaft.
|
|
| 2. |
Inspect the oil clearance of connecting rod bearing.
| (1)
|
Check the alignment marks of connecting rod and connecting rod cap for correct installation.
|
| (2)
|
Loosen the 2 connecting rod cap bolts.
|
| (3)
|
Remove the connecting rod cap and lower bearing.
|
| (4)
|
Clean the crankshaft pin journals and bearings.
|
| (5)
|
Place the plastic gauge in axial direction.
|
| (6)
|
Reinstall the lower bearing and connecting rod cap and then tighten the bolts to the specified
torque (Do not reuse the bolts).
Tightening torque
17.7 - 21.6 N·m (1.8 - 2.2 kgf·m , 13.0 - 15.9 lb·ft) + 88 - 92°
|
|
Do not turn the crankshaft.
|
|
| (7)
|
Remove the connecting rod cap again.
|
| (8)
|
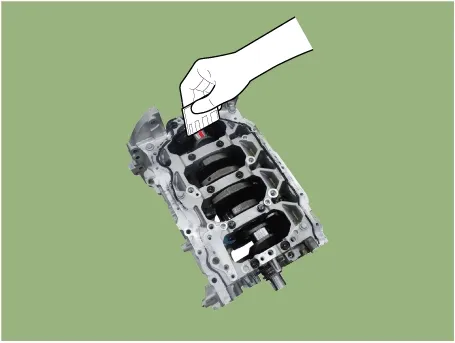
Measure the widest part of the plastic gauge.
Standard oil clearance :
0.032 - 0.050 mm (0.00126 - 0.00197 in.)
|
|
| (9)
|
If the measured value of plastic gauge is out of the specified value, replace the bearing with a
new one having the same classification color and then remeasure the oil clearance
|
Do not adjust the clearance by machining the bearing or cap.
|
|
| (10)
|
If the remeasured value is still out of the specified value, install the next larger or smaller
bearing and then remeasure the oil clearance.
|
•
|
If the proper oil clearance is not obtained even after assembling the next larger
or smaller bearing, replace the crankshaft and then inspect again from step 1.
|
|
•
|
If the classification marks are indecipherable because of the accumulation of dirt
and dust, do not scrub them with a wire brush or scraper.
Clean them only with solvent or detergent.
|
|
Classification mark position for connecting rod
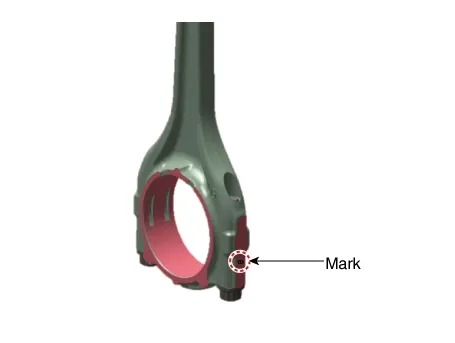
Classification table for connecting rod
Class
|
Mark
|
Inside Diameter
|
a
|
A
|
51.000 - 51.006 mm
(2.00787 - 2.00811 in.)
|
b
|
B
|
51.006 - 51.012 mm
(2.00811 - 2.00834 in.)
|
c
|
C
|
51.012 - 51.018 mm
(2.00834 - 2.00858 in.)
|
Classification mark position for outer diameter of
crankshaft pin
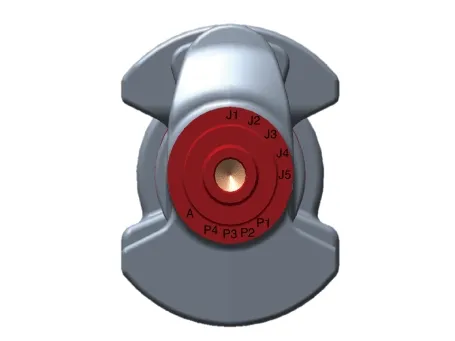
Identification Of Crankshaft Pin Outside Diameter
Class
|
Mark
|
Crankshaft pin journal outer diameter
|
I
|
1
|
47.966 - 47.972 mm
(1.8884 - 1.8887 in.)
|
II
|
2
|
47.960 - 47.966 mm
(1.8882 - 1.8884 in.)
|
III
|
3
|
47.954 - 47.960 mm
(1.8879 - 1.8882 in.)
|
Classification color position for connecting rod bearing
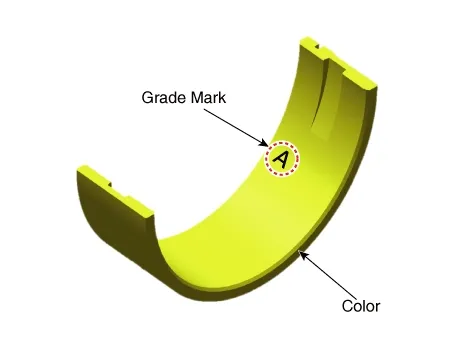
Classification table for connecting rod bearing
Class
|
Color
|
Connecting rod bearing thickness
|
A
|
Sky Blue
|
1.507 - 1.510 mm
(0.0593 - 0.0594 in.)
|
B
|
Black
|
1.504 - 1.507 mm
(0.0592 - 0.0593 in.)
|
C
|
White
|
1.501 - 1.504 mm
(0.0591 - 0.0592 in.)
|
D
|
Light Green
|
1.498 - 1.501 mm
(0.0590 - 0.0591 in.)
|
E
|
Pink
|
1.495 - 1.498 mm
(0.0589 - 0.0590 in.)
|
|
| (11)
|
Select the proper connecting rod bearing using the below bearing selection table.
Selection table for connecting rod bearing
|
Classification mark for connecting rod
|
A
|
B
|
C
|
Classification mark for crankshaft pin journal
|
1
|
E
(Pink)
|
D
(Light Green)
|
C
(White)
|
2
|
D
(Light Green)
|
C
(White)
|
B
(Black)
|
3
|
C
(White)
|
B
(Black)
|
A
(Sky Blue)
|
|
|
| 3. |
Inspect the connecting rod.
| (1)
|
When installing the new connecting rod, make sure that the notches for holding the bearing in place
are on the same side.
|
| (2)
|
Replace the connecting rod if it is damaged on the thrust faces at either end. Also if step wear or
a severely rough surface of the inside diameter of the small end is apparent, the connecting rod must
be replaced as well.
|
| (3)
|
Using a connecting rod aligning tool, measure the bend/twist of connecting rod and if the measured
value is close to the allowable value, modify the connecting rod using the press machine. If the
bend/twist is excessive, replace the connecting rod.
Allowable bend of connecting rod :
0.05mm (0.0020 in.) or less for 100mm (3.94 in.)
Allowable twist of connecting rod :
0.10mm (0.0039 in.) or less for 100mm (3.94 in.)
|
|
In the absence of bearings, there should be no side step difference.
|
|
|
Piston
| 1. |
Clean the piston
| (1)
|
Remove the carbon deposits on the top of the piston using a scraper.
|
| (2)
|
Clean the piston ring groove using a broken ring.
|
| (3)
|
Thoroughly clean the piston using solvent and brush.
|
Do not use the wire brush.
|
|
|
| 2. |
Check the clearance by calculating the difference between the cylinder bore inner diameter and the piston
outer diameter.
Clearance between piston and cylinder:
0.04 - 0.06 mm (0.0016 - 0.0024 in.)
|
| (1)
|
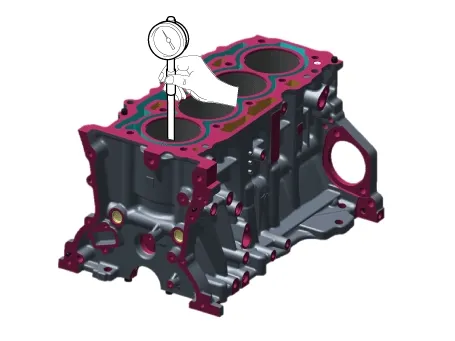
Measure the cylinder bore inner diameter at position in the thrust and axial direction using a
cylinder bore gauge.
Cylinder bore diameter :
88.50 - 88.53 mm (3.4842 - 3.4854 in.)
|
|
| (2)
|
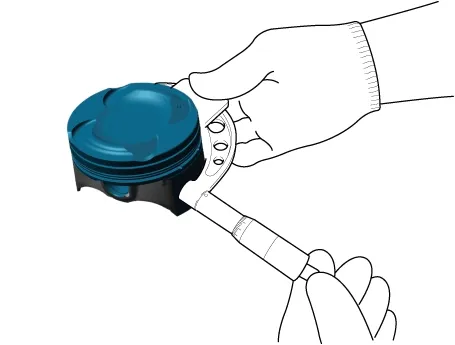
Measure the piston outer diameter at 13.0 mm (0.51181 in.) from bottom land of the piston.
Piston outside diameter :
88.45 - 88.48 mm (3.4823 - 3.4835 in.)
|
|
|
| 3. |
Select the piston matching with the cylinder bore class. (Same classification mark)
Piston-to-cylinder clearance :
0.04 - 0.06 mm (0.0016 - 0.0024 in.)
|
| (1)
|
Check the cylinder bore size mark on the lateral side of cylinder block.
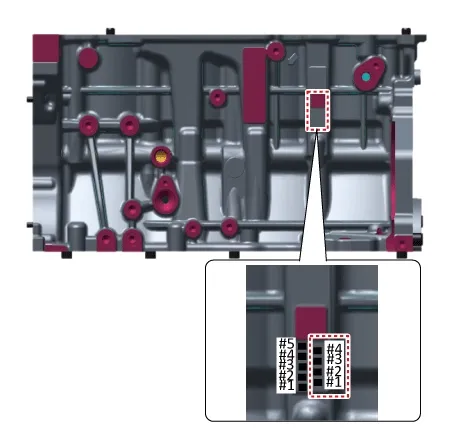
Classification table for cylinder bore size
Class
|
Mark
|
Cylinder bore inner diameter
|
a
|
A
|
88.50 - 88.51 mm
(3.4842 - 3.4846 in.)
|
b
|
B
|
88.51 - 88.52 mm
(3.4846 - 3.4850 in.)
|
c
|
C
|
88.52 - 88.53 mm
(3.4850 - 3.4854 in.)
|
|
| (2)
|
Check the piston outer diameter size mark (A) on the top of piston.
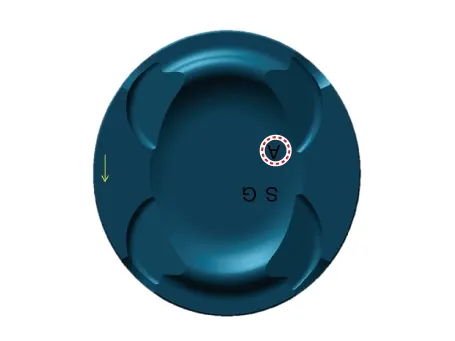
Classification table for piston outer diameter size
Mark
|
Piston outer diameter
|
A
|
88.45 - 88.46 mm
(3.4823 - 3.4827 in.)
|
B
|
88.46 - 88.47 mm
(3.4827 - 3.4831 in.)
|
C
|
88.47 - 88.48 mm
(3.4831 - 3.4835 in.)
|
|
|
Piston Rings
| 1. |
Inspect the side clearance of piston ring.
Measure the clearance between the piston ring groove and the piston ring using a feeler gauge.
Piston ring groove width dimension of piston
No.1 ring : 1.235 - 1.250 mm (0.04862 - 0.04921 in.)
No.2 ring : 1.230 - 1.250 mm (0.04843 - 0.04921 in.)
Oil ring: 2.010 - 2.025 mm (0.07913 - 0.07972 in.)
Piston ring width dimension
No. 1 ring: 1.170 - 1.190 mm (0.04606 - 0.04685 in.)
No. 2 ring: 1.170 - 1.190 mm (0.04606 - 0.04685 in.)
Oil ring: 1.910 - 1.970 mm (0.07520 - 0.07756 in.)
Side clearance between piston and piston ring
No.1 ring: 0.045 - 0.080 mm (0.00177 - 0.00315 in.
No.2 ring: 0.040 - 0.080 mm (0.00157 - 0.00315 in.
Oil ring: 0.040 - 0.115 mm (0.00157 - 0.00453 in.)
|
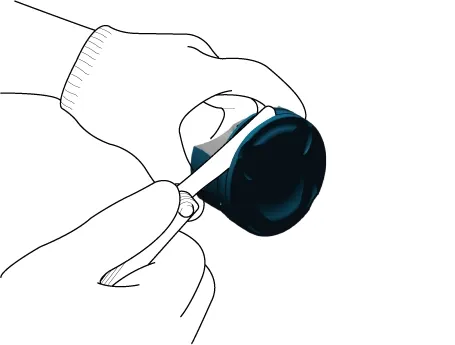
If clearance exceeds limit value, replace the piston.
|
| 2. |
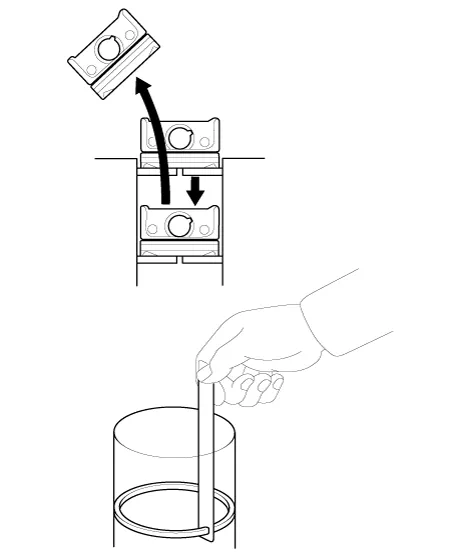
Inspect the piston ring end gap.
Insert the piston ring into the cylinder to measure the piston ring end gap. At this time, gently pressing
the ring with a piston so that the piston ring is positioned at the correct angle to the cylinder wall.
Measure the end gap using a feeler gauge and replace the piston ring if end gap exceeds limit value.
Piston ring end gap
Specified value
No. 1 ring: 0.14 - 0.19 mm (0.00669 - 0.00748 in.)
No. 2 ring: 0.30 - 0.40 mm (0.01181 - 0.01575 in.)
Oil ring: 0.10 - 0.40 mm (0.00394 - 0.01575 in.)
|
|
Piston Pin
| 1. |
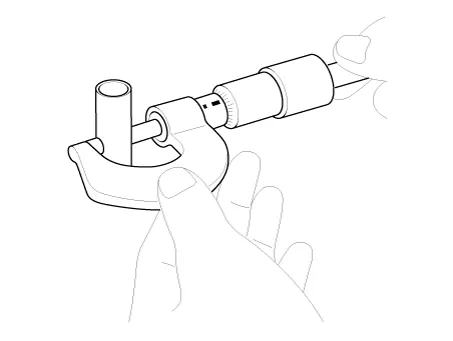
Measure the outer diameter of piston pin.
Piston pin diameter :
19.997 - 20.000mm (0.7873 - 0.7874 in.)
|
|
| 2. |
Measure the clearance between the piston pin and the piston.
Piston pin-to-piston clearance :
0.003 - 0.010 mm (0.00012 - 0.00039 in.)
|
|
| 3. |
Measure the clearance between the outer diameter of piston pin and the inner diameter of connecting rod
small end.
Piston pin-to-connecting rod interference :
0.005 - 0.014 mm (0.00020 - 0.00055 in.)
|
|
|
•
|
Clean the each part before assembling.
|
|
•
|
Apply new engine oil on the sliding/rotating surface before assembling parts.
|
|
•
|
Always use the new gasket, O-ring and oil seal.
|
|
| 1. |
Assemble the piston and the connecting rod.
| (1)
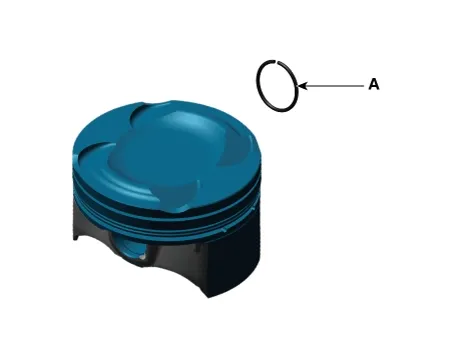
|
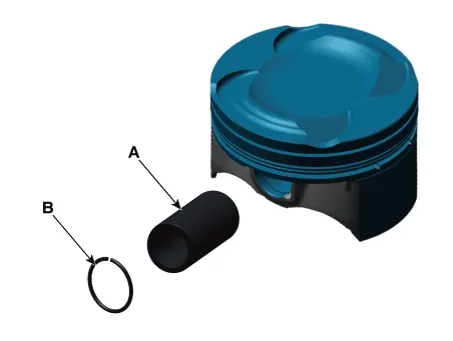
Insert the snap ring (A) into the one side of piston pin hole.
|
| (2)
|
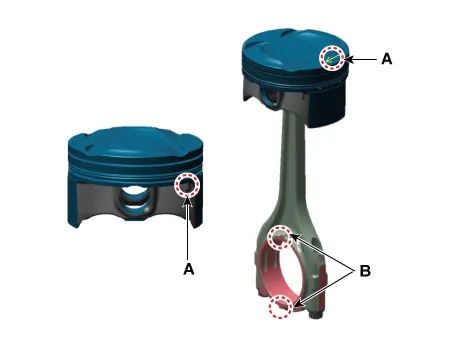
Align the piston front mark (A) and the connecting rod front mark (B).
|
| (3)
|
Insert the piston pin (A) into the piston pin hole and the small end bore of connecting rod.
|
| (4)
|
Insert the snap ring (B) into the another piston pin hole.
|
•
|
Before assembling the piston pin, apply a sufficient amount of engine to the outer
surface of piston, inner surface of piston hole and connecting small end bore
|
|
•
|
When inserting, be careful not to damage or scratch the connecting rod small end
hole, piston pin and piston pin hole.
|
|
•
|
Set the snap ring so that it contacts securely with the whole groove of the piston
pin hole.
|
|
•
|
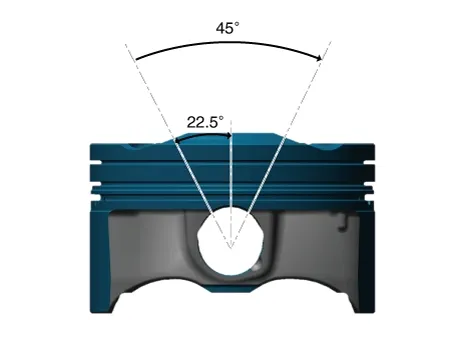
Set the snap ring so that its cutting section is positioned at the 45 ° range of
upper direction.
|
|
|
|
| 2. |
Install the piston ring.
| (1)
|
Install the oil ring expander and 2 side rails with hand.
|
| (2)
|
Using a piston ring expander, install the 2 compression rings with the code mark facing upward.
|
| (3)
|
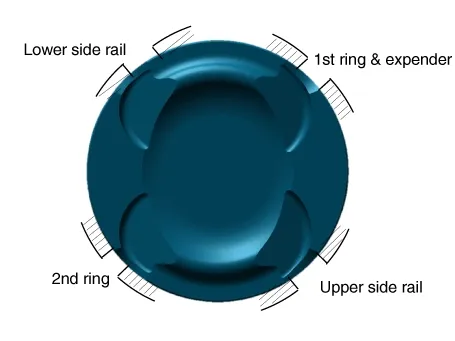
Install the piston rings to ensure the ring ends are positioned as shown below.
|
|
| 3. |
Install the connecting rod bearing.
| (1)
|
Align the connecting rod and bearing cap (A) grooves and the protrusion of bearing (B).
|
| (2)
|
Install the bearing (B) to the connecting rod and bearing cap (A).
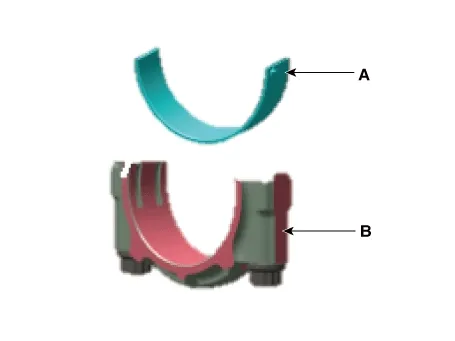
|
|
| 4. |
Install the piston and connecting rod assembly.
|
•
|
Before assembling the piston, apply a small amount of engine oil on the piston ring groove
and the inner surface of cylinder.
|
|
•
|
The piston front mark (A) and the connecting rod front mark (B) should face the timing
chain.
|
|
| (1)
|
Install the piston ring compressor while checking that the piston ring is securely in place. Put
the piston in the cylinder and then tap it in using the wooden handle of a hammer.
|
| (2)
|
Stop once the piston ring is inserted into the cylinder and then recheck the alignment of journal
and connecting rod before pushing the piston into place.
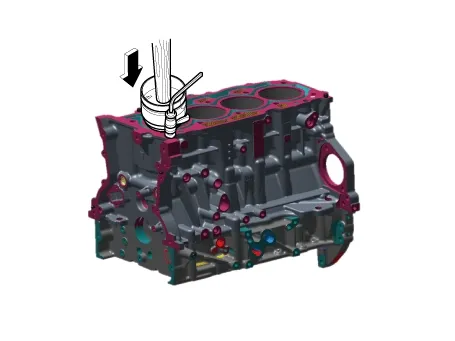
|
Insert the piston while pressing down the piston ring compressor to prevent the piston ring
expansion before piston ring is inserted into the cylinder.
|
|
| (3)
|
Install the connecting rod caps (A) and then tighten the bolts to the specified torque.
Tightening torque :
17.7 - 21.6 N·m (1.8 - 2.2 kgf·m , 13.0 - 15.9 lb·ft) + (88 - 92°)
|
|
Always use new connecting rod bearing cap bolts.
|
|
|
| 5. |
Assemble the other parts in the reverse order of disassembly.
|
Replacement
1.
Remove the automatic transaxle assembly.
(Refer to Automatic Transaxle System - "Automatic
Transaxle")
...
See also:
User Settings Mode
Description
On this mode, you can change setting of the doors, lamps, and so on.
Door
Auto Door Lock (if equipped)
...
Rear Door Module Repair Procedures
Removal
1.
Remove the rear door window glass.
(Refer to Door (Rear) - "Rear Door Window Glass")
...
Description
Limitations Of The Navigation system
GPS Signal Reception State
As the GPS satellite frequency is received/transmitted in straight lines,
reception may not work if hiding devices are pla ...



 Rear Oil Seal Repair procedures
 Crankshaft Repair procedures
