 Kia Sorento: Crankshaft Repair procedures
|
•
|
Use fender covers to avoid damaging painted surfaces.
|
|
•
|
Wait until the engine cools down to room temperature to avoid damaging the cylinder head before
removing.
|
|
•
|
When handling the metal gasket, be careful not to fold or damage the surface.
|
|
•
|
To avoid damage, disconnect the wiring connectors carefully.
|
|
|
•
|
Mark all wirings and hoses to avoid misconnection.
|
|
•
|
Turn the crankshaft pulley so that the piston of No.1 cylinder is positioned at the top dead center
(TDC).
|
|
| 1. |
Remove the engine and transaxle assembly from a vehicle.
(Refer to Engine And Transaxle Assembly - "Engine And Transaxle
Assembly")
|
| 2. |
Remove the automatic transaxle.
(Refer to Automatic Transaxle System - "Automatic
Transaxle")
|
| 3. |
Remove the drive plate.
(Refer to Cylinder Block - "Drive Plate")
|
| 4. |
Remove the rear oil seal.
(Refer to Cylinder Block - "Rear Oil Seal")
|
| 5. |
Install the engine to engine stand for disassembly.
|
| 6. |
Remove the cylinder head cover.
(Refer to Cylinder Head Assembly - "Cylinder Head Cover")
|
| 7. |
Remove the oil pan.
(Refer to Lubrication System - "Oil Pan")
|
| 8. |
Remove the timing chain cover.
(Refer to Timing System - “Timing Chain Cover”)
|
| 9. |
Remove the timing chain.
(Refer to Timing System - “Timing Chain”)
|
| 10. |
Remove the Integrated thermal management module (ITM).
(Refer to Cooling System - "Integrated Thermal Management Module
(ITM)")
|
| 11. |
Remove the intake/exhaust CVVT and camshaft assembly.
(Refer to Cylinder Head Assembly - "CVVT & Camshaft")
|
| 12. |
Remove the intake manifold.
(Refer to Intake And Exhaust System - "Intake Manifold")
|
| 13. |
Remove the exhaust manifold.
(Refer to Intake And Exhaust System - "Exhaust Manifold")
|
| 14. |
Remove the EGR cooler.
(Refer to Intake And Exhaust System - "EGR cooler")
|
| 15. |
Remove the cylinder head.
(Refer to Cylinder Head Assembly - "Cylinder Head")
|
| 16. |
Remove the oil pump.
(Refer to Lubrication System - "Oil Pump")
|
| 17. |
Remove the balance shaft assembly.
(Refer to Lubrication System - "Balance Shaft Assembly")
|
| 18. |
Remove the water pump.
(Refer to Cooling System - "Water Pump")
|
| 19. |
Remove the alternator.
(Refer to Engine Electrical System - "Alternator")
|
| 20. |
Refer to oil filter & oil cooler.
(Refer to Lubrication System - "Oil Filter & Oil
Cooler")
|
| 21. |
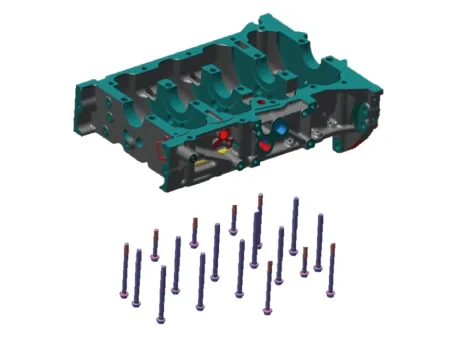
Remove the lower crankcase.
| (1)
|
Loosen the crank lower case mouting bolts.
|
| (2)
|
Loosen the main bearing cap bolts.
|
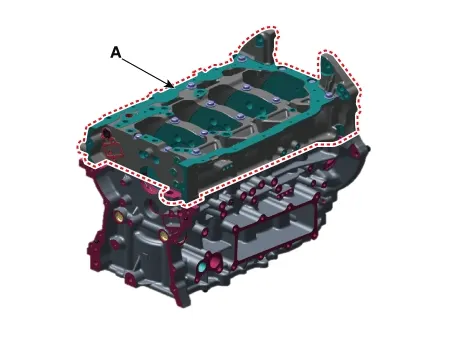
| (3)
|
Remove the lower crankcase (A).
|
|
| 22. |
Remove the piston and connecting rod assembly.
(Refer to Cylinder Block - "Piston and Connecting Rod")
|
| 23. |
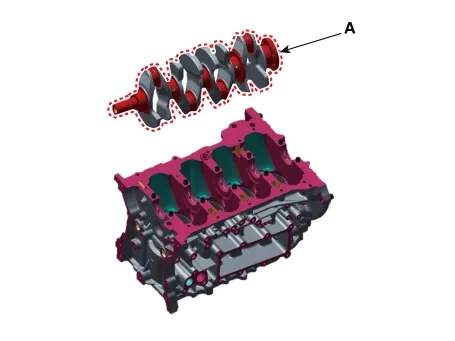
Remove the crankshaft (A) from the cylinder block. At this time, be careful not to damage the crankshaft
journals.
|
Arrange the main bearings and thrust bearings in regular sequence.
|
|
| 24. |
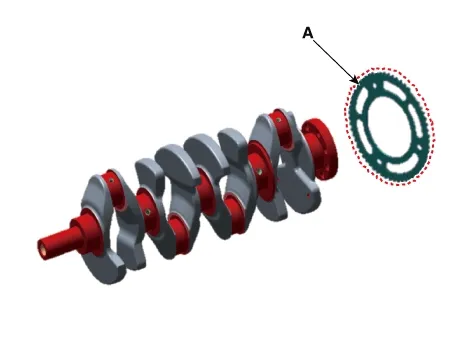
Remove the crankshaft position sensor wheel (A).
|
| 1. |
Measure the oil clearance of crankshaft bearing.
| (1)
|
Clean each main journal and bearing with a cloth, etc.
|
| (2)
|
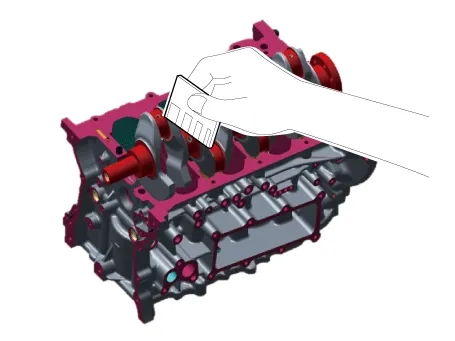
Place a piece of plastic gauge in the axial direction of each main journal.
|
| (3)
|
Refit the bearing and bearing cap and then tighten to the specified torque.
Tightening torque :
Main bearing cap bolts :
27.5 - 31.4 N·m (2.8 - 3.2 kgf·m , 20.3 - 23.1 lb·ft) + 120 - 125°
Crank lower case mouting bolts :
29.4 - 33.3 N·m (3.0 - 3.4 kgf·m , 21.7 - 24.6 lb·ft)
|
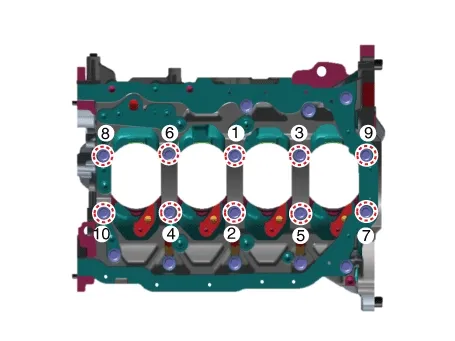
Main bearing cap bolt
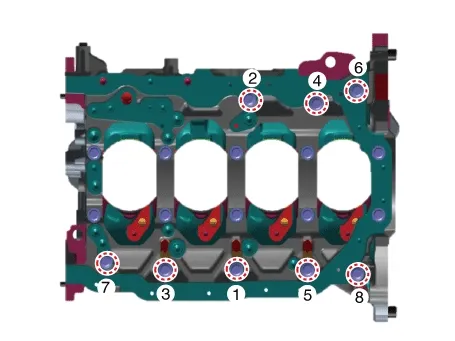
Crank lower case mouting bolt
|
Do not turn the crankshaft.
|
|
| (4)
|
Remove the lower crankcase and then measure the widest part of the plastic gauge.
Bearing oil clearance :
NO. 1, 2, 4, 5 : 0.022 - 0.040 mm (0.00087 - 0.00157 in.)
NO. 3 : 0.028 - 0.046 mm (0.00110 - 0.00181 in.)
|
|
| (5)
|
If the measured value of the plastic gauge is out of the specified value, replace bearing with a
new one having the same classification color and then remeasure the oil clearance. (Refer to
crankshaft bearing selection table)
|
Do not adjust the clearance by machining the bearing or cap.
|
|
| (6)
|
If the remeasured value is still out the specified value, install the next larger or smaller
bearing and then remeasure the oil clearance. (Refer to crankshaft bearing selection table)
|
•
|
If the remeasured value is still out the specified value, install the next larger
or smaller bearing and then remeasure the oil clearance. (Refer to crankshaft bearing
selection table)
|
|
•
|
If the identification mark is indecipherable due to the accumulation of dust, dirt,
etc., clean it with solvent or cleaning agent and do not use wire brush or scraper.
|
|
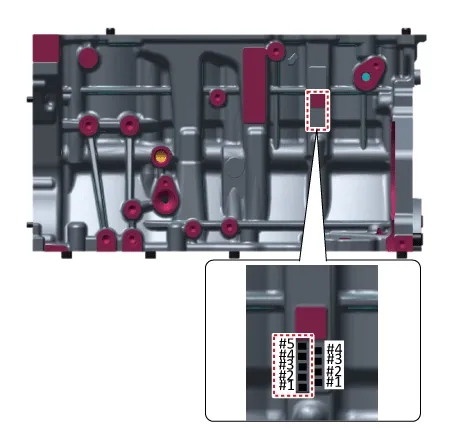
Classification mark position for crankshaft bore inner
diameter
The each size mark of the 5 main journal bores is engraved on the side of cylinder block. Use the
journal bore inner diameter mark engraved on the cylinder block and the journal outer diameter mark
engraved on the crankshaft for correct bearing selection.
Class
|
Mark
|
Cylinder block crankshaft journal bore inner diameter
|
a
|
A
|
57.000 - 57.006 mm
(2.2441 - 2.2443 in.)
|
b
|
B
|
57.006 - 57.012 mm
(2.2443 - 2.2446 in.)
|
c
|
C
|
57.012 - 57.018 mm
(2.2446 - 2.2448 in.)
|
Classification mark position for crankshaft main journal
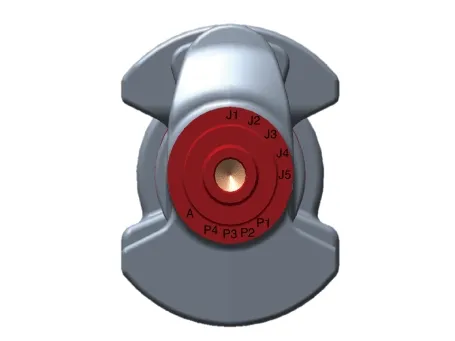
Classification table for crankshaft main journal
Class
|
Mark
|
Crankshaft main journal outer diameter
|
I
|
1
|
51.954 - 51.960 mm
(2.0454 - 2.0457 in.)
|
II
|
2
|
51.948 - 51.954 mm
(2.0452 - 2.0454 in.)
|
III
|
3
|
51.942 - 51.948 mm
(2.0450 - 2.0452 in.)
|
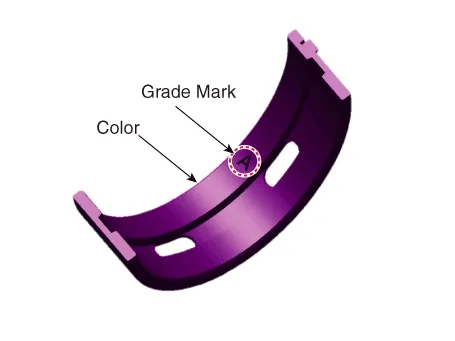
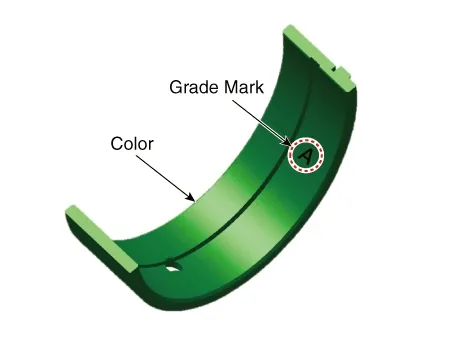
Classification mark position of crankshaft bearing
[#2, 4 journal upper bearing]
[#1, 3, 5 journal upper bearing]
[Lower bearing]
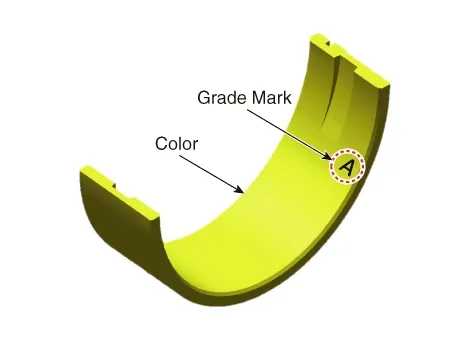
Identification Of Crankshaft Bearing
Class
|
Color
|
Bearing thickness
|
A
|
Sky Blue
|
2.518 - 2.521mm
(0.0991 - 0.0993in.)
|
B
|
Black
|
2.515 - 2.518mm
(0.0990 - 0.0991in.)
|
C
|
White
|
2.512 - 2.515mm
(0.0989 - 0.0990in.)
|
D
|
Light Green
|
2.509 - 2.512mm
(0.0988 - 0.0989in.)
|
E
|
Pink
|
2.506 - 2.509 mm
(0.0987 - 0.0988 in.)
|
F
|
Yellow
|
2.503 - 2.506 mm
(0.0985 - 0.0987 in.)
|
|
| (7)
|
Select the proper crankshaft main bearing using the below bearing selection table.
Selection table for crankshaft main bearing
[#1, 2, 4, 5 journal bearing]
|
Classification mark for main journal bore
|
a (A)
|
b (B)
|
c (C)
|
Classification mark for crankshaft main journal
|
I (1)
|
E
(Pink)
|
D
(Light Green)
|
C
(White)
|
II (2)
|
D
(Light Green)
|
C
(White)
|
B
(Black)
|
III (3)
|
C
(White)
|
B
(Black)
|
A
(Sky Blue)
|
[#3 journal bearing]
|
Classification mark for main journal bore
|
a (A)
|
b (B)
|
c (C)
|
Classification mark for crankshaft main journal
|
I (1)
|
F
(Yellow)
|
E
(Pink)
|
D
(Light Green)
|
II (2)
|
E
(Pink)
|
D
(Light Green)
|
C
(White)
|
III (3)
|
D
(Light Green)
|
C
(White)
|
B
(Black)
|
|
|
| 2. |
Measure the crankshaft end play.
Check the axial clearance by moving the crankshaft back and forth using a dial gauge.
Crankshaft end play
0.100 - 0.280 mm (0.0039 - 1.0110 in.)
|
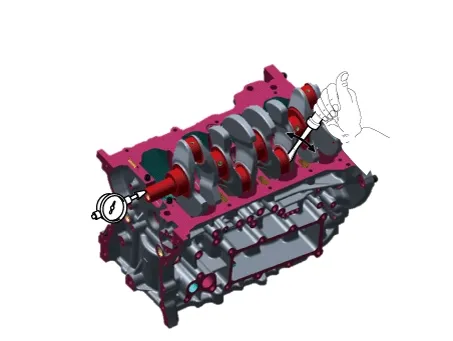
If end play exceeds limit value, replace the thrust bearing.
Thrust bearing thickness :
2.41 - 2.45 mm (0.09488 - 0.09646 in.)
|
|
| 3. |
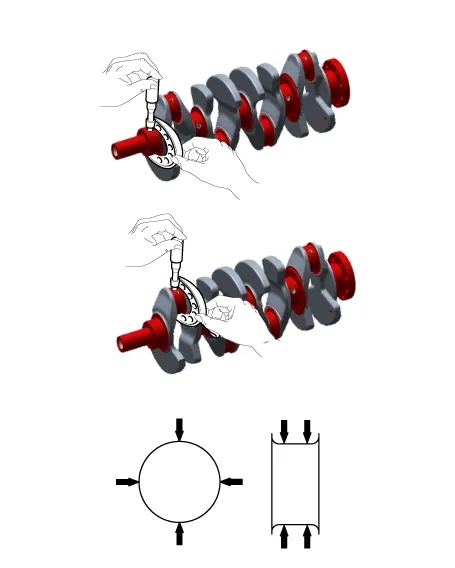
Check the crankshaft main journals and pin journals.
Use a micrometer to measure the outer diameter of the crankshaft main journals and pin journals.
Main journal diameter :
51.942 - 51.960 mm (2.0450 - 2.0457 in.)
Crank pin journal diameter :
47.954 - 47.972 mm (1.8879 - 1.8887 in.)
|
|
|
•
|
Clean the each part before assembling.
|
|
•
|
Apply new engine oil on the sliding/rotating area before assembling parts.
|
|
•
|
Always use the new gasket, O-ring and oil seal.
|
|
| 1. |
Install the crankshaft position sensor wheel (A).
Tightening torque :
26.5 - 27.5 N·m (2.7 - 2.8 kgf·m , 19.5 - 20.3 lb·ft)
|
|
| 2. |
Install the main bearing.
|
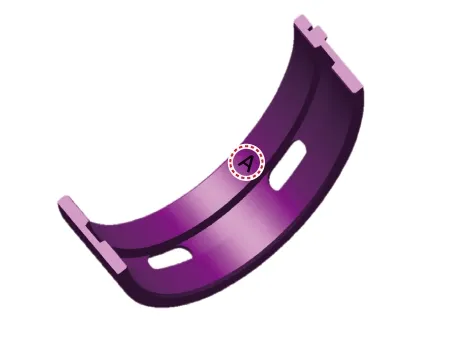
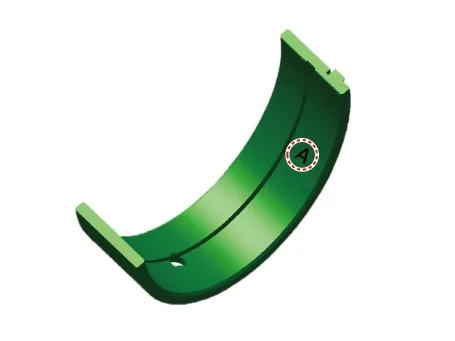
Install the crankshaft upper bearing which fits to each journal.
|
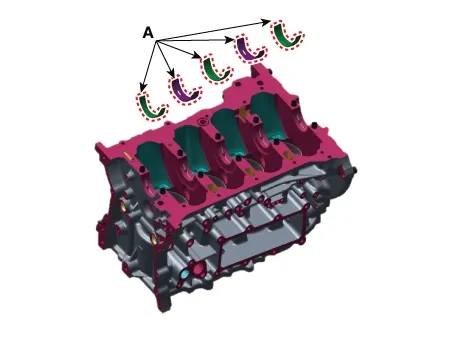
[#2, 4 journal upper bearing]
[#1, 3, 5 journal upper bearing]
| (1)
|
Install the 5 upper bearings (A) by aligning the cylinder block groove and the bearing protrusion.
|
| (2)
|
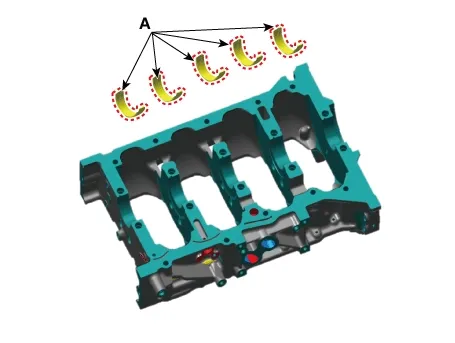
Install the 5 lower bearings (A) by aligning the lower crankcase groove and the bearing protrusion.
|
| (3)
|
Apply engine oil after assembling the main bearings.
|
|
| 3. |
Install the thrust bearings.
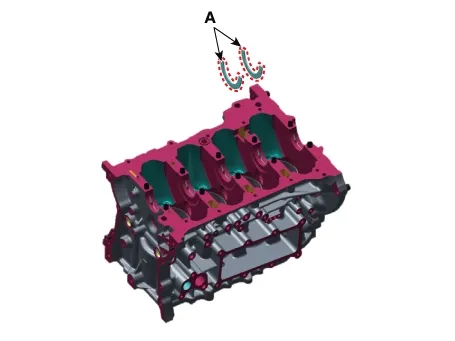
Install the 2 thrust bearings (A) under the cylinder block No. 4 journal, with the oil groove facing
outward.
|
| 4. |
Install the crankshaft (A) to the cylinder block.
|
| 5. |
Install the lower crankcase.
| (1)
|
Be sure to remove the hardening sealant, foreign substance, oil, dust or moisture remaining on the
liquid gasket sealing surface of the lower crankcase.
Spray cleaner on the sealing surface and then wipe off with a clean towel.
|
| (2)
|
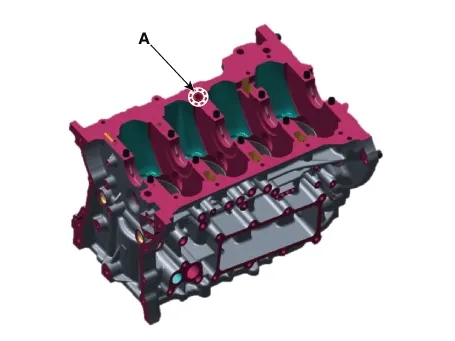
Install the new O-ring (A) to the cylinder block.
|
| (3)
|
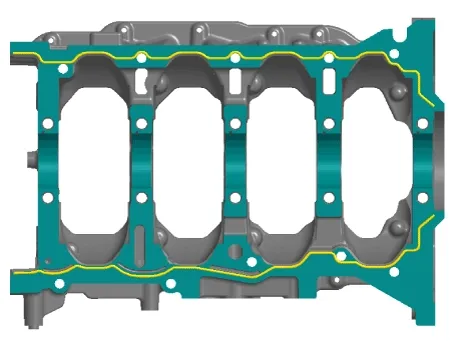
Apply liquid gasket to the lower crankcase mounting surface and then assemble within 5 minutes.
Bead width : Ø 2.5 - 3.5 mm (0.09843 - 0.13780 in.)
Sealant : THREEBOND 1217H / LOCTITE 5900H or
equivalent
|
|
| (4)
|
Tighten the main bearing cap bolts in several passes in the below sequence.
Tightening torque :
27.5 - 31.4 N·m (2.8 - 3.2 kgf·m , 20.3 - 23.1 lb·ft) + (120 - 125°)
|
|
Always use the new bearing cap bolts.
|
|
| (5)
|
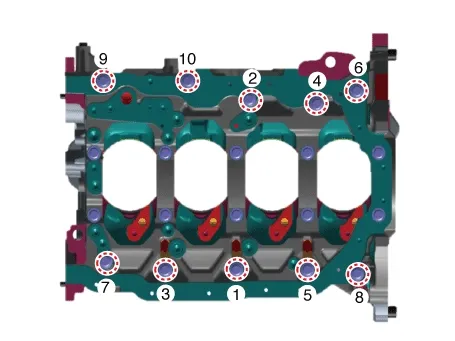
Tighten the crank lower case mouting bolts in several passes in the below sequence.
Tightening torque :
29.4 - 33.3 N·m (3.0 - 3.4 kgf·m , 21.7 - 24.6 lb·ft)
|
|
Using the oil pan bolt, pretigthen the lower crankcase tightening sequence No. 9 and No.
10.
Before installing the oil pan, remove the lower crankcase tightening sequence No. 9 and No.
10 then install the oil pan.
|
|
| (6)
|
Check if the crankshaft rotates smoothly.
|
|
| 6. |
Check the crankshaft end play.
|
| 7. |
Install the piston and connecting rod assembly.
(Refer to Cylinder Block - "Piston and Connecting Rod")
|
| 8. |
Assemble the other parts in the reverse order of disassembly.
|
•
|
When replacing the crankshaft, select and install the appropriate connecting rod bearing
according to the pin journal mark on the crankshaft.
|
|
•
|
Connecting rod bearing selection
(Refer to Cylinder Block - "Piston and Connecting
Rod")
|
|
|
See also:
Components (1)
1. Driver Airbag (DAB)
2. Steering Wheel
3. Clock Spring
4. Seat Belt Pretensioner (BPT)
5. Front Side Impact Sensor (FSIS)
6. Side Airbag (SAB)
7. Passenger Airbag (PAB)
...
Components Location
1. Purge Control Solenoid Valve (PCSV)
2. Vapor line
3. Fuel tank air filter
4. Canister Close Valve (CCV)
5. Canister
6. Fuel Tank Pressure Sensor (FTPS)
...
Tail Gate Replacement
Tailgate Trim Replacement
1.
Using a screwdriver or remover, remove the upper trim (B).
2.
After loosening the mounting screws, then remove ...



 Piston and Connecting Rod Repair procedures
 Cylinder Block Repair procedures
