 Kia Sorento: Heater Core Replacement
Second Generation XM (2011-2025) / Kia Sorento XM 2011-2025 Service Manual / Heating,Ventilation And Air Conditioning / Heater / Heater Core Replacement
| 1. |
Disconnect the negative (-) battery terminal.
|
| 2. |
Remove the heater and blower assembly.
(Refer to Heater -"Heater Unit")
|
| 3. |
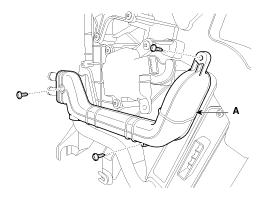
Remove the heater core cover (A) after loosening the mounting
screws.
|
| 4. |
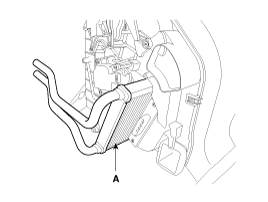
Pull out the heater core (A) from the heater unit.
|
| 5. |
Install in the reverse order of removal.
|
 Heater Unit Replacement
1.
Disconnect the negative (-) battery terminal.
2.
Recover the refrigerant with a recovery/recycling/charging station.
3.
...
 Evaporator Core Replacement
1.
Disconnect the negative (-) battery terminal.
2.
Remove the heater and blower assembly.
(Refer to Heater -"Heater Unit")
...
See also:
Rear Assist Arm Inspection
1.
Check the bushing for wear and deterioration.
2.
Check the rear assist arm for deformation.
...
Front Seat Replaccement
Seat Assembly Replacement
1.
Remove the seat assembly mounting cover.
2.
After loosening the seat assembly mounting bolts, remove the seat
...
Cooling Fan Description
Control the cooling motor voltage in according to the duty(300Hz) of ECM.
[ECU → PWM Input Signal(SI : 300Hz)]
Signal Input Duty (%)
Motor Voltage (V)
10
...
Copyright ® www.ksmanual.com 2014-2025


