 Kia Sorento: Alternator On Vehicle Inspection
Electrical Specified Value Inspection (Using the Voltmeter and Ammeter)
| 1. |
Voltage Drop Test Of Alternator Output Wire
This test determines whether or not the wiring between the alternator B terminal and the battery (+)
terminal is good by the voltage drop method.
| (1)
|
Preparation
| a. |
Turn the ignition switch to "OFF".
|
| b. |
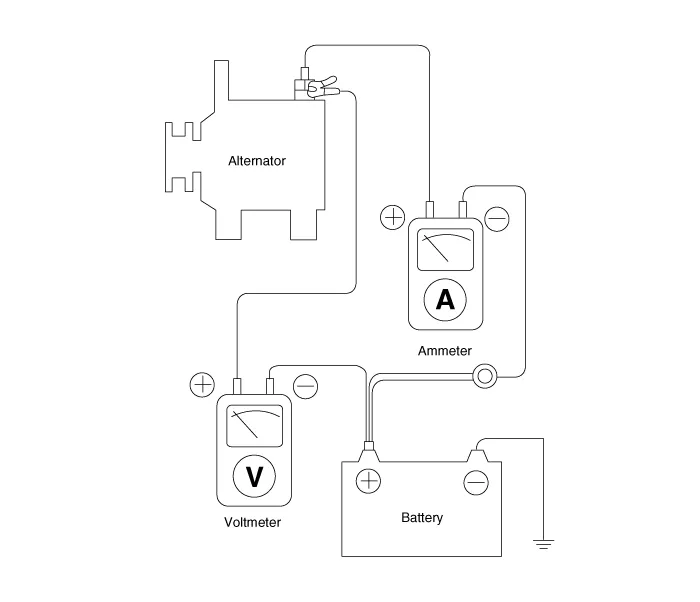
Disconnect the output wire from the alternator B terminal. Connect the ( + ) lead wire of
ammeter to the B terminal of alternator and the ( - ) lead wire of ammeter to the output wire.
Connect the ( + ) lead wire of voltmeter to the B terminal of alternator and the ( - ) lead
wire of voltmeter to the ( + ) terminal of battery.
|
|
| (2)
|
Test
| b. |
Turn on the headlamps and blower motor, and set the engine speed until the ammeter
indicates 20 A. And then, read the voltmeter at this time.
|
|
| (3)
|
Result
| a. |
The voltmeter may indicate the standard value.
Standard value (V) : Maximum 0.2
|
|
| b. |
If the value of the voltmeter is higher than expected (above Maximum 0.2 V), poor wiring is
suspected. In this case check the wiring from the alternator B terminal to the battery ( + )
terminal. Check for loose connections, color change due to an over-heated harness, etc.
Correct them before testing again.
|
| c. |
Upon completion of the test, set the engine speed at idle. Turn off the headlamps, blower
motor and the ignition switch.
|
|
|
| 2. |
Output Current Test
This test determines whether or not the alternator gives an output current that is equivalent to the normal
output.
| (1)
|
Preparation
| a. |
Prior to the test, check the following items and correct as necessary.
Check the battery installed in the vehicle to ensure that it is good condition. The battery
checking method is described in the section "Battery".
The battery that is used to test the output current should be one that has been partially
discharged.
With a fully charged battery, the test may not be conducted correctly due to an
insufficient load.
Check the tension of the alternator drive belt. The belt tension check method is described
in the section "Inspect drive belt".
|
| b. |
Turn off the ignition switch.
|
| c. |
Disconnect the battery ground cable.
|
| d. |
Disconnect the alternator output wire from the alternator B terminal.
|
| e. |
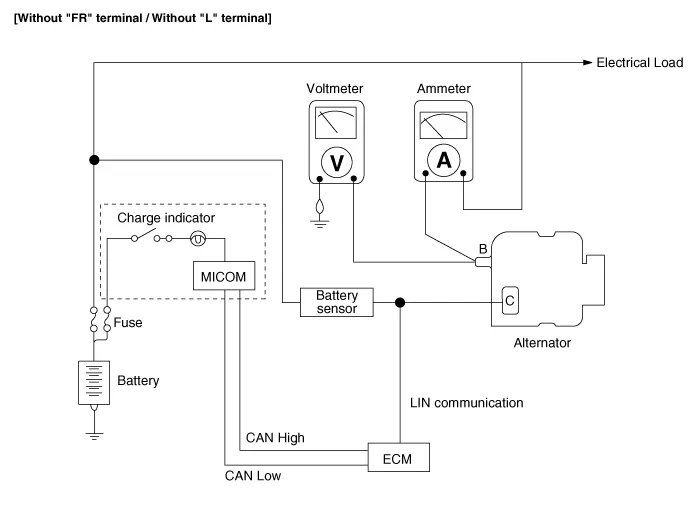
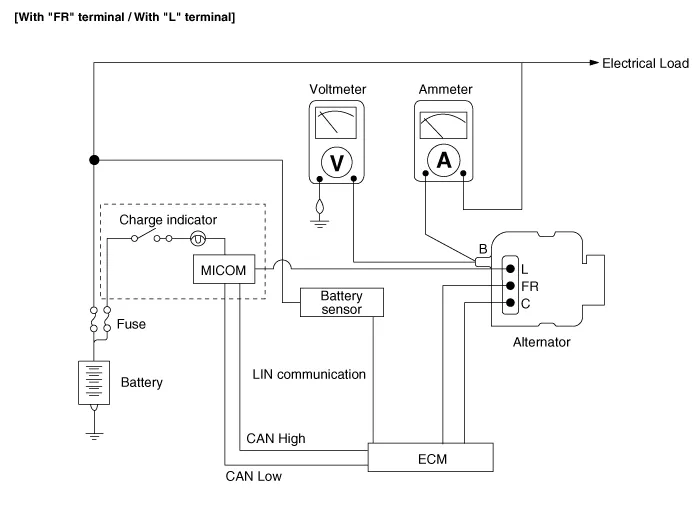
Connect a DC ammeter (0 - 150A) in series between the B terminal and the disconnected
output wire. Be sure to connect the ( - ) lead wire of the ammeter to the disconnected output
wire.
|
Tighten each connection securely, as a heavy current will flow. Do not rely on
clips.
|
|
| f. |
Connect a voltmeter (0 - 20V) between the B terminal and ground. Connect the ( + ) lead
wire to the alternator B terminal and ( - ) lead wire to a good ground.
|
| g. |
Connect the battery ground cable.
|
| h. |
Leave the engine hood open.
|
|
| (2)
|
Test
| a. |
Check to see that the voltmeter reads as the same value as the battery voltage. If the
voltmeter reads 0 V, and the open circuit in the wire between alternator B terminal and
battery ( + ) terminal or poor grounding is suspected.
|
| b. |
Start the engine and turn on the headlamps.
|
| c. |
Set the headlamps to high beam and the heater blower switch to HIGH, quickly increase the
engine speed to 2,500 rpm and read the maximum output current value indicated by the ammeter.
|
After the engine start up, the charging current quickly drops. Therefore, the above
operation must be done quickly to read the maximum current value correctly.
|
|
|
| (3)
|
Result
| a. |
The ammeter reading must be higher than the limit value. If it is lower but the alternator
output wire is in good condition, remove the alternator from the vehicle and test it.
Limit value (%) : 60 of the voltage rate
|
|
The nominal output current value is shown on the nameplate affixed to the
alternator body.
|
|
•
|
The output current value changes with the electrical load and the
temperature of the alternator itself. Therefore, the nominal output current
may not be obtained. If such is the case, keep the headlamps on the cause
discharge of the battery, or use the lights of another vehicle to increase the
electrical load.
|
|
•
|
The nominal output current may not be obtained if the temperature of the
alternator itself or ambient temperature is too high. In such a case, reduce
the temperature before testing again.
|
|
|
| b. |
Upon completion of the output current test, lower the engine speed to idle and turn off the
ignition switch
|
| c. |
Disconnect the battery negative ( - ) terminal.
|
| d. |
Remove the ammeter and voltmeter and the engine tachometer.
|
| e. |
Connect the alternator output wire to the alternator B terminal.
|
| f. |
Connect the battery negative ( - ) terminal.
|
|
|
| 3. |
Regulated Voltage Test
The purpose of this test is to check that the electronic voltage regulator controls voltage correctly.
| (1)
|
Preparation
| a. |
Prior to the test, check the following items and correct if necessary.
Check that the battery installed on the vehicle is fully charged. The battery checking
method is described in the section "Battery".
Check the alternator drive belt tension. The belt tension check method is described in the
section "Inspect drive belt".
|
| b. |
Turn ignition switch to "OFF".
|
| c. |
Disconnect the battery negative ( - ) terminal.
|
| d. |
Connect a digital voltmeter between the B terminal of the alternator and ground. Connect
the ( + ) lead of the voltmeter to the B terminal of the alternator. Connect the ( - ) lead to
good ground or the battery ( - ) terminal.
|
| e. |
Disconnect the alternator output wire from the alternator B terminal.
|
| f. |
Connect a DC ammeter (0 to 150A) in series between the B terminal and the disconnected
output wire. Connect the ( - ) lead wire of the ammeter to the disconnected output wire.
|
| g. |
Connect the battery negative ( - ) terminal.
|
|
| (2)
|
Test
| a. |
Turn on the ignition switch and check to see that the voltmeter indicates the following
value.
Voltage : Battery voltage
|
If it reads 0 V, there is an open circuit in the wire between the alternator B terminal and
the battery and the battery ( - ) terminal.
|
| b. |
Start the engine. Keep all lights and accessories off.
|
| c. |
Run the engine at a speed of about 2,500 rpm and read the voltmeter when the alternator
output current drops to 10 A or less
|
|
| (3)
|
Result
| a. |
If the voltmeter reading doesn't agree with the standard value, the voltage regulator
or the alternator is faulty.
Regulated Voltage (V) : 11.7 - 15.3
|
|
| b. |
If the voltmeter reading doesn't agree with the standard value, the voltage regulator
or the alternator is faulty.
|
| c. |
Disconnect the battery negative ( - ) terminal.
|
| d. |
Remove the voltmeter and ammeter.
|
| e. |
Connect the alternator output wire to the alternator B terminal.
|
| f. |
Connect the battery negative ( - ) terminal.
|
|
|
Electrical Specified Value Inspection (Using the Voltmeter and Clamp type
Ammeter)
| 1. |
Voltage Drop Test Of Alternator Output Wire
This test determines whether or not the wiring between the alternator B terminal and the battery ( + )
terminal is good by the voltage drop method.
| (1)
|
Preparation
| a. |
Turn the ignition switch to "OFF".
|
| b. |
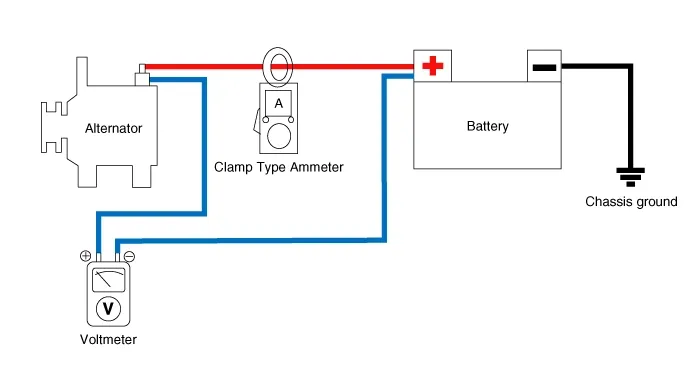
Install the clamp type ammeter between battery positive ( + ) and alternator B terminal.
|
| c. |
Connect the ( + ) lead wire of voltmeter to the B terminal of alternator and the ( - ) lead
wire of voltmeter to the ( + ) terminal of battery.
|
|
| (2)
|
Test
| b. |
Turn on the headlamps and blower motor, and set the engine speed until the ammeter
indicates 20A. And then, read the voltmeter at this time.
|
|
| (3)
|
Result
| a. |
The voltmeter may indicate the standard value.
Standard value (V) : Maximum 0.2
|
|
| b. |
If the value of the voltmeter is higher than expected (above Maximum 0.2 V), poor wiring is
suspected. In this case check the wiring from the alternator B terminal to the battery ( + )
terminal. Check for loose connections, color change due to an over-heated harness, etc.
Correct them before testing again.
|
| c. |
Upon completion of the test, set the engine speed at idle. Turn off the headlamps, blower
motor and the ignition switch.
|
|
|
| 2. |
Output Current Test
This test determines whether or not the alternator gives an output current that is equivalent to the normal
output.
| (1)
|
Preparation
| a. |
Prior to the test, check the following items and correct as necessary.
Check the battery installed in the vehicle to ensure that it is good condition. The battery
checking method is described in the section "Battery".
The battery that is used to test the output current should be one that has been partially
discharged.
With a fully charged battery, the test may not be conducted correctly due to an
insufficient load.
Check the tension of the alternator drive belt. The belt tension check method is described
in the section "Inspect drive belt".
|
| b. |
Turn off the ignition switch.
|
| c. |
Disconnect the battery negative ( - ) terminal.
|
| d. |
Install the clamp type ammeter between battery positive ( + ) and alternator B terminal.
|
| e. |
Connect a DC ammeter (0 - 150A) in series between the B terminal and the disconnected
output wire. Be sure to connect the ( - ) lead wire of the ammeter to the disconnected output
wire.
|
Tighten each connection securely, as a heavy current will flow. Do not rely on
clips.
|
|
| f. |
Connect a voltmeter (0 - 20V) between the B terminal and ground. Connect the ( + ) lead
wire to the alternator B terminal and ( - ) lead wire to a good ground.
|
| g. |
Connect the battery negative ( - ) terminal.
|
| h. |
Leave the engine hood open.
|
|
| (2)
|
Test
| a. |
Check to see that the voltmeter reads as the same value as the battery voltage. If the
voltmeter reads 0 V, and the open circuit in the wire between alternator B terminal and
battery ( + ) terminal or poor grounding is suspected.
|
| b. |
Start the engine and turn on the headlamps.
|
| c. |
Set the headlamps to high beam and the heater blower switch to HIGH, quickly increase the
engine speed to 2,500 rpm and read the maximum output current value indicated by the ammeter.
|
After the engine start up, the charging current quickly drops. Therefore, the above
operation must be done quickly to read the maximum current value correctly.
|
|
|
| (3)
|
Result
| a. |
The ammeter reading must be higher than the limit value. If it is lower but the alternator
output wire is in good condition, remove the alternator from the vehicle and test it.
Limit value : 60% of the voltage rate
|
|
The nominal output current value is shown on the nameplate affixed to the
alternator body.
|
|
•
|
The output current value changes with the electrical load and the
temperature of the alternator itself. Therefore, the nominal output current
may not be obtained. If such is the case, keep the headlamps on the cause
discharge of the battery, or use the lights of another vehicle to increase the
electrical load.
|
|
•
|
The nominal output current may not be obtained if the temperature of the
alternator itself or ambient temperature is too high. In such a case, reduce
the temperature before testing again.
|
|
|
| b. |
Upon completion of the output current test, lower the engine speed to idle and turn off the
ignition switch
|
| c. |
Disconnect the battery negative ( - ) terminal.
|
| d. |
Remove the ammeter and voltmeter and the engine tachometer.
|
| e. |
Connect the alternator output wire to the alternator B terminal.
|
| f. |
Connect the battery negative ( - ) terminal.
|
|
|
| 3. |
Regulated Voltage Test
The purpose of this test is to check that the electronic voltage regulator controls voltage correctly.
| (1)
|
Preparation
| a. |
Prior to the test, check the following items and correct if necessary.
Check that the battery installed on the vehicle is fully charged. The battery checking
method is described in the section "Battery".
Check the alternator drive belt tension. The belt tension check method is described in the
section "Inspect drive belt".
|
| b. |
Turn ignition switch to "OFF".
|
| c. |
Disconnect the battery negative ( - ) terminal.
|
| d. |
Connect a digital voltmeter between the B terminal of the alternator and ground. Connect
the ( + ) lead of the voltmeter to the B terminal of the alternator. Connect the ( - ) lead to
good ground or the battery ( - ) terminal.
|
| e. |
Disconnect the alternator output wire from the alternator B terminal.
|
| f. |
Connect a DC ammeter (0 - 150A) in series between the B terminal and the disconnected
output wire. Connect the ( - ) lead wire of the ammeter to the disconnected output wire.
|
| g. |
Connect the battery negative ( - ) terminal.
|
|
| (2)
|
Test
| a. |
Turn on the ignition switch and check to see that the voltmeter indicates the following
value.
Voltage : Battery voltage
|
If it reads 0 V, there is an open circuit in the wire between the alternator B terminal and
the battery and the battery ( - ) terminal.
|
| b. |
Start the engine. Keep all lights and accessories off.
|
| c. |
Run the engine at a speed of about 2,500 rpm and read the voltmeter when the alternator
output current drops to 10 A or less
|
|
| (3)
|
Result
| a. |
If the voltmeter reading doesn't agree with the standard value, the voltage regulator
or the alternator is faulty.
Regulated Voltage (V) : 11.7 - 15.3
|
|
| b. |
If the voltmeter reading doesn't agree with the standard value, the voltage regulator
or the alternator is faulty.
|
| c. |
Disconnect the battery negative ( - ) terminal.
|
| d. |
Remove the voltmeter and ammeter.
|
| e. |
Connect the alternator output wire to the alternator B terminal.
|
| f. |
Connect the battery negative ( - ) terminal.
|
|
|
Alternator Components and Components Location
Components
1. Alternator Pulley1-a. 75.5 - 81.4 N·m (7.7 - 8.3
kgf·m, 55.7 - 60.0 lb·ft)2...
Removal
1.
Disconnect the battery negative ( - ) terminal.
2.
Remove the drive belt.
(...



 Alternator Components and Components Location. Alternator Description and Operation
 Alternator Removal and Installation
