 Kia Sorento: Evaporator Core Replacement
|
1. |
Disconnect the negative (-) battery terminal.
|
|
2. |
Remove the heater and blower assembly.
(Refer to Heater -"Heater Unit")
|
|
3. |
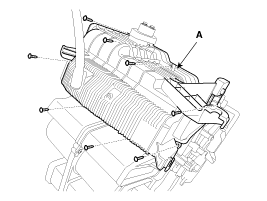
Remove the heater unit lower case (A) after loosening the mounting
screws.

|
|
4. |
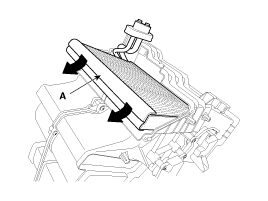
Pull out the evaporator core (A) from the heater unit.

|
Be careful that the inlet and outlet pipe are not bent
during heater core and evaporator core removal/installation.
|
|
|
5. |
Install in the reverse order of removal.
| A. |
If you're installing a new evaporator core, add refrigerant
oil (PAG OIL).
|
| B. |
Replace the O-rings with new ones at each fitting, and
apply a thin coat of refrigerant oil before installing them.
Be sure to use the right O-rings for R-134a to avoid leakage.
|
| C. |
Immediately after using the oil, replace the cap on the
container, and seal it to avoid moisture absorption.
|
| D. |
Do not spill the refrigerant oil on the vehicle; it may
damage the paint; if the refrigerant oil contacts the paint,
wash it off immediately.
|
| E. |
Apply sealant to the grommets.
|
| F. |
Make sure that there is no air leakage.
|
| G. |
Charge the system and test its performance.
|
| H. |
Do not interchange the inlet and outlet heater hoses and
install the hose clamps securely.
|
| I. |
Refill the cooling system with engine coolant.
|
|
1.
Disconnect the negative (-) battery terminal.
2.
Remove the heater and blower assembly.
(Refer to Heater -"Heater Unit")
...
The heater unit includes mode control actuator and temperature control
actuator.
The temperature control actuator is located at the heater unit. It regulates
the temperature by the proced ...
See also:
Special Service Tools
Tool (Number and name)
Illustration
Use
Alternator pulley remover wrench
(09373-27000)
Removal and installation of alternator pulley
...
Inspection
1.
Turn ignition switch OFF.
2.
Remove the air duct.
(Refer to Engine Mechanical System - "Air cleaner")
...
Roof rack (if equipped)
If the vehicle has a roof rack, you can load cargo on top of your vehicle.
✽ NOTICE
If the vehicle is equipped with a sunroof, be sure not to position cargo onto
the roof rack in such a wa ...
 Kia Sorento: Evaporator Core Replacement
 Heater Core Replacement
 Temperature Control Actuator Description


