 Kia Sorento: Front Strut Assembly Removel
Second Generation XM (2011-2026) / Kia Sorento XM 2011-2026 Service Manual / Suspension System / Front Suspension System / Front Strut Assembly Removel
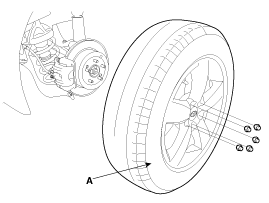
| 1. |
Remove the front wheel and tire (A) from front hub .
|

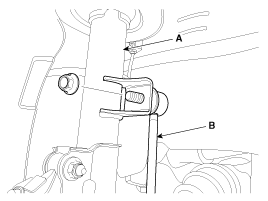
| 2. |
Remove the brake hose (A) & wheel speed sensor (B) from the front
strut assembly by loosening mounting bolts.
|

| 3. |
Disconnect the stabilizer link(B) with the front strut assembly(A)
after loosening the nut.
|
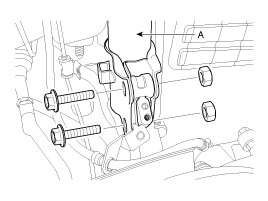
| 4. |
Disconnect the front strut assembly(A) with the knuckle by loosening
the bolt & nut.
|
| 5. |
Remove the cowl top cover.
(Refer to Body (Interior and Exterior) - "Cowl Top Cover")
|
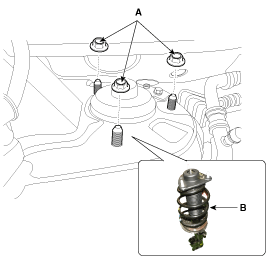
| 6. |
Remove the front strut assembly (B) and then loosen the strut
mounting nuts (A-3ea).
|
| 7. |
Install in the reverse order of removal.
|
 Front Strut Assembly Components
1. Strut assembly
2. Insulator
3. Bearing
4. Spring upper pad
5. Spring
6. Dust cover
7. Spring lower pad
...
 Front Strut Assembly Disassembly
1.
Remove the dust cover(A).
2.
Using the special tool (09546-26000), compress the coil spring
(A).
3.
...
See also:
Power Door Mirror Switch Circuit Diagram
...
Interior Trim Components
1. Front pillar trim
2. Center pillar lower trim
3. Center pillar upper trim
4. Front door scuff trim
5. Rear door scuff trim
6. Cowlside trim
7. Rear pillar trim
8 ...
Oil Level Gauge & Pipe Removal and Installation
1.
Remove the oil gauge(A).
2.
Remove the intake manofold.
(Refer to Intake And Exhaust System - "Intake Manifold")
...
Categories
- Home
- First Generation
- Second Generation
- Kia Sorento XM 2011-2026 Owners Manual
- Kia Sorento XM 2011-2026 Service Manual

Copyright ® www.ksmanual.com 2014-2026