 Kia Sorento: Rear Driveshaft Disassembly
Second Generation XM (2011-2026) / Kia Sorento XM 2011-2026 Service Manual / Driveshaft and axle / Rear Driveshaft Assembly / Rear Driveshaft Disassembly
|

| 1. |
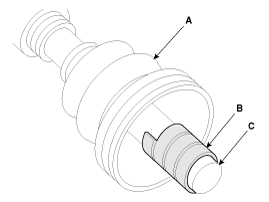
Remove the TJ boot bands and pull the TJ boot from the TJ outer
race.
|
| 2. |
Pull out the driveshaft from the TJ outer race.
|
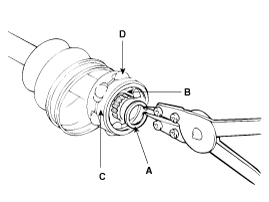
| 3. |
Remove the snap ring (A) and take out the inner race(B), cage(C)
and balls(D) as an assembly.
|
| 4. |
Clean the inner race, cage and balls without disassembling.
|
| 5. |
Remove the BJ boot bands and pull out the TJ boot and BJ boot.
|
 Rear Driveshaft Inspection
1.
Check the driveshaft boots for damage and deterioration.
2.
Check the ball joint for wear and damage.
3.
Che ...
 Rear Driveshaft Reassembly
1.
Wrap tape around the driveshaft splines (TJ side ) to prevent
damage to the boots.
2.
Apply grease to the driveshaft and install the boo ...
See also:
Output Speed Sensor Signal Waveform
...
Description
Back view camera will activate when the backup light is ON with the ignition
switch ON and the shift lever in the R position.
This system is a supplemental system that shows behind the vehic ...
Components Location
1. Automatic transaxle
2. Shift cable bracket
3. Inhibitor switch connector
4. Manual control lever
5. Automatic transaxle mounting support bracket
6. Solenoid valve conne ...
Categories
- Home
- First Generation
- Second Generation
- Kia Sorento XM 2011-2026 Owners Manual
- Kia Sorento XM 2011-2026 Service Manual

Copyright ® www.ksmanual.com 2014-2026