
 Kia Sorento: Heater Unit Replacement
Second Generation XM (2011-2026) / Kia Sorento XM 2011-2026 Service Manual / Heating,Ventilation And Air Conditioning / Heater / Heater Unit Replacement
| 1. |
Disconnect the negative (-) battery terminal.
|
| 2. |
Recover the refrigerant with a recovery/recycling/charging station.
|
| 3. |
When the engine is cool, drain the engine coolant from the radiator.
(Refer to Engine Mechanical System - “Coolant”)
|
| 4. |
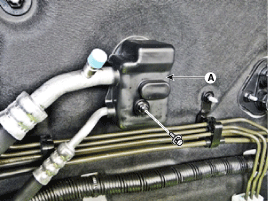
Remove the expansion valve cover (A).
|
| 5. |
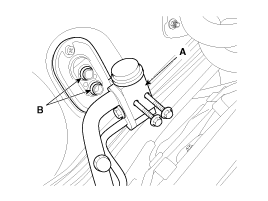
Remove the expansion valve (A) from the evaporator core.
|

| 6. |
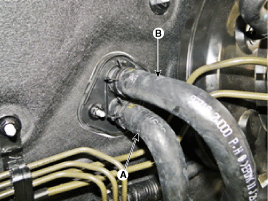
Disconnect the inlet (A) and outlet (B) heater hoses from the
heater unit.
|

| 7. |
Remove the cowl top cover.
(Refer to Body - "Cowl Top Cover")
|
| 8. |
Remove the front pillar trim.
(Refer to Body - "Interior Trim")
|
| 9. |
Remove the front seat assembly.
(Refer to Body - "Front Seat")
|
| 10. |
Remove the console assembly.
(Refer to Body - "Console")
|
| 11. |
Remove the shift lever assembly.
(Refer to Automatic Transaxle Control System - "Shift lever")
|
| 12. |
Remove the cowl side trim.
(Refer to Body - "Interior Trim")
|
| 13. |
Remove the crash pad lower panel.
(Refer to Body - "Crash Pad")
|
| 14. |
Remove the steering column shroud panel.
(Refer to Body - "Steering Column Shroud Panel")
|
| 15. |
Lower the steering column after loosening the mounting bolts.
(Refer to Steering System - "Steering Column and Shaft")
|
| 16. |
Remove the glove box housing.
(Refer to Body - "Crash Pad")
|
| 17. |
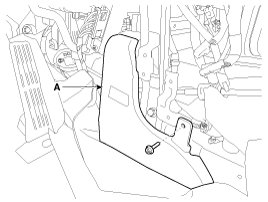
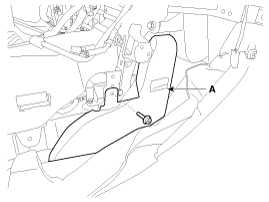
After loosening the mounting bolt, then remove the rear airduct
(A).
[LH]
[RH]
|
| 18. |
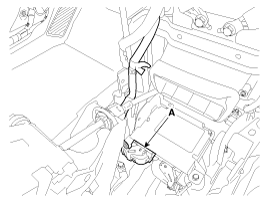
Disconnect the airbag control module (SRSCM) connector (A).
|
| 19. |
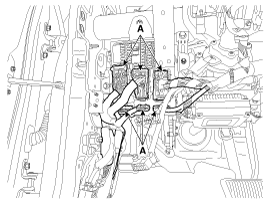
Disconnect the passenger compartment junction box connectors (A).
|
| 20. |
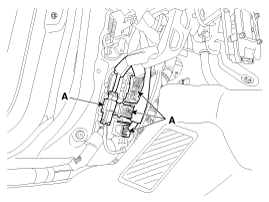
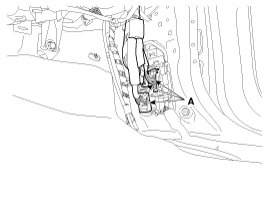
Disconnect the multi box connectors (A).
[Driver's side]
[Passenger's side]
|
| 21. |
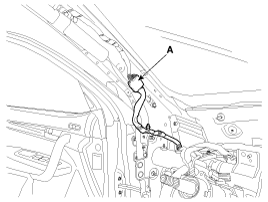
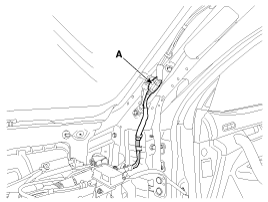
Disconnect the connector (A) and the mounting clips in the front
pillar.
[Driver's side]
[Passenger's side]
|
| 22. |
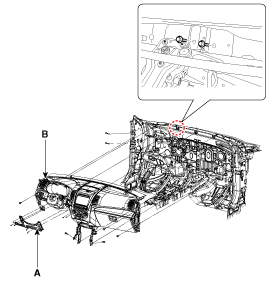
After loosening the mounting bolts, remove the reinforce panel
(A).
|
| 23. |
After loosening the nuts and bolts remove the main crash pad (B)
and cowl cross bar assembly (B) together.
|
| 24. |
Loosen the drain hose fixing clip under the vehicle.
|
| 25. |
Disconnect the heater unit connectors.
|
| 26. |
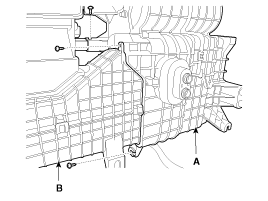
Remove the heater and blower unit from the crash pad after loosening
the mounting nuts.
|
| 27. |
Separate the blower unit from the heater unit after loosening
the screws.
|
| 28. |
Install in the reverse order of removal.
|
 Heater Unit Components
1. Heater Case
2. B Pillar Case
3. Shower Duct
4. PTC Heater
5. Heater Core
6. Heater Core Cover
7. Mode Actuator
8. Mode Bracket
9. Mode Lever Main
10. Def D ...
 Heater Core Replacement
1.
Disconnect the negative (-) battery terminal.
2.
Remove the heater and blower assembly.
(Refer to Heater -"Heater Unit")
...
See also:
Wheel Hub nut tightening sequence
Tighten the hub nuts as follows.
Tightening torque:
88.3 ~ 107.9N.m (9.0 ~ 11.0kgf.m, 65.1 ~ 79.6lb-ft)
...
Smart key precautions
The smart key will not work if any of the following occur: The smart key
is close to a radio transmitter such as a radio station or an airport which
can interfere with normal operation of the s ...
Rear Hub - Carrier Components
1. Rear carrier assembly
2. Parking brake assembly
3. Rear hub assembly
4. Rear brake disc
...
Categories
- Home
- First Generation
- Second Generation
- Kia Sorento XM 2011-2026 Owners Manual
- Kia Sorento XM 2011-2026 Service Manual

Copyright © www.ksmanual.com 2014-2026