
 Kia Sorento: Refrigerant Recovery/Recycling/Charging/Vacuum/Leak Test
Kia Sorento (MQ4, 2021-2026) Service Manual / Heating,Ventilation And Air Conditioning / Air Conditioning System / Refrigerant Recovery/Recycling/Charging/Vacuum/Leak Test
| Refrigerant Recovery/Recycling/Charging/Vacuum/Leak Test (R-134a) |
Equipped with R-134a recovery/recycling/charging equipment
| 1. |
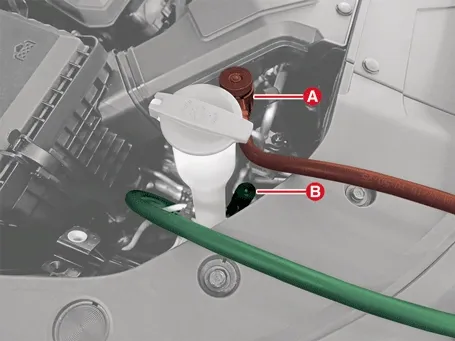
Connect the R-134a recovery/recycling/charging equipment to the high-pressure service port (A) and
low-pressure service port (B) by reading the refrigerant recovery/recycling/charging equipment instruction
manual.
|

Refrigerant recovery operation
| • |
Use only service equipment that is U.L-listed and is certified to meet the requirements of SAE J2210 to
remove HFC-134a (R-134a) from the air conditioning system.
|
| • |
If accidental system discharge occurs, ventilate work area before resume of service.
|
| • |
Additional health and safety information may be obtained from the refrigerant and lubricant manufacturers.
|
| 1. |
Measure the amount of refrigerant oil removed from the A/C system after the recovery process is completed.
Be sure to install the same amount of new refrigerant oil back into the A/C system before charging.
|
Refrigerant system vacuum operation
| • |
Use only service equipment that is U.L-listed and is certified to meet the requirements of SAE J2210 to
remove HFC-134a (R-134a) from the air conditioning system.
|
| • |
If accidental system discharge occurs, ventilate work area before resume of service.
|
| • |
Additional health and safety information may be obtained from the refrigerant and lubricant manufacturers.
|
| 1. |
When an A/C System has been opened to the atmosphere, such as during installation or repair, it must be
evacuated using an R-134a refrigerant Recovery / Recycling / Charging System. (If the system has been open for
several days, the receiver / dryer should be replaced, and the system should be evacuated for several hours.)
|
| 2. |
Connect an R-134a refrigerant
Recovery / Recycling / Charging System to the high-pressure service port and the low-pressure service port
as shown, following the equipment manufacturer's instructions.
|
| 3. |
If the low-pressure does not reach more than 93.3 kPa (700 mmHg, 27.6 in.Hg) in 10 minutes, there is
probably a leak in the system. Partially charge the system, and check for leaks (see Refrigerant Leak Test).
|
| 4. |
Remove the low pressure valve from the low-pressure service port.
|
Refrigerant charge
| • |
Use only service equipment that is U.L-listed and is certified to meet the requirements of SAE J2210 to
remove HFC-134a (R-134a) from the air conditioning system.
|
| • |
If accidental system discharge occurs, ventilate work area before resume of service.
|
| • |
Additional health and safety information may be obtained from the refrigerant and lubricant manufacturers.
|
| 1. |
Connect an R-134a refrigerant
Recovery / Recycling / Charging System to the high-pressure service port as shown, following the equipment
manufacturer's instructions.
|
| 2. |
Add the same amount of new refrigerant oil to system that was removed during recovery. Use only specified
refrigerant oil. Charge the system with R-134a refrigerant. Do not overcharge the system the compressor will
be damaged.
|
|
Regulated refrigerant capacity
Without rear A/C : 650 ± 25g (22.9 ± 0.88 oz.)
With rear A/C : 850 ± 25g (29.9 ± 0.88 oz.)
|
Leak test of refrigerant
| • |
Always conduct a leak test with an electronic leak detector whenever leakage or refrigerant is suspected
and when conducting service operations which are accompanied by disassembly or removing or connection
fittings.
|

| • |
If a gas leak is detected, proceed as follows:
|
| 1. |
Check the torque on the connection fittings and, if too loose, tighten to the proper torque. Check for gas
leakage with a leak detector.
|
| 2. |
If leakage continues even after the fitting has been tightened, discharge the refrigerant from the system,
disconnect the fittings, and check their seating faces for damage. Always replace, even if the damage is
slight.
|
| 3. |
Check the compressor oil and add oil if required.
|
| 4. |
Charge the system and recheck for gas leaks. If no leaks are found, evacuate and charge the system again.
|
| Refrigerant Recovery/Recycling/Charging/Vacuum/Leak Test (R-1234yf) |
Install the refrigerant recovery/recycling/charging equipment
| 1. |
Connect the refrigerant recovery/recycling/charging equipment to the high-pressure service port (A) and
low-pressure service port (B).
|
Refrigerant recovery operation
| 1. |
Perform the refrigerant recovery using the refrigerant recovery/recycling/charging equipment while the high
and low-pressure valves open.
|
| 2. |
Measure the amount of compressor oil drained from the air conditioner system after the recovery operation
is completed. Supplement the compressor oil drained when charging the air conditioner refrigerant.
|
Refrigerant system vacuum operation
When charging the refrigerant, the air conditioning system must be evacuated. This vacuum operation is
performed to remove all the air and moisture that have flowed into the unit, and the system is performed the
evacuating operation for more than 10 minutes after each part is installed.
|
| 1. |
Perform the air conditioner system vacuum using the refrigerant recovery/recycling/charging equipment while
the high and low-pressure valves open.
|
| 2. |
If the gauge is maintained in the vacuum zone for 10 minutes while the high and low pressure valves closed,
the vacuum has been performed normally. If the pressure increases, there is a leak in the system, so repair
the leak by the following order.
|
| 3. |
After evacuating for more than 10 minutes, check the vacuum and close both high and low pressure valves.
This state is ready for charging.
|
Refrigerant charge
| 1. |
Replenish the capacity of discharged compressor oil by using refrigerant recovery/recycling/charging
equipment while the high pressure valve is opened after vacuum the air conditioning system.
|
| 2. |
Charge the refrigerant with specified capacity by using the refrigerant recovery/recycling/charging
equipment while opening the high-pressure valve and then closing the high pressure valve.
|
| 3. |
Check if the refrigerant is not leaking from the system with leak detector. (Refer to refrigerant leak
test)
|
Leak test of refrigerant
When the refrigerant leak is suspected or the connection part is disassembled or loosened, perform the leak test
with an electronic leak detector.
| 1. |
Check the torque of the connection part, and if it is too loose, check the gas leak with leak detector
after tightening it with the tightening torque.
|
| 2. |
If leakage continues even after re-tightening the connection part, drain the refrigerant and separate the
connection part to check the contact surface for damage. If there is even a small damage, replace it with a
new one.
|
| 3. |
Check the compressor oil and add oil if necessary.
|
| 4. |
Charging the system and check for gas leakage. If there is no problem, evacuate the system before charging.
|
Description and Operation
The component of the air conditioner is basically as shown in the figure below. As the refrigerant circulates
between each part, it continuously changes to li...
 Description and Operation
Components and Components Location
Component
Front Refrigerant Line
1. Expansion Valve1-a. 8.8 - 13.7 N·m (0.9 - 1....
 Components and Components Location. On Vehicle Inspection
See also:
Camshaft Position Sensor (CMPS) Removal and Installation
Removal
...
Front Door Glass Run Repair Procedures
Removal
1.
Remove the front door window glass.
(Refer to Door (Front) - "Front Door Window Glass")
...
Manuals list
- Kia Sorento MQ4 2021-2026 Owners Manual
- Kia Sorento XM 2011-2015 Owners Manual
- Kia Sorento XM 2011-2015 Service Manual

Copyright © www.ksmanual.com 2014-2026 - 0.0565