 Kia Sorento: Receiver-Drier Replacement
Second Generation XM (2011-2026) / Kia Sorento XM 2011-2026 Service Manual / Heating,Ventilation And Air Conditioning / Air conditioning System / Receiver-Drier Replacement
| 1. |
Remove the condenser.
|
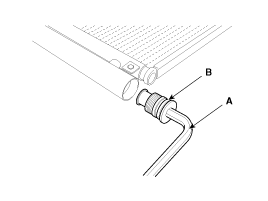
| 2. |
Remove the cap (B) on the bottom of the condenser with a L wrench
(A).
|
| 3. |
Remove the receiver-drier (A) from condenser using a long nose
plier. Check for crumbled receiver-drier and clogged bottom cap filter.
|

| 4. |
Apply air conditioning compressor oil along the O-rings and threads
of the new bottom cap.
|
| 5. |
Insert a new receiver-drier into the receiver drier tank. The
receiver-drier must be sealed in vacuum before it is exposed to air
for use.
|
| 6. |
Install a new bottom cap to the condenser.
|

 Condenser Replacement
1.
Recover the refrigerant with a recovery/recycling/charging station.
2.
Disconnect the negative (-) battery terminal.
3.
...
 A/C Pressure Transducer Description
The A/C Pressure Transducer (APT) converts the pressure value of high
pressure line into voltage value after measuring it. By converted voltage value,
engine ECU controls the cooling fan by o ...
See also:
Tail Gate Replacement
Tailgate Trim Replacement
1.
Using a screwdriver or remover, remove the upper trim (B).
2.
After loosening the mounting screws, then remove ...
Panorama Sunroof Adjustment
Inspect Glass Alignment
1.
Inspect the alignment of the movable glass (C) that is between
the front (A) and rear (B) glass and if needed adjust it.
...
Mode Control Actuator Replacement
1.
Disconnect the negative (-) battery terminal.
2.
Using a screwdriver or remover, remove the driver's side crash
pad side cover.
...
Categories
- Home
- First Generation
- Second Generation
- Kia Sorento XM 2011-2026 Owners Manual
- Kia Sorento XM 2011-2026 Service Manual

Copyright ® www.ksmanual.com 2014-2026