
 Kia Sorento: Rear Lower Arm Repair procedures
Kia Sorento (MQ4, 2021-2026) Service Manual / Suspension System / Rear Suspension System / Rear Lower Arm Repair procedures
| Removal |
| 1. |
Disconnect the (-) battery terminal.
|
| 2. |
Remove the rear wheel and tire.
(Refer to Tires/Wheels - "Wheel")
|
| 3. |
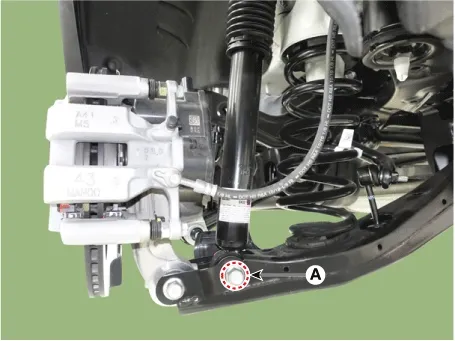
Remove the bolt (A) and nut and remove the rear shock absorber from the rear lower arm.
|
| 4. |
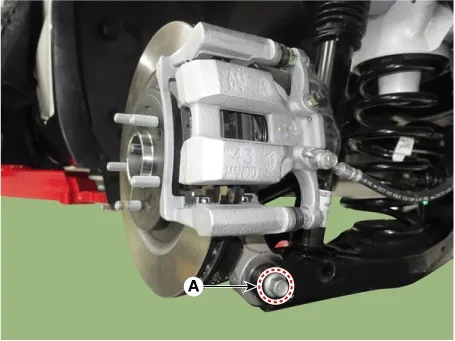
Remove the bolt and nut (A) and then remove the rear lower arm from the rear axle.
|

| 5. |
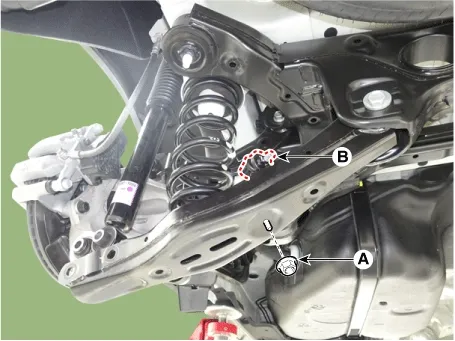
Remove the nut (A) and then disconnect the rear stabilizer bar link (B) from the rear lower arm.
|
| 6. |
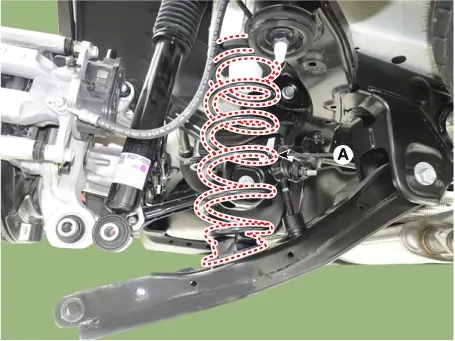
Remove the rear coil spring (A).
|
| 7. |
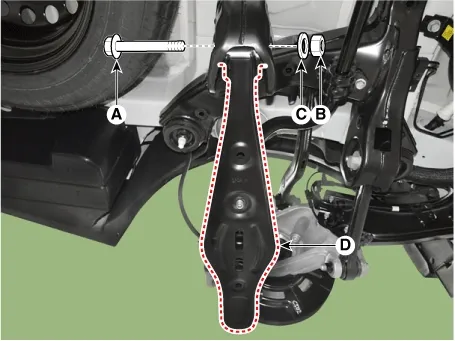
Remove bolt (A), nut (B) and washer (C) and remove rear lower arm (D).
|
| Inspection |
| 1. |
Check the bushing for wear and deterioration.
|
| 2. |
Check the rear lower arm for deformation.
|
| 3. |
Check the coil spring and spring pad for deterioration and deformation.
|
| 4. |
Check all bolts and nuts.
|
| Installation |
| 1. |
Install in the reverse order of removal.
|
| 2. |
Check the alignment.
(Refer to Suspension System - "Alignment")
|
Removal
1.
Disconnect the (-) battery terminal.
2.
Remove the rear wheel and tire.
(Ref...
 Rear Upper Arm Repair procedures
Removal
1.
Disconnect the (-) battery terminal.
2.
Remove the rear wheel and tire.
(Ref...
 Rear Assist Arm Repair procedures
See also:
Input Speed Sensor Signal Waveform
...
OBD-II review
1. Overview
The California Air Resources Board (CARB) began regulation of On Board
Diagnostics (OBD) for vehicles sold in California beginning with the 1988 model
year. The first phase, O ...
Direct Electro Hydraulic Actuator Coupling Description
4WD ECU processes signals from various sensors and determines the current
road and driving conditions. The ECU then utilizes this information to implement
precision control over the 4WD coupl ...
Manuals list
- Kia Sorento MQ4 2021-2026 Owners Manual
- Kia Sorento XM 2011-2015 Owners Manual
- Kia Sorento XM 2011-2015 Service Manual

Copyright © www.ksmanual.com 2014-2026 - 0.0655