 Kia Sorento: Parking Brake Pedal Assembly Installation
Second Generation XM (2011-2026) / Kia Sorento XM 2011-2026 Service Manual / Brake System / Parking Brake System / Parking Brake Pedal Assembly Installation
| 1. |
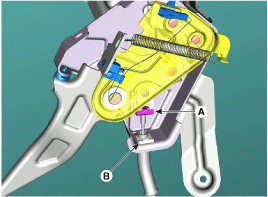
Install the holding clip (A, B) after fixing the parking brake
cable.
|
| 2. |
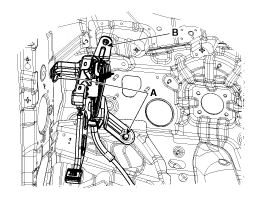
Install the parking brake pedal, and then install the parking
brake pedal mounting bolts (A) and nut (B).
|
| 3. |
Adjust the parking brake pedal stroke by turning the adjusting
nut (A).
|
| 4. |
Reconnect the parking brake switch connector.
|
| 5. |
Install the juncting box.
(Refer to Body Electrical System - "Relay Box(Passenger Compartment"))
|
| 6. |
Install the crash pad lower panel.
(Refer to Body - "Crash pad lower panel")
|
 Parking Brake Pedal Assembly Removal
1.
Turn ignition switch OFF and disconnect the negative (-) battery
cable.
2.
Remove the crash pad lower panel.
(Refer to Body - & ...
 Parking Brake Pedal Assembly Adjustment
Parking Brake Pedal Stroke Adjustment
1.
Operate the parking brake pedal through a full stroke over 3 times
for setting the parking cables.
2.
...
See also:
Engine compartment
1. Engine coolant reservoir
2. Engine oil filler cap
3. Brake fluid reservoir
4. Air cleaner
5. Fuse box
6. Positive battery terminal
7. Negative battery terminal
8. Windshield washer fluid r ...
Exhaust Manifold Removal and Installation
1.
Remove the engine cover.
2.
Disconnect the battery negative terminal.
3.
Disconnect the front oxygen sensor ...
Rear Coil Spring Inspection
1.
Check the spring for distortion, aging or damage.
2.
Check the spring upper pad and lower pad for aging or damage.
...
Copyright ® www.ksmanual.com 2014-2026


