 Kia Sorento: Mirror Replacement
Second Generation XM (2011-2026) / Kia Sorento XM 2011-2026 Service Manual / Body (Interior and Exterior) / Exterior / Mirror Replacement
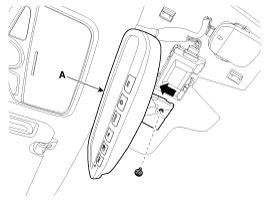
Outside Rear View Mirror Assembly Replacement
|

| 1. |
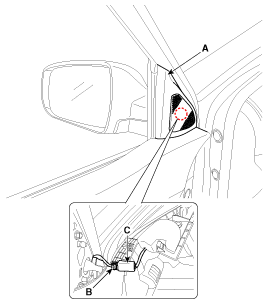
Using a screwdriver, remove the quadrant inner cover (A).
|
| 2. |
Push the lock pin (B), then remove the tweeter speaker connector
(C).
|
| 3. |
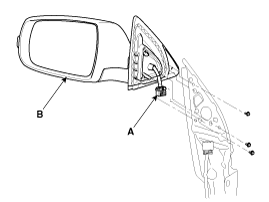
After disconnecting the connector (A), then remove the outside
rear view mirror (B).
|
| 4. |
Install in the reverse order of removal.
|
Inside Rear View Mirror Assembly Replacement
| [Manual Mirror] |
| 1. |
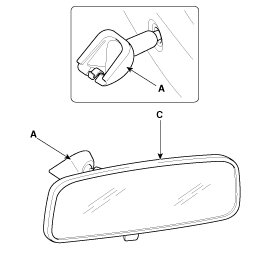
Push the inside rear view mirror base (A) up to remove the inside
rear view mirror assembly (C).
|
| 2. |
Install in the reverse order of removal.
|
| [ECM Mirror] |
| 1. |
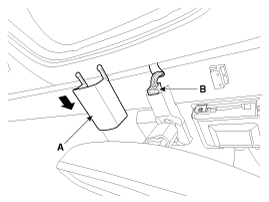
Remove the ECM mirror cover (A).
|
| 2. |
Disconnect the ECM mirror connector (B).
|
| 3. |
Loosen the ECM mirror mounting screw.
|
| 4. |
Push the ECM mirror base up to remove the ECM mirror assembly
(A).
|
| 5. |
Install in the reverse order of removal.
|
 Panorama Sunroof Adjustment
Inspect Glass Alignment
1.
Inspect the alignment of the movable glass (C) that is between
the front (A) and rear (B) glass and if needed adjust it.
...
 Cowl Top Cover Replacement
1.
Remove the cap (A) and remove the nuts, then remove the wiper
arm (B).
Tightening torque :
22.6 ~ 26.5 N.m(2.3 ~ 2.7 kgf.m, 16.6 ~ ...
See also:
Removal
1.
Turn the ignition switch OFF and disconnect the battery negative
(-) cable.
2.
Disconnect the manifold absolute pressure sensor connecto ...
Keep your vehicle clean
The best way to prevent corrosion is to keep your vehicle clean and free of corrosive
materials. Attention to the underside of the vehicle is particularly important.
If you live in a high-corrosi ...
Crankshaft Reassembly
1.
Install the main bearings.
Upper bearings have an oil groove of oil ho ...
Categories
- Home
- First Generation
- Second Generation
- Kia Sorento XM 2011-2026 Owners Manual
- Kia Sorento XM 2011-2026 Service Manual

Copyright ® www.ksmanual.com 2014-2026