 Kia Sorento: Exhaust Manifold Removal and Installation
Second Generation XM (2011-2026) / Kia Sorento XM 2011-2026 Service Manual / Engine Mechanical System / Intake And Exhaust System / Exhaust Manifold Removal and Installation
| 1. |
Remove the engine cover.
|
| 2. |
Disconnect the battery negative terminal.
|
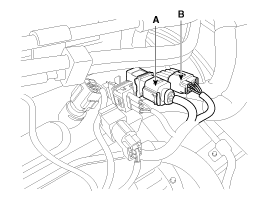
| 3. |
Disconnect the front oxygen sensor connector (A) and the rear oxygen
sensor connector (B).
|
| 4. |
Remove the front muffler.
(Refer to Intake And Exhaust System - "Muffler")
|
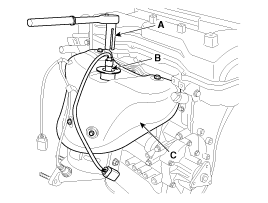
| 5. |
Remove the heated oxygen sensor (A).
(Refer to Engine Control/Fuel System - "Heated Oxygen Sensor (HO2S)")
|
| 6. |
Remove the exhaust manifold heat protector (B).
|
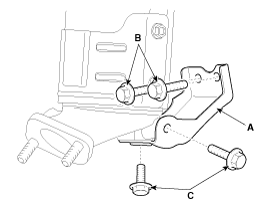
| 7. |
Remove the exhaust manifold stay (A).
|
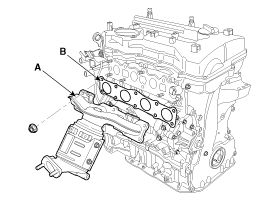
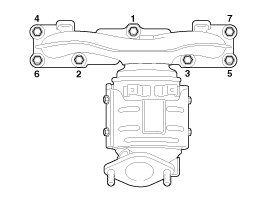
| 8. |
Remove the exhaust manifold (A) with the gasket (B).
When installing the intake manifold, tighten the nuts with pre-torque
first, and then tighten the nuts with specified torque in the sequence
shown.
|

| 9. |
Install in the reverse order of removal.
|
 Exhaust Manifold Components
1. Heat protector
2. Exhaust manifold
3. Exhaust manifold gasket
4. Exhaust manifold stay
...
 Muffler Components
1. Front muffler
2. Catalytic converter
3. Center muffler
4. Main muffler
5. Gasket
6. Hanger
...
See also:
Fault Diagnosis
Features a fail-safe mechanism that provides "limp-home" 4th gear hold
to enable the vehicle to be driven to the owner's home or dealer shop.
Fail-Safe: The TCM provides 4th ge ...
Emergency Fastening Device (EFD) Description
Emergency Fastening Device (EFD) operates as well as Belt Pretensioner
at the same time If it gets into its deploy condition after a collision. It
is located at near anchor on driver and pass ...
Categories
- Home
- First Generation
- Second Generation
- Kia Sorento XM 2011-2026 Owners Manual
- Kia Sorento XM 2011-2026 Service Manual

Copyright ® www.ksmanual.com 2014-2026