 Kia Sorento: Cooling System Replacement
| Replacement and Air Bleeding |
|
•
|
Never remove the pressure cap when the engine is hot. Otherwise, serious scalding could be caused
by hot fluid under high pressure escaping from the radiator. Open the pressure cap after engine cools
down sufficiently.
|
|
|
•
|
When changing coolant, Be careful not to spill coolant on the belt, electrical devices, etc.
|
|
•
|
When changing engine coolant and conduct air bleeding, be sure to follow the integrated thermal
management module (ITM) coolant filling method.
|
|
When KDS is available, conduct coolant change and air bleeding following
the below procedure.
| 1. |
When KDS is available, conduct coolant change and air bleeding following the below procedure.
|
| 2. |
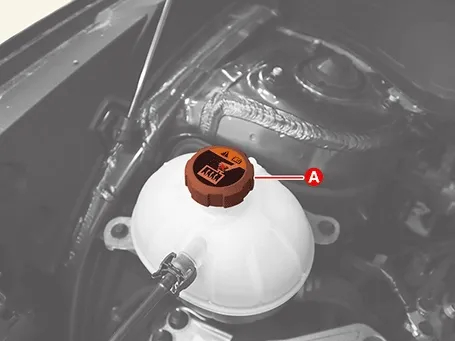
Remove the pressure cap (A).
|
| 3. |
Remove the engine room under cover.
(Refer to Engine And Transaxle Assembly - "Engine Room Under
Cover")
|
| 4. |
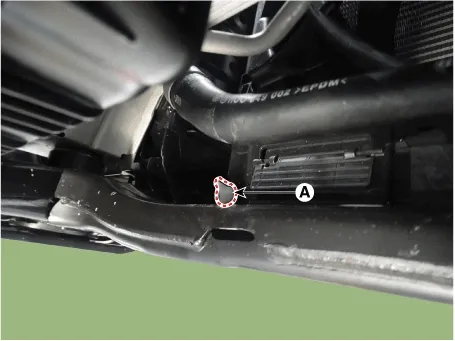
Drain engine coolant by removing the drain plug (A).
|
| 5. |
After coolant drain is completed, retighten the drain plug.
|
| 6. |
Drain coolant in the reservoir tank and then clean reservoir tank.
|
| 7. |
Install the coolant refill tank on the radiator and then add the mixture of anti-freeze and water (45 -
50%) (except for North America, Europe and China: 55 - 60%)
|
Fill coolant as far as possible with engine and all power supplies shut off.
|
Coolant capacity
Approx.9.2 ℓ (2.4 U.S.gal., 9.7 U.S.qt., 8.1 lmp.qt.)
|
|
•
|
Press the radiator upper/lower hoses to allow air to escape easily.
|
|
•
|
Use only genuine antifreeze.
|
|
•
|
Do not mix antifreeze/coolant from different brands.
|
|
•
|
Do not add any anti-rust.
|
|
•
|
Use only distilled water when mixing antifreeze with water.
|
|
•
|
For best corrosion protection, the coolant concentration must be maintained year-round at
45% (except for North America, Europe and China: 55%) minimum.
Coolant concentrations less than 45% (except for North America, Europe and China: 55%) may
not provide sufficient protection against corrosion or freezing.
|
|
•
|
Coolant concentrations greater than 60% will impair cooling efficiency and are not
recommended.
|
|
|
| 9. |
Select the "ITM coolant filling mode" in the Vehicle S/W Management.
|
Refer to the KDS screen for operating conditions and details
|
|
| 11. |
Warm up the engine for 20 minutes after cooling fan operates 1 time.
|
| 12. |
After disconnecting the KDS, turn the ignition switch to OFF and then restart engine.
|
| 13. |
Install the pressure cap (A).
|
| 14. |
Add coolant if it is insufficient.
|
| 15. |
Install the engine room under cover.
(Refer to Engine And Transaxle Assembly - "Engine Room Under
Cover")
|
When KDS is unavailable, conduct coolant change and air bleeding
following the below procedure.
| 1. |
Check that the engine and radiator cool down sufficiently.
|
| 2. |
Remove the pressure cap (A).
|
| 3. |
Remove the engine room under cover.
(Refer to Engine And Transaxle Assembly - "Engine Room Under
Cover")
|
| 4. |
Drain engine coolant by loosening the drain plug (A).
|
| 5. |
After coolant drain is completed, retighten the drain plug.
|
| 6. |
Drain coolant in the reservoir tank and then clean the reservoir tank.
|
| 7. |
Install the coolant refill tank on the radiator and then add the mixture of anti-freeze and water (45 -
50%) (except for North America, Europe and China: 55 - 60%)
|
Fill coolant as far as possible with engine and all power supplies shut off.
|
Coolant capacity
Approx.9.2 ℓ (2.4 U.S.gal., 9.7 U.S.qt., 8.1 lmp.qt.)
|
|
•
|
Press the radiator upper/lower hoses to allow air to escape easily.
|
|
•
|
Use only genuine antifreeze.
|
|
•
|
Do not mix antifreeze/coolant from different brands.
|
|
•
|
Do not add any anti-rust.
|
|
•
|
Use only distilled water when mixing antifreeze with water.
|
|
•
|
For best corrosion protection, the coolant concentration must be maintained year-round at
45% (except for North America, Europe and China: 55%) minimum.
Coolant concentrations less than 45% (except for North America, Europe and China: 55%) may
not provide sufficient protection against corrosion or freezing.
|
|
•
|
Coolant concentrations greater than 60% will impair cooling efficiency and are not
recommended.
|
|
|
| 8. |
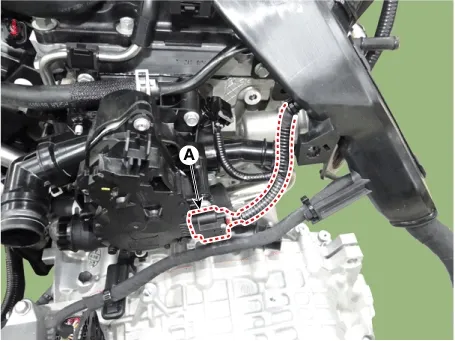
Disconnect the integrated thermal management module (ITM) connector (A).
|
•
|
When disconnecting the integrated thermal management module (ITM) connector, be sure to
recheck that the engine and all power supplies are shut off.
|
|
•
|
Be careful not to allow the static electricity and any other voltage are not applied to the
integrated thermal management module (ITM).
|
|
•
|
Keep away the magnetic objects (Ex. magnet) from the integrated thermal management module
(ITM).
|
|
|
| 9. |
Start the engine.
|
Keep the engine with idling.
|
|
| 10. |
Warm up the engine for 20 minutes after cooling pan operates 1 time.
|
| 11. |
After turning the ignition switch to OFF, reconnect the integrated thermal management module (ITM)
connector (A).
|
•
|
When reconnecting the integrated thermal management module (ITM) connector, moisture and
oil in the connector must be completely removed and foreign materials should not enter.
|
|
•
|
When replacing the integrated thermal management module (ITM) connector, be sure to use the
specified connector.
|
|
|
| 13. |
Check the integrated thermal management module (ITM) for operation by operating sound.
|
Before/after starting up the engine, integrated thermal management module (ITM) operating sound can
be generated.
|
|
| 14. |
Repeat the engine ON/OFF and check the engine warning lamp OFF.
| (1)
|
Wait for 5 seconds with engine ON and then turn OFF the engine.
|
| (2)
|
Repeat the step (1) 3 times.
|
| (3)
|
Check the engine warning lamp OFF when engine is turned ON a fourth time.
|
|
| 15. |
Drive a vehicle until cooling fan operates and check the remaining amount of coolant in reservoir tank
while engine is hot.
|
| 16. |
Add coolant if it is insufficient.
|
| 17. |
Install the engine room under cover.
(Refer to Engine And Transaxle Assembly - "Engine Room Under
Cover")
|
| Replacement and Air Bleeding |
|
•
|
Never remove the coolant radiator cap when the engine is hot. Otherwise, serious scalding could be
caused by hot fluid under high pressure escaping from the radiator. Open the coolant radiator cap
after engine cools down sufficiently.
|
|
|
•
|
When changing coolant, Be careful not to spill coolant on the belt, electrical devices, etc.
|
|
•
|
When changing engine coolant and conduct air bleeding, be sure to follow the iIntegrated thermal
management module (ITM) coolant filling method.
|
|
When KDS is available, conduct coolant change and air bleeding following
the below procedure.
| 1. |
When KDS is available, conduct coolant change and air bleeding following the below procedure.
|
| 2. |
Remove the coolant reservoir cap (A).
|
| 3. |
Remove the engine room under cover.
(Refer to Engine and Transaxle Assembly - "Engine Room Under
Cover")
|
| 4. |
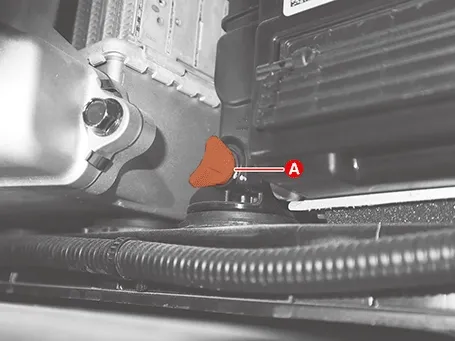
Drain engine coolant by removing the drain plug (A).
|
| 5. |
After coolant drain is completed, retighten the drain plug.
|
| 6. |
Drain coolant in the reservoir tank and then clean reservoir tank.
|
| 7. |
Install the coolant refill tank on the radiator and then add the mixture of anti-freeze and water (45 -
50%) (except for North America, Europe and China: 55 - 60%)
|
Fill coolant as far as possible with engine and all power supplies shut off.
|
Coolant capacity
Approx.8.4 ℓ (2.2 U.S.gal., 8.9 U.S.qt., 7.4 lmp.qt.)
|
|
•
|
Press the radiator upper/lower hoses to allow air to escape easily.
|
|
•
|
Use only genuine antifreeze.
|
|
•
|
Do not mix antifreeze/coolant from different brands.
|
|
•
|
Do not add any anti-rust.
|
|
•
|
Use only distilled water when mixing antifreeze with water.
|
|
•
|
For best corrosion protection, the coolant concentration must be maintained year-round at
45% (except for North America, Europe and China: 55%) minimum.
Coolant concentrations less than 45% (except for North America, Europe and China: 55%) may
not provide sufficient protection against corrosion or freezing.
|
|
•
|
Coolant concentrations greater than 60% will impair cooling efficiency and are not
recommended.
|
|
|
| 9. |
Select the "ITM coolant filling mode" in the Vehicle S/W Management.
|
Refer to the KDS screen for operating conditions and details
|
|
| 11. |
Warm up the engine for 20 minutes after cooling fan operates 1 time.
|
| 12. |
After disconnecting the KDS, turn the ignition switch to OFF and then restart engine.
|
| 13. |
Install the coolant reservoir cap (A).
|
| 14. |
Add coolant if it is insufficient.
|
| 15. |
Install the engine room under cover.
(Refer to Engine And Transaxle Assembly - "Engine Room Under
Cover")
|
When KDS is unavailable, conduct coolant change and air bleeding
following the below procedure.
| 1. |
Check that the engine and radiator has cooled down sufficiently.
|
| 2. |
Remove the coolant reservoir cap (A).
|
| 3. |
Remove the engine room under cover.
(Refer to Engine And Transaxle Assembly - "Engine Room Under
Cover")
|
| 4. |
Drain engine coolant by removing the drain plug (A).
|
| 5. |
After coolant drain is completed, retighten the drain plug.
|
| 6. |
Drain coolant in the reservoir tank and then clean the reservoir tank.
|
| 7. |
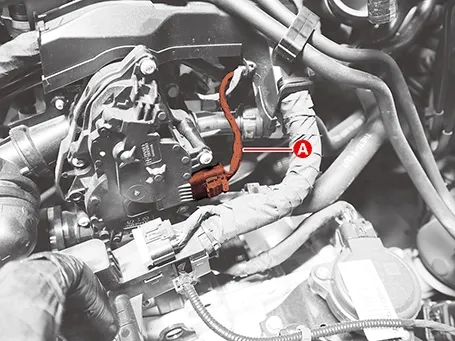
Disconnect the integrated thermal management module (ITM) connector (A).
|
•
|
When disconnecting the integrated thermal management module (ITM) connector, be sure to
recheck that the engine and all power supplies are shut off.
|
|
•
|
Be careful not to allow the static electricity and any other voltage are not applied to the
integrated thermal management module (ITM).
|
|
•
|
Keep away the magnetic objects (Ex. magnet) from the integrated thermal management module
(ITM).
|
|
|
| 8. |
Install the coolant refill tank on the radiator and then add the mixture of anti-freeze and water (45 -
50%) (except for North America, Europe and China: 55 - 60%)
|
Fill coolant as far as possible with engine and all power supplies shut off.
|
Coolant capacity
Approx.8.4 ℓ (2.2 U.S.gal., 8.9 U.S.qt., 7.4 lmp.qt.)
|
|
•
|
Press the radiator upper/lower hoses to allow air to escape easily.
|
|
•
|
Use only genuine antifreeze.
|
|
•
|
Do not mix antifreeze/coolant from different brands.
|
|
•
|
Do not add any anti-rust.
|
|
•
|
Use only distilled water when mixing antifreeze with water.
|
|
•
|
For best corrosion protection, the coolant concentration must be maintained year-round at
45% (except for North America, Europe and China: 55%) minimum.
Coolant concentrations less than 45% (except for North America, Europe and China: 55%) may
not provide sufficient protection against corrosion or freezing.
|
|
•
|
Coolant concentrations greater than 60% will impair cooling efficiency and are not
recommended.
|
|
|
| 9. |
Start the engine.
|
Keep the engine with idling.
|
|
| 10. |
Warm up the engine for 20 minutes after cooling pan operates 1 time.
|
| 11. |
After turning the ignition switch to OFF, reconnect the integrated thermal management module (ITM)
connector (A).
|
•
|
When reconnecting the integrated thermal management module (ITM) connector, moisture and
oil in the connector must be completely removed and foreign materials should not enter.
|
|
•
|
When replacing the integrated thermal management module (ITM) connector, be sure to use the
specified connector.
|
|
|
| 13. |
Check the integrated thermal management module (ITM) for operation by operating sound.
|
Before/after starting up the engine, integrated thermal management module (ITM) operating sound can
be generated.
|
|
| 14. |
Repeat the engine ON/OFF and check the engine warning lamp OFF.
| (1)
|
Wait for 5 seconds with engine ON and then turn OFF the engine.
|
| (2)
|
Repeat the step (1) 3 times.
|
| (3)
|
Check the engine warning lamp OFF when engine is turned ON a fourth time.
|
|
| 15. |
Drive a vehicle until cooling fan operates and check the remaining amount of coolant in reservoir tank
while engine is hot.
|
| 16. |
Add coolant if it is insufficient.
|
| 17. |
Install the engine room under cover.
(Refer to Engine And Transaxle Assembly - "Engine Room Under
Cover")
|
Radiator hoses
| 1. |
Check radiator hoses for the following
|
Coolant level
| 1. |
Check the coolant level in the coolant reservoir. Make sure it is between the "F" mark and
"L" mark.
|
| 2. |
If the coolant level in the coolant reservoir is at or below the "L" mark, add coolant to bring
it between the "L" and "F" marks, then inspect the cooling system for leaks.
|
Coolant quality
| 1. |
Remove the pressure cap.
|
| 2. |
Check if there are any excessive deposits of rust or scale around the radiator cap sub-assembly and
radiator filler hole. Also, the coolant should be free of oil.
If excessively dirty, clean the coolant passage and replace the coolant.
|
| 3. |
Install the pressure cap.
|
On Vehicle Inspection
Battery voltage and status
Check the battery voltage and status by using a battery tester.
Battery terminal
1.
Move back and ...
Inspection
1.
Check belt for maintenance and abnormal wear of V-ribbed part. Replace if necessary.
...
See also:
Service Data
Service Data
Advanced Driver Assistance System (Driving)
Front Corner Radar
Item
Specification
Rated vo ...
Rear Body
* These dimensions indicated in this figure are actual-measurement
dimensions. [ Unit : mm (inch) ]
Side outer p ...
Rear Seat Belt Replacement
Second Row Seat Belt Replacement
...



 Battery Inspection
 Drive Belt Removal and Installation
