 Kia Sorento: Battery Vehicle parasitic current inspection
|
1. |
Turn the all electric devices OFF, and then turn the ignition
switch OFF.
|
|
2. |
Close all doors except the engine hood, and then lock all doors.
|
(1) |
Disconnect the hood switch connector.
|
|
(3) |
Close the doors or remove the door switches.
|
|
|
3. |
Wait a few minutes until the vehicleŌĆÖs electrical systems go to
sleep mode.
|
ŌĆó |
For an accurate measurement of a vehicle parasitic
current, all electriacl systems should go to sleep mode.
(It takes at least one hour or at most one day.) However,
an approximate vehicle parasitic current can be measured
after 10~20 minutes.
|
|
|
|
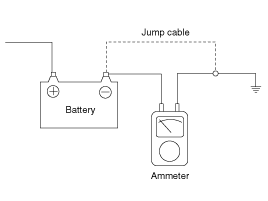
4. |
Connect an ammeter in series between the battery (-) terminal
and the ground cable, and then disconnect the clamp from the battery
(-) terminal slowly.
|
ŌĆó |
Be careful that the lead wires of an ammeter do
not come off from the battery (-) terminal and the ground
cable to prevent the battery from being reset. In case
the battery is reset, connect the battery cable again,
and then start the engine or turn the ignition switch
ON for more than 10 sec. Repeat the procedure from No.
1.
To prevent the battery from being reset during
the inspection,
|
| 1) |
Connect a jump cable between the battery (-) terminal
and the ground cable.
|
| 2) |
Disconnect the ground cable from the battery (-)
terminal.
|
| 3) |
Connect an ammeter between the battery (-) terminal
and the ground cable.
|
| 4) |
After disconnecting the jump cable, read the current
value of the ammeter.
|
|
|
|
5. |
Read the current value of the ammeter.
| A. |
If the parasitic current is over the limit value, search
for abnormal circuit by removing a fuse one by one and checking
the parasitic current.
|
| B. |
Reconnect the suspected parasitic current draw circuit
fuse only and search for suspected unit by removing a compoconnected
with the circuit one by one until the parasitic draw drops below
limit value.
|
Limit value (after 10~20 min.)
: Below 50mA
|
|
1.
Install in the reverse order of removal.
Battery (-)terminal installation
nut:
4.0 ~ 6.0 N.m (0.4 ~ 0.6 kgf.m, 3.0 ~ 4.4 lb-ft) ...
1.
Make sure the ignition switch and all accessories are in the OFF
position.
2.
Disconnect the battery cables (negative first).
...
See also:
Panorama Sunroof Switch Inspection
1.
Disconnect the negative (-) battery terminal.
2.
Open the sunglass case cover from the overhead console then remove
the 2 screws holding ...
Intake Manifold Removal and Installation
1.
Disconnect the battery negative terminal.
2.
Remove the air cleaner assembly.
(Refer to Intake And Exhaust System - "Air Cleaner ...
Schematic Diagrams
Circuit Diagram - ESC (1)
Circuit Diagram - ESC (2)
Circuit Diagram - ESC (3)
Circuit Diagram - ESC (4)
ESC connector input/output
Connector Terminal
Specifica ...

 Battery Installation
 Battery Cleaning