 Kia Sorento: Release Residual Pressure in Fuel Line
Second Generation XM (2011-2025) / Kia Sorento XM 2011-2025 Service Manual / Engine Control / Fuel System / Fuel Delivery System / Release Residual Pressure in Fuel Line
Whenever the high pressure fuel pump, fuel pipe, delivery pipe,
or injector is removed immediately after shutting off the engine, an
injury may be caused by the release of highly pressurized fuel. Release
the residual pressure in the high pressure fuel line by referring to
the "Residual fuel pressure release procedure" below before removing
any high pressure fuel system components.
|
Wear safety glasses and fuel resistant gloves.
|
| 1. |
Turn the ignition off and disconnect the battery negative cable.
|
| 2. |
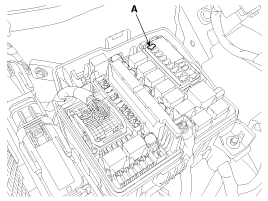
Remove the fuel pump fuse (A).
|
| 3. |
Disconnect the electrical connector from the high pressure fuel
pump.
|
| 4. |
Reconnect the battery negative cable.
|
| 5. |
Run the engine for about 20 seconds to lower the pressure in both
the high or low pressurelines. The engine may shut off within the 20
second period. If not, turn the engine off.
|
| 6. |
Proceed with the service or repair. Use rags to cover opening
and catch spills when opening up the high pressure system.
|
| 7. |
Reinstall / re-connect all components in reverse order of removal.
Start engine and confirm proper operation, and make sure there are no
fuel leaks.
|
| 8. |
After completing, clear DTC(s) using GDS scan tool (the procedure
described above will cause DTC to set).
|
 Fuel Pressure Test (Low pressure system)
1.
Release the residual pressure in fuel line.
(Refer to the Fuel Delivery System - Repair Procedures - "Release
Residual Pressure in Fuel Line")
...
 Fuel Tank Removal
1.
Release the residual pressure in fuel line.
(Refer to the Fuel Delivery System - Repair Procedures - "Release
Residual Pressure in Fuel Line")
...
See also:
Circuit Diagram
...
Installation
1.
Install the key lock cylinder.
2.
Install the illumination bulb, lens and cover.
3.
Install the key warning ...
Power Seat Control Switch Inspection
1.
With the power seat switch in each position, make sure that continuity
exists between the terminals below. If continuity is not as specified,
replace the power seat ...
Copyright ® www.ksmanual.com 2014-2025


