 Kia Sorento: Parking Brake Lever Assembly Adjustment
Second Generation XM (2011-2025) / Kia Sorento XM 2011-2025 Service Manual / Brake System / Parking Brake System / Parking Brake Lever Assembly Adjustment
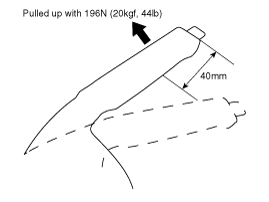
Parking Brake Lever Stroke Adjustment
| 1. |
Remove the floor console.
(Refer to Body - "Floor console")
|
| 2. |
Apply the brake pedal 20 times with the force of 10kgf after bleeding.
Then, for the cable to settle in, apply the parking brake full stroke
more than 3 times.
|
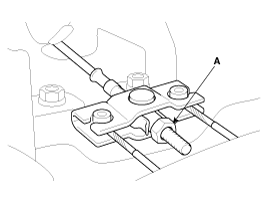
| 3. |
Install the parking brake cable adjuster, then adjust the parking
brake lever stroke by turning adjusting nut (A).
|

| 4. |
Release the parking brake lever fully, and check that parking
brakes do not drag when the rear wheels are turned. Readjust if necessary.
|
| 5. |
Make sure that the parking brakes are fully applied when the parking
brake lever is pulled up fully.
|
| 6. |
Install the floor console.
(Refer to Body - "Floor console")
|
 Parking Brake Lever Assembly Installation
1.
Install the parking brake lever assembly (A).
Tightening torque :
19.6 ~ 29.4 N.m (2.0 ~ 3.0 kgf.m, 14.5 ~ 21.7 lb-ft)
...
 Parking Brake Pedal Assembly Removal
1.
Turn ignition switch OFF and disconnect the negative (-) battery
cable.
2.
Remove the crash pad lower panel.
(Refer to Body - & ...
See also:
Dynamic Damper Installation
1.
Apply soap powder on the shaft to prevent being damaged between
the shaft spline and the dynamic damper.
2.
Install the dynamic damper.
...
Front Impact Sensor (FIS) Removal
ŌĆó
Removal of the airbag must be performed according to the
precautions/ procedures des ...
Air Ventilation Seat Removal
1.
Remove the seat back cover (A).
(Refer to Body - "Front seat")
2.
Remove the blower fan (A) after removing the scr ...
Categories
- Home
- First Generation
- Second Generation
- Kia Sorento XM 2011-2025 Owners Manual
- Kia Sorento XM 2011-2025 Service Manual

Copyright ® www.ksmanual.com 2014-2025