 Kia Sorento: Crankshaft Inspection
Second Generation XM (2011-2025) / Kia Sorento XM 2011-2025 Service Manual / Engine Mechanical System / Cylinder Block / Crankshaft Inspection
| 1. |
Check the crankshaft bearing oil clearance.
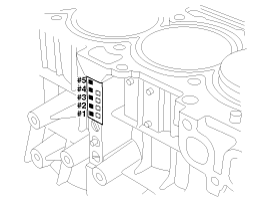
Crankshaft Bore Identification Mark
Letters have been stamped on the block as a mark for the size of each
of the 5 main journal bores.
Use them, and the numbers or bar stamped on the crank (marks for main
journal size), to choose the correct bearings.
Cylinder Block Specifications
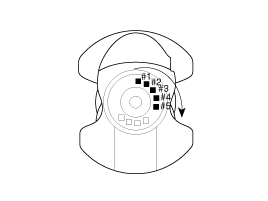
Crankshaft Journal Identification Mark
Crankshaft Specifications
Crankshaft Bearing Identification Mark
Crankshaft Bearing Specifications
Selection Chart For Crankshaft Bearings
|
||||||||||||||||||||||||||||||||||||||||


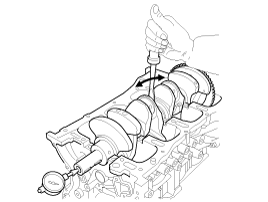
| 2. |
Check crankshaft end play.
Using a dial indicator, measure the thrust clearance while prying the
crankshaft back and forth with a screwdriver.
If the end play is greater than maximum, replace the thrust bearings
as a set.
|
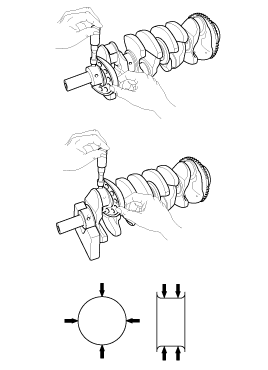
| 3. |
Inspect main journals and crank pins.
Using a micrometer, measure the diameter of each main journal and crank
pin.
|
 Crankshaft Disassembly
ŌĆó
Use fender covers to avoid damaging painted surfaces.
ŌĆó
...
 Crankshaft Reassembly
1.
Install the main bearings.
Upper bearings have an oil groove of oil ho ...
See also:
AC Inverter Unit Components
...
CVVT & Camshaft Installation
1.
Install the intakeCVVT assembly(A), exhaust CVVT assembly(B) and camshaft(C).
Tightening torque :
53.9 ~ 63.7 N.m (5.5 ~ 6.5 kgf.m, 39 ...
Circuit Diagram
...
Categories
- Home
- First Generation
- Second Generation
- Kia Sorento XM 2011-2025 Owners Manual
- Kia Sorento XM 2011-2025 Service Manual

Copyright ® www.ksmanual.com 2014-2025