 Kia Sorento: Light bulbs
WARNING - Working on the lights
Prior to working on the light, firmly apply the parking brake, ensure that the ignition switch is turned to the LOCK position and turn off the lights to avoid sudden movement of the vehicle and burning your fingers or receiving an electric shock.
Use only the bulbs of the specified wattage.
CAUTION
Be sure to replace the burnedout bulb with one of the same wattage rating. Otherwise, it may cause damage to the fuse or electric wiring system.
CAUTION
If you donŌĆÖt have necessary tools, the correct bulbs and the expertise, consult an authorized Kia dealer. In many cases, it is difficult to replace vehicle light bulbs because other parts of the vehicle must be removed before you can get to the bulb. This is especially true if you have to remove the headlight assembly to get to the bulb(s). Removing/installing the headlight assembly can result in damage to the vehicle.
✽ NOTICE
After driving in heavy rain or washing, headlight and taillight lenses could appear frosty. This condition is caused by the temperature difference between the lamp inside and outside. This is similar to the condensation on your windows inside your vehicle during rain and doesnŌĆÖt indicate a problem with your vehicle. If the water leaks into the lamp bulb circuitry, have the vehicle checked by an authorized Kia dealer.
Headlight, position light, turn signal light, and front fog light bulb replacement
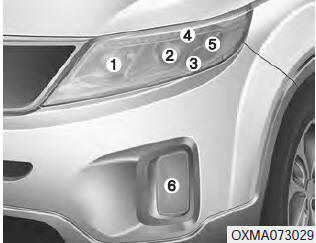
(1) Headlight (High)
(2) Headlight (Low)
(3) Front turn signal light
(4) Position light
(5) Side marker
(6) Front fog light (if equipped)

Headlight bulb
WARNING - Halogen bulbs
- Halogen bulbs contain pressurized gas that will produce flying pieces of glass if broken.
- Always handle them carefully, and avoid scratches and abrasions. If the bulbs are lit, avoid contact with liquids. Never touch the glass with bare hands.
- Residual oil may cause the bulb to overheat and burst when lit. A bulb should be operated only when installed in a headlight.
- If a bulb becomes damaged or cracked, replace it immediately and carefully dispose of it.
- Wear eye protection when changing a bulb. Allow the bulb to cool down before handling it.
WARNING - HID Headlamp low beam (if equipped)
Do not attempt to replace or inspect the low beam (XENON bulb) due to electric shock danger. If the light bulb does not operate, we recommend that you checked an authorized Kia dealer.
Headlamp (bulb type) -high/low
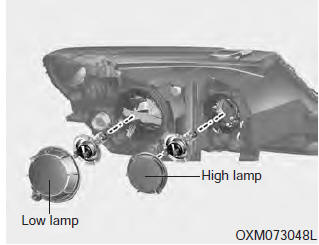
1. Open the hood.
2. Remove the headlamp bulb cover by turning it counterclockwise.
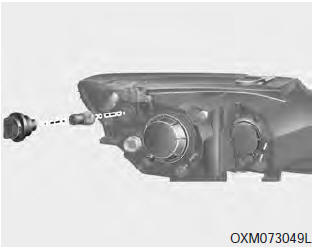
3. Remove the socket from the assembly by turning the socket counterclockwise until the tabs on the socket align with the slots on the assembly.
4. Remove the bulb by pulling it out.
5. Inset a new bulb by inserting it into the socket.
6. Install the socket in the assembly by aligning the tabs on the socket with the slots in the assembly.
Push the socket into the assembly and turn the socket clockwise.
7. Install the headlamp bulb cover by turning it clockwise.
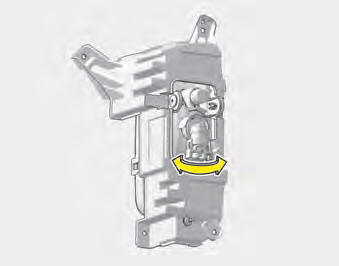
Turn signal lamp/Position lamp
1. Remove the socket from the assembly by turning the socket counterclockwise until the tabs on the socket align with the slots on the assembly.
2. Remove the bulb from the socket by pressing it in and rotating it counterclockwise until the tabs on the bulb align with the slots in the socket. Pull the bulb out of the socket
3. Insert a new bulb by inserting it into the socket and rotating it until it locks into place.
4. Install the socket in the assembly by aligning the tabs on the socket with the slots in the assembly. Push the socket into the assembly and turn the socket clockwise.
✽ NOTICE
If bulb will not rotate inside socket, remove bulb, rotate 180┬░, and try again.
Front fog lamp bulbs (if equipped)
1. Remove the front bumper under cover.
2. Reach your hand into the back of the front bumper.
3. Disconnect the power connector from the socket.
4. Remove the bulb-socket from the housing by turning the socket counter clockwise until the tabs on the socket align with the slots on the housing.
5. Install the new bulb-socket into the housing by aligning the tabs on the socket with the slots in the housing. Push the socket into the housing and turn the socket clockwise.
6. Connect the power connector to the socket.
7. Reinstall the front bumper under cover.
✽ NOTICE
Always have the headlight aiming Adjusted after an accident or the Headlight assembly is reinstalled at a Authorized Kia dealer.
Headlamp (HID type), Front position (LED), bulb replacement
If the light bulb does not operate, we recommend that you checked an authorized Kia dealer.
✽ NOTICE
HID lamps have superior performance vs. halogen bulbs. HID lamps are estimated by the manufacturer to last twice as long or longer than halogen bulbs depending on their frequency of use. They will probably require replacement at some point in the life of the vehicle. Cycling the headlamps on and off more than typical use will shorten HID lamps life. HID lamps do not fail in the same manner as halogen incandescent lamps. If a headlamp goes out after a period of operation but will immediately relamp when the headlamp switch is cycled it is likely the HID lamp needs to be replaced. HID lamping components are more complex than conventional halogen bulbs thus have higher replacement cost.
 Fuse/relay panel description
Inside the fuse/relay panel covers, you can find the fuse/relay label describing
fuse/relay name and capacity.
✽ NOTICE
Not all fuse panel descriptions in this manual may be applicable to ...
 Side repeater lamp replacement
If the light bulb does not operate, we recommend that you check with an authorized
Kia dealer.
Rear combination lamp bulb replacement
(1) Stop and tail light
(2) Tail light
(3) Rear turn sign ...
See also:
Windshield Wiper-Washer Switch Inspection
Check for continuity between the terminals while operating the wiper and
washer switch. If it is not normal condition, replace wiper and wiper switch.
Wiper Switch
Washer Switch
R ...
Installation
1.
Install in the reverse order of removal.
ŌĆó
...
Battery Vehicle parasitic current inspection
1.
Turn the all electric devices OFF, and then turn the ignition
switch OFF.
2.
Close all doors except the engine hood, and then lock all d ...
Categories
- Home
- First Generation
- Second Generation
- Kia Sorento XM 2011-2025 Owners Manual
- Kia Sorento XM 2011-2025 Service Manual
