 Kia Sorento: Replacement
The injector combustion seal should be replaced new one to prevent leakage
after removing the injector.
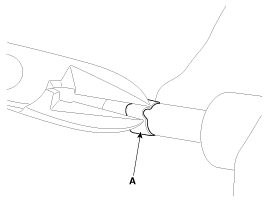
| 1. |
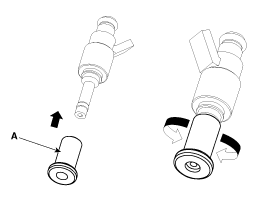
Remove the combustion seal (A) with a wire cutter.
|

| 2. |
Before the assembly of the sealing ring the groove must be cleaned
using a clean cloth.
Any coking of the injector sealing surface must be carefully removed
with a brass-wire brush.
|
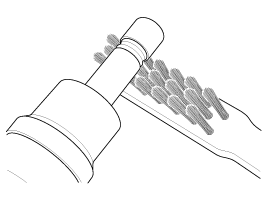
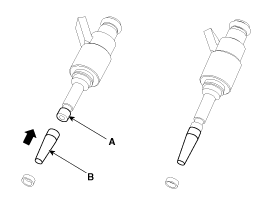
| 3. |
Place the seal installing guide (B) (SST No.: 09353-2B000) on
the tip of the injector not to damage the injector tip (A).
Push the sealing ring (C) with thumb and index finger over the
conical assembly tool until it snaps into the groove.
The complete assembly must not take longer than 2 to 3 seconds.
|
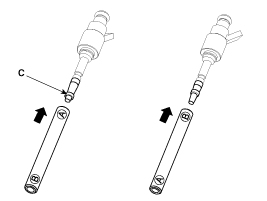
| 4. |
To size the sealing ring the injector is first introduced into
the sizing tool (A) (SST No.: 09353-2B000) and then pressed and at the
same time rotated 180┬░ into the sizing tool.
|
| 5. |
Pull the injector out of the sizing tool by turning it in the
reverse direction to that used for the press-in process.
|
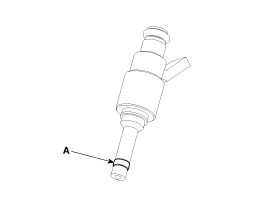
| 6. |
Check the combustion seal (A) installation.
|
 Installation
1.
Combustion seal
2.
Rubber washer
3.
Support disc
4.
O-ring
...
 Purge Control Solenoid Valve (PCSV)
Purge Control Solenoid Valve (PCSV) is installed on the surge tank and
controls the passage between the canister and the intake manifold. It is a solenoid
valve and is open when the ECM groun ...
See also:
Curtain Airbag (CAB) Module Removal
1.
Disconnect the battery negative cable and wait for at least thirty
seconds before beginning work.
2.
Remove the roof trim. (Refer to the ...
Rear Disc Brake Components
1. Guide rod bolt
2. Bleed screw
3. Caliper carrier
4. Caliper body
5. Inner pad shim
6. Brake pad
7. Pad retainer
...
Driver's and passenger's front air bag
Your vehicle is equipped with an Advanced Supplemental Restraint (Air Bag) System
and lap/shoulder belts at both the driver and passenger seating position.
The indication of the system's prese ...
Categories
- Home
- First Generation
- Second Generation
- Kia Sorento XM 2011-2026 Owners Manual
- Kia Sorento XM 2011-2026 Service Manual

Copyright ® www.ksmanual.com 2014-2026