
 Kia Sorento: Crankshaft Reassembly
Second Generation XM (2011-2026) / Kia Sorento XM 2011-2026 Service Manual / Engine Mechanical System / Cylinder Block / Crankshaft Reassembly
| 1. |
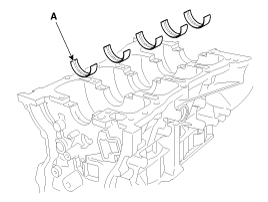
Install the main bearings.
|

| 2. |
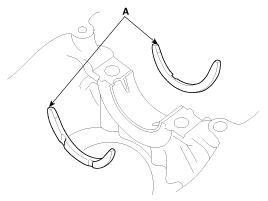
Install the thrust bearings.
Install the 2 thrust bearings(A) under the No.3 journal position of
the cylinder block with the oil grooves facing outward.
|
| 3. |
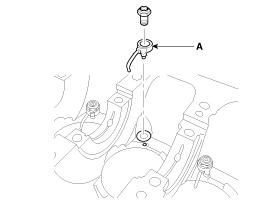
Install the oil jet (A).
|
| 4. |
Place the crankshaft(A) on the cylinder block.
|

| 5. |
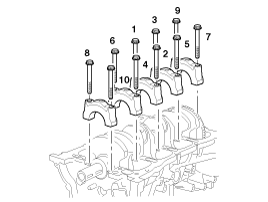
Place the main bearing caps on cylinder block.
|
| 6. |
Install the main bearing cap bolts.
|
| 7. |
Check crankshaft end play.
|
| 8. |
Install piston and connecting rod assemblies.
(Refer to Cylinder Block - "Piston And Connecting Rod")
|
 Crankshaft Inspection
1.
Check the crankshaft bearing oil clearance.
(1)
To check main bearing-to-journal oil clearance, remove the main
caps and bearing ...
 Cooling System
...
See also:
In-car Sensor Inspection
1.
Turn the ignition switch ON.
2.
Blow air with changing temperature into the in-car sensor air
inlet. Measure the sensor resistance betwe ...
Direct Electro Hydraulic Actuator Coupling Inspection
All units are filled up with coupling fluid (ultra-low viscosity
ATF) prior to shipping. Inspection, fill-up, and replac ...
Telemetics Unit (TMU) Installation
1.
Install the TMU unit.
2.
Install the AVN head unit and center fascia panel.
3.
Connect the negative (-) batt ...
Categories
- Home
- First Generation
- Second Generation
- Kia Sorento XM 2011-2026 Owners Manual
- Kia Sorento XM 2011-2026 Service Manual

Copyright © www.ksmanual.com 2014-2026