 Kia Sorento: Wide Angle Camera Adjustment
Tolerance Calibration Outline.
Tolerance calibration compensates for the error margins of surround view video that occur due to the installation
tolerance when the four cameras that comprise the SVM system are installed.
|
Tolerance calibration must be performed when the following actions are
performed.
|
–
|
When conducting a body task that causes the focus of the wide angle camera changes.
|
|
–
|
When replacing the ADAS Parking ECU.
|
|
–
|
When a failure code (System Out of Calibration) occurs.
|
|
Tolerance Calibration Environments
|
SVM calibration tool is required to perform tolerance calibration as shown below.
|
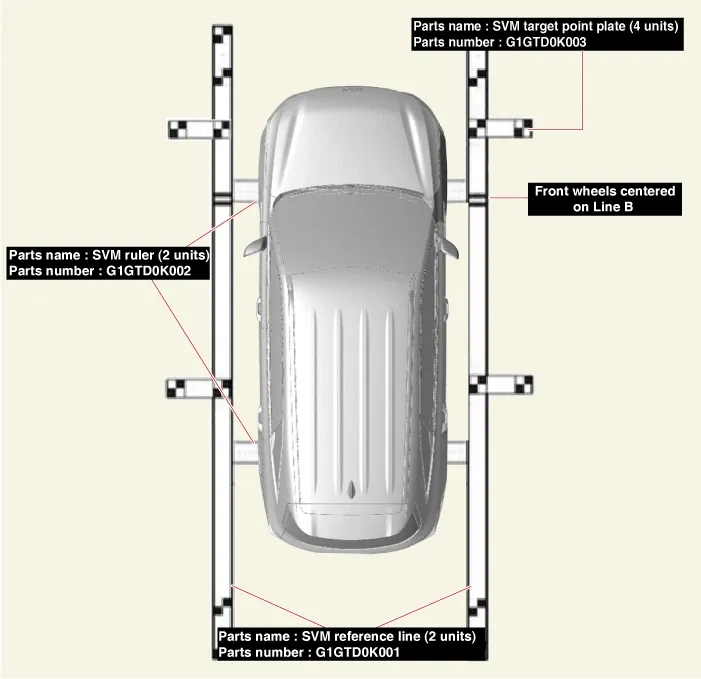
Manual Tolerance Calibration Procedure
| 1. |
Prepare in advance as below.
|
–
|
Confirm that the car hood, trunk and doors are closed.
|
|
–
|
Close the door after getting in on the driver side.
|
|
–
|
Unfold outside rear view mirrors.
|
|
–
|
Shift the gear to the 'N'.
|
|
–
|
During the advance preparation, do not install exhaust inhaler or other equipment that may block
the view of rearview cameras.
|
|
–
|
Engage foot brake or electronic parking brake (EPB) to hold vehicle in place.
|
|
| 2. |
Before entering tolerance calibration mode, to check normal operation of SVM ECU and cameras, perform the
following.
|
–
|
Check that initial setting screen of SVM is displayed. (Front view image + surround view image when
shifted to N)
|
|
–
|
Check that front, rear, left and right images of surround view monitor are properly displayed.
|
|
–
|
If images are properly displayed, enter tolerance calibration mode. Otherwise, if images are
abnormally displayed or are not displayed, replace relevant part.
|
|
| 3. |
Install two calibration scales, two calibration reference line boards, and four calibration target boards
around the vehicle by referring to the manual provided with the tools.
|
•
|
There are two types (Type A & B) and the base line should be matched to vehicle type.
|
|
•
|
Accurately set the location (distance/angle) of the center of white and black calibration
board as this is the reference point.
|
|
| (1)
|
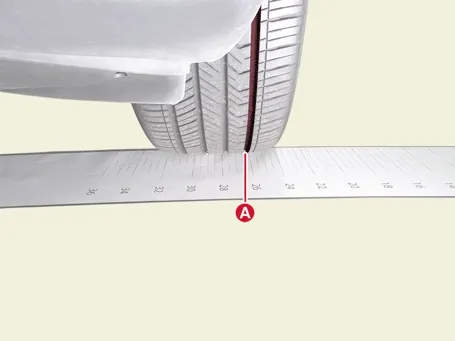
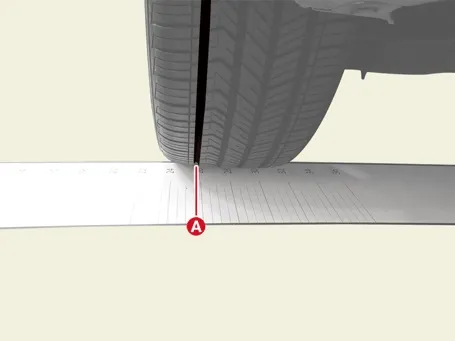
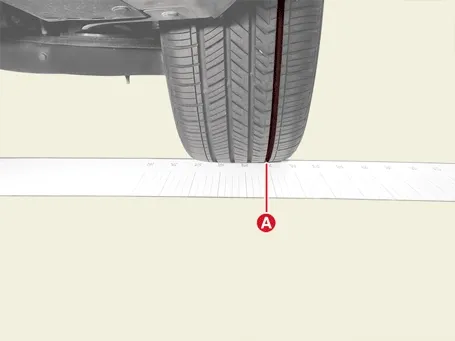
Align the vehicle in a straight line and install the SVM ruler on the front and rear tires in the
direction of the arrow.
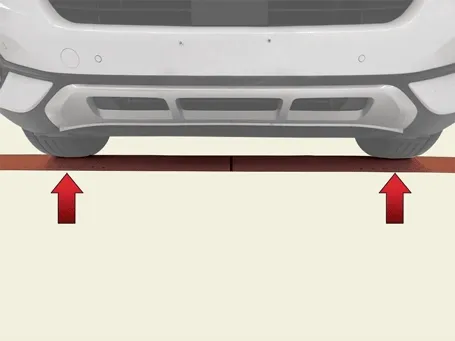
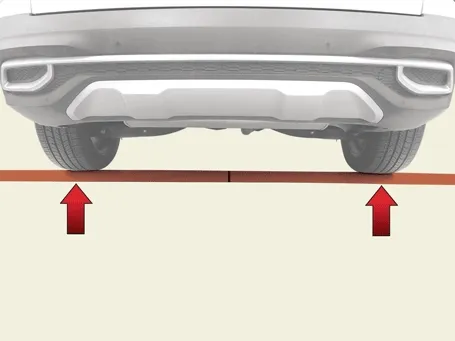
|
| (2)
|
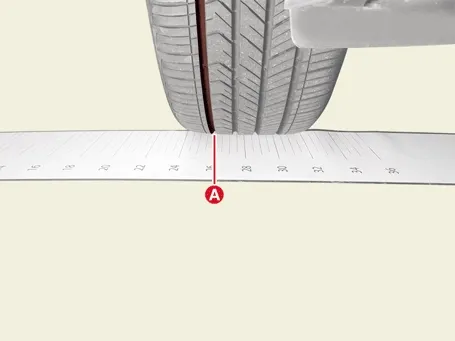
To align the center point of the vehicle, install the calibration ruler by moving it from side to
side so that the calibration ruler dimensions below the tires on the right and left sides are the
same.
|
•
|
Be careful not to crease when installing the SVM ruler.
|
|
•
|
The measurements on both sides should be the same.
|
|
[RH]
[LH]
[LH]
[RH]
|
•
|
If the user is equipped with tires of different dimensions than the specification,
the results of the SVM tolerance correction work may not be accurate.
|
|
•
|
The dimensions of the front and rear tires may be different.
|
|
|
| (3)
|
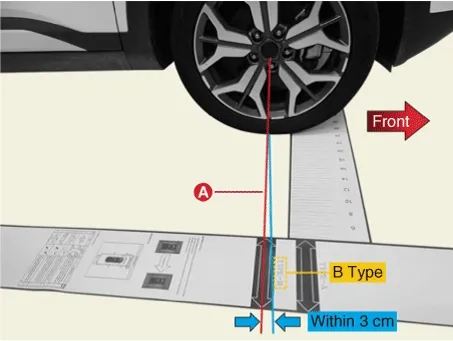
The SVM reference line should be installed according to the end point of SVM ruler.
|
•
|
Align the right-front wheel center of the tire with the base line on the SVM
reference line.
|
|
•
|
There are two types(Type A & B) and the Base line should be matched to vehicle
type.
|
|
•
|
Base line margin of error should be 3 cm (1.1 in.)
|
|
•
|
Measure the margin of error at the end of the baseline (A).
|
|
|
Install it in the same way on the left hand side.
|
|
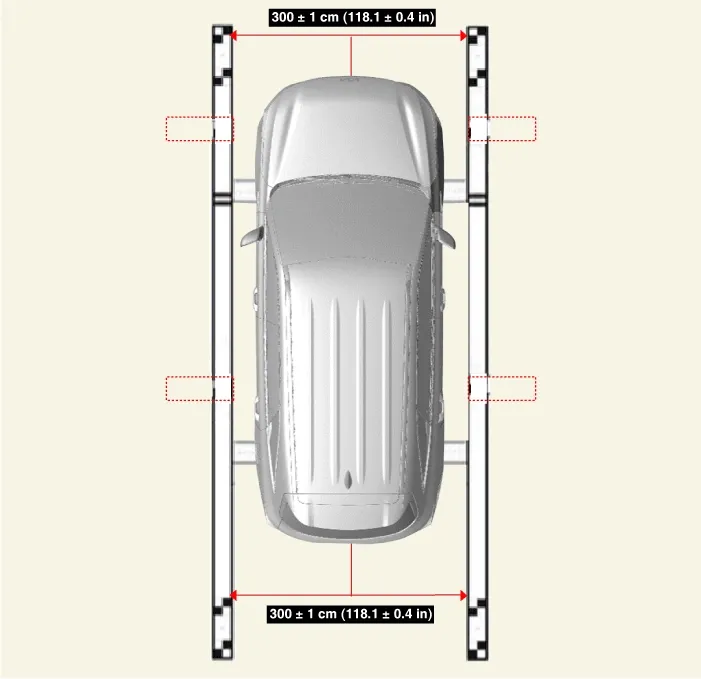
| (4)
|
After installing the calibration ruler and the calibration reference line, verify that the left and
right calibration reference lines are installed parallel to each other.
|
•
|
If the distance between left and right is the same back and forth, the calibration
reference line is normally installed.
|
|
•
|
The error range of the calibration reference line left/right distance shall be 299
to 301 cm (117.7 ~ 118.5 in).
|
|
|
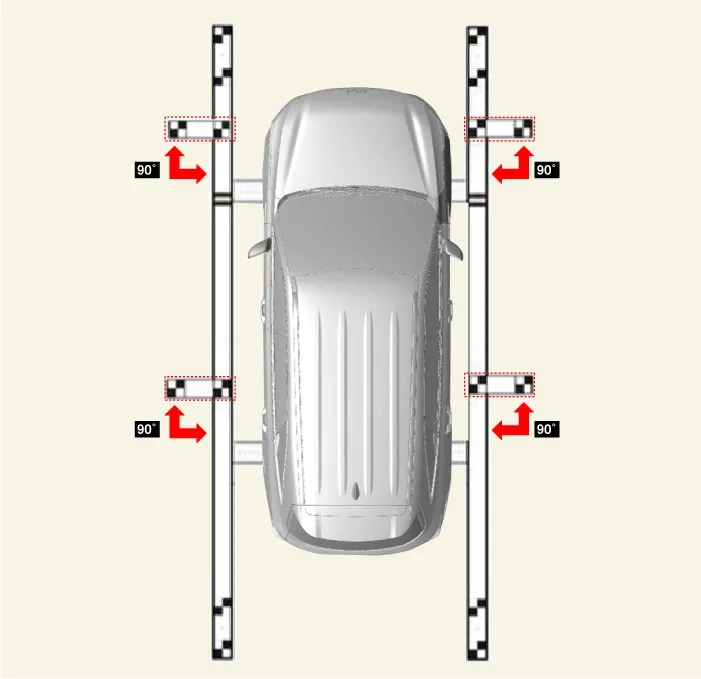
| (5)
|
Install the SVM target on the SVM reference line.
|
•
|
The angle between the SVM calibration reference line and the SVM calibration target
shall be 90 degrees.
|
|
•
|
Rotation error when aligning vehicle should be within 1° to left/right.
|
|
|
|
| 4. |
Maintain IG ON with vehicle stopped, check that the gear is in P, and engage parking brake even on flat
ground.
|
| 5. |
Work is carried out with the parking/view button ON.
|
| 6. |
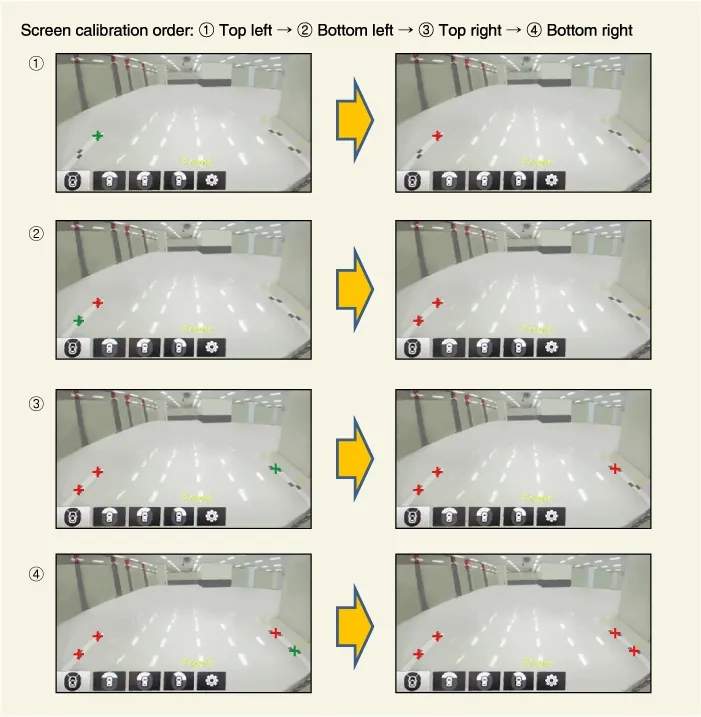
Perform the order below with the KDS.
(S/W Management → Advanced Driver Assistance System Parking → SVM Calibration Mode)
|
Refer to the KDS screen for operating conditions and details
|
|
•
|
Before matching calibration points: "+" green light flashes.
|
|
•
|
When clicking [OK] after matching calibration points: "+" red light ON.
|
|
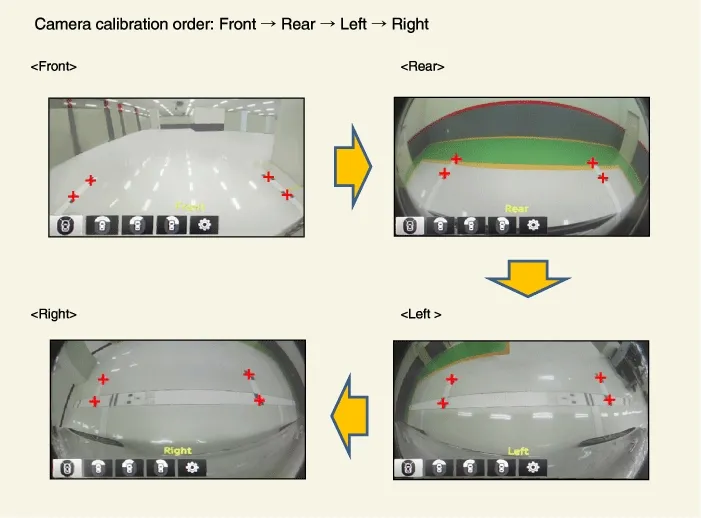
•
|
After matching the four front calibration points, click the OK button and click the Update
SVM button to move to the next camera calibration.
|
|
•
|
Perform calibration tasks in the order of the front -> rear -> left -> right
camera.
|
|
|
| 7. |
Check the vehicle and the calibration line on the monitor screen to see if the calibration has been
completed normally and press the [OK] button.
If calibration has not been properly performed, click [Cancel] and reenter calibration points.
[AVN Monitor Screen]
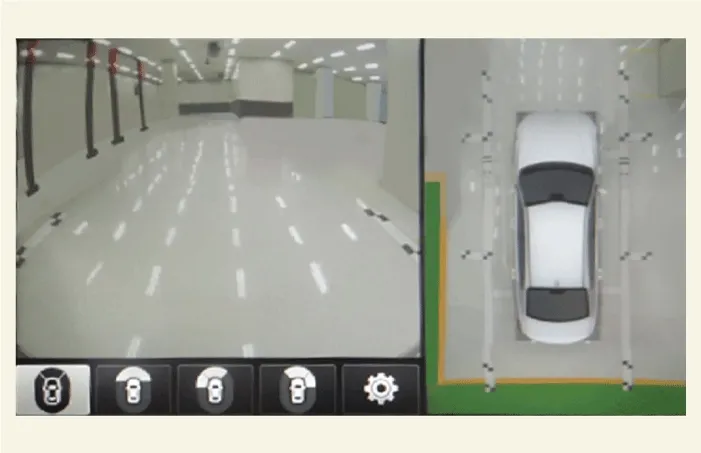
|
|
•
|
Do not fold and store the calibration ruler, calibration reference line, calibration target.
|
|
•
|
Clean any debris found on the SVM rulers, SVM reference lines or the target point before storing
them in their container.
|
|
•
|
The calibration ruler, calibration reference line, and calibration target are rolled into the
enclosed cylindrical roll and stored in a dedicated storage bag.
|
|
Automatic Tolerance Calibration While Driving
| 1. |
Check the following conditions for normal operation of the automatic tolerance calibration while driving.
|
–
|
Check whether the front/rear/left/right sides of the SVM top view are displayed normally.
|
|
–
|
If the image is not displayed normally, check the related parts.
|
|
|
•
|
It shall be carried out in manual mode as possible and shall be carried out only in unavoidable
cases, such as the absence of equipment.
|
|
| 1. |
Perform the order below with the KDS.
(S/W Management → Advanced Driver Assistance System Parking → SVM Self-calibration mode)
|
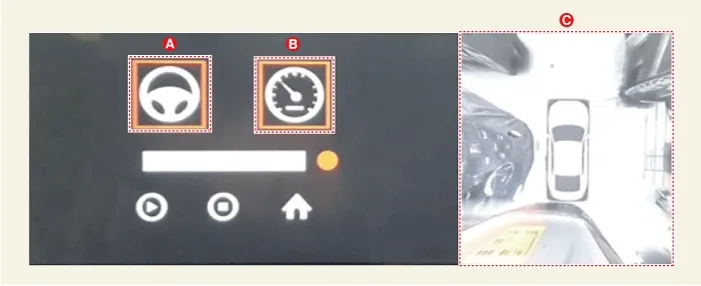
| 2. |
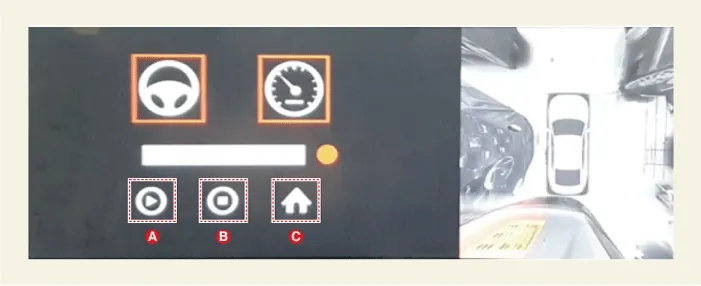
Check the steering angle (A), vehicle speed (B) and SVM top view (C) are displayed normally on the dealer
mode screen.
|
•
|
After entering the automatic tolerance correction while driving, the diagnostic device
entry mode can be terminated by manipulating the MAP and MEDIA buttons.
|
|
•
|
The operating conditions for automatic tolerance correction while driving are steering
wheel steering angle -5 ~ 5° and vehicle speed1 ~ 50 km/h (0.6 ~ 31 mph)
|
|
•
|
When a vehicle is out of the steering angle or vehicle speed the steering wheel symbol (A)
and the speed meter symbol (B) are displayed in red and if the vehicle meets the requirements,
they will be displayed in green.
|
|
•
|
Tolerance calibration is performed only when both the steering wheel symbol and the
speedometer symbol are marked in green.
|
|
|
| 3. |
Move a vehicle to road and select the start button (A) on the dealer mode screen to perform the tolerance
calibration while maintaining constant speed.
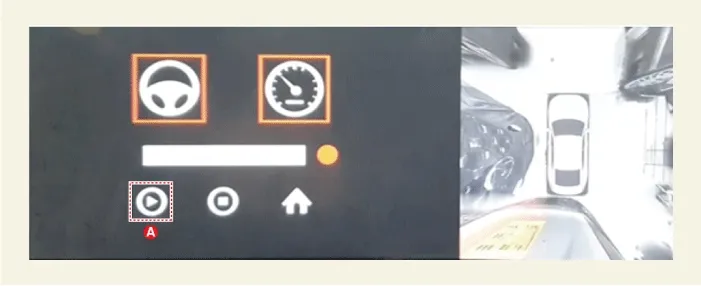
|
•
|
When the steering wheel angle and speed conditions are met, a green border is expressed on
each symbol and calibration is initiated.
|
|
•
|
If the top view is inconsistent after the calibration is completed, press the start button
(A) to re-run.
|
|
|
•
|
Ideal road conditions for tolerance calibration while driving.
|
|
–
|
The center lane of a one-way three-lane road with markers such as arrows, letters, etc. on
the road surface.
|
|
–
|
A flat road which is not uphill/downhill and without slope.
|
|
•
|
Factors that can cause temporary stop or delay of tolerance calibration while driving.
|
|
–
|
Road/environment without feature points.
|
|
–
|
Nighttime, rainfall, snowfall environment.
|
|
–
|
Painted indoor parking lot.
|
|
•
|
Correctable camera distortion limit.
|
|
|
| 4. |
The calibration progress rate while driving can be checked with the status bar (A).
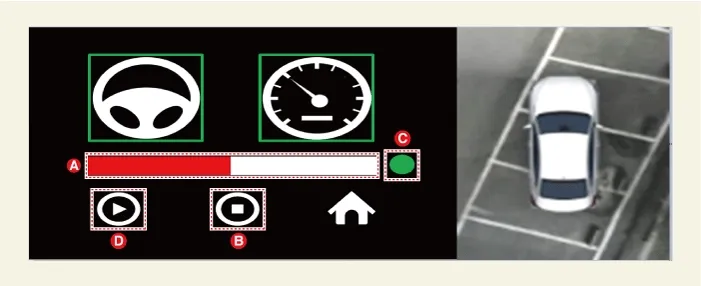
|
•
|
The indicator (C) on the dealer mode screen blinks in green during calibration.
|
|
•
|
It is possible to drive freely without restrictions on the steering angle and vehicle speed
while the calibration is in progress after entering the calibration.
|
|
•
|
The calibration time takes about 2 minutes under ideal conditions.
|
|
•
|
When a start button (D) is pressed during calibration, it can resume from the point of stop
after pause.
|
|
•
|
If the stop button (B) is pressed during calibration, it can be stopped, and if the start
button (D) is pressed again, it can be started from the beginning.
|
|
•
|
When the status bar is filled fully, calibration is completed and the signal light (C) is
displayed in green.
|
|
|
| 5. |
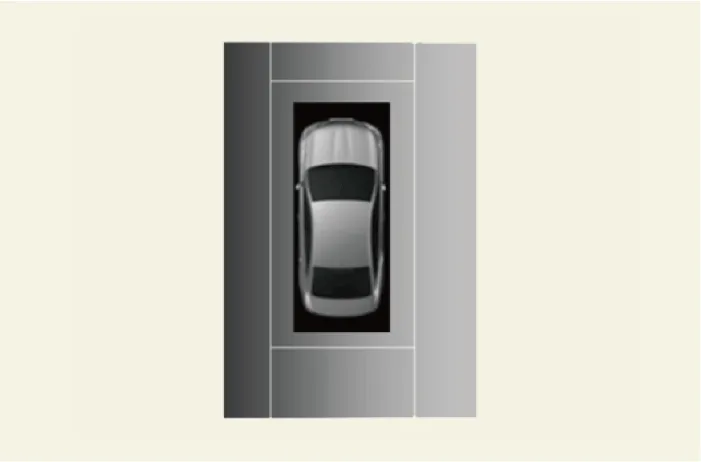
Check the calibration result when the calibration is completed.
Criteria for judging the calibration result : The distortion of the mating surface area at a distance of
1.8 m (5.9 ft) from a vehicle must be within 8 cm (3.15 in).
|
| 6. |
Press the Home button (C) at the end of the calibration function. (The AVNT monitor automatically reboots
at the end of the calibration function)
|
•
|
Do not operate the audio/AVNT monitor button if a pop-up 'Update in progress'
occurs during reboot.
|
|
•
|
To check the calibration results, we recommend a flat and precisely divided parking lot.
|
|
•
|
If the calibration result is not satisfied, perform the automatic tolerance calibration
again while driving.
|
|
–
|
If additional calibration is needed after the saved calibration result, select the start
button (A) to perform it again.
|
|
–
|
After deleting the saved result by selecting the stop button (B), you can perform a new
calibration by selecting start button (A).
|
|
|
Driver Parking Assistance Switch Removal and Installation
Removal
1.
Remove the floor console upper cover.
(Refer to Body - &...



 Wide Angle Camera Removal and Installation
 Driver Parking Assistance Switch Removal and Installation. ADAS Parking ECU (ADAS_PRK) Specification
