 Kia Sorento: Panorama Sunroof Assembly Repair Procedures
|
•
|
Use the tools shown in the figure below to remove the panorama sunroof assembly.
[Tooling Diagram]
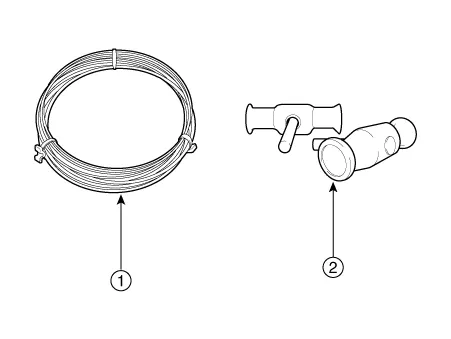

Square wire 
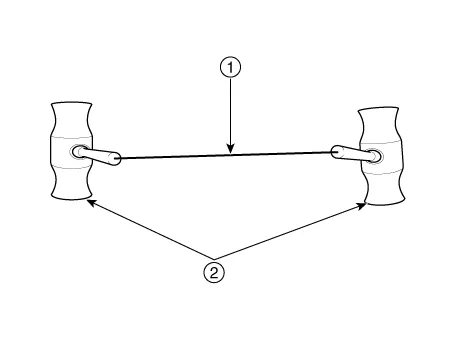
Insert-type wire grip [Tooling Assembly Diagram]
|
|
•
|
Insert and affix square wire
into the insert hole of the wire grip .
|
|
| 1. |
Close the moving glass completely by pressing the panorama sunroof switch.
|
| 2. |
Remove the roof rack.
(Refer to Body Side Molding - "Roof Rack")
|
| 3. |
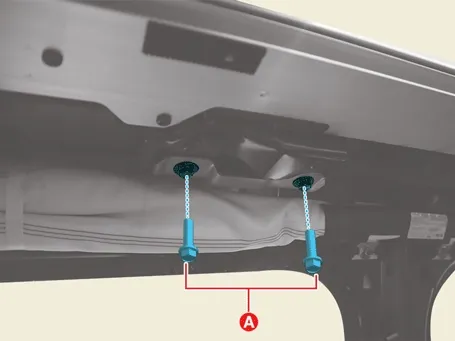
Remove the panorama sunroof side bracket bolts (A).
Tightening torque :
7.8 - 11.8 N·m (0.8 - 1.2 kgf·m, 5.8 - 8.7 lb·ft)
|
|
| 4. |
Remove the panorama sunroof nuts (A).
[Front]
Tightening torque :
7.8 - 11.8 N·m (0.8 - 1.2 kgf·m, 5.8 - 8.7 lb·ft)
|
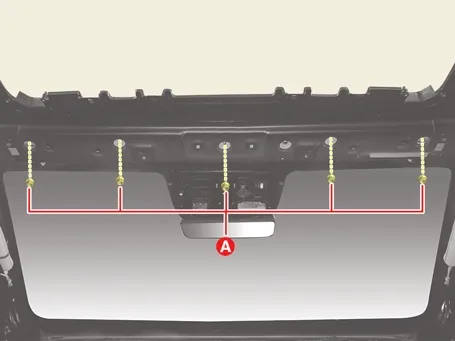
[Rear]
Tightening torque :
7.8 - 11.8 N·m (0.8 - 1.2 kgf·m, 5.8 - 8.7 lb·ft)
|
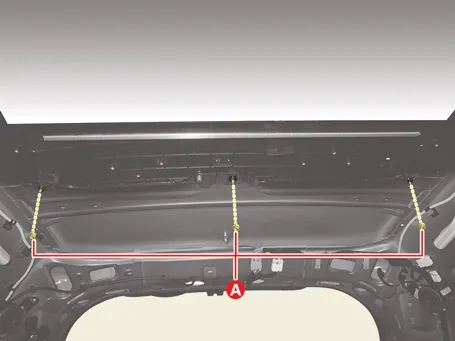
|
| 5. |
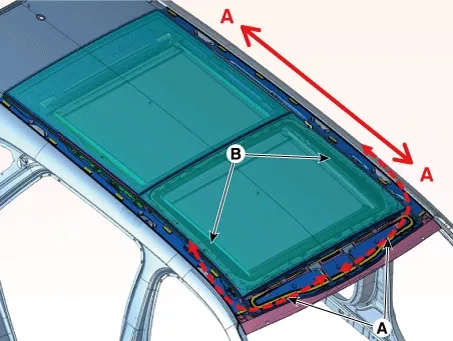
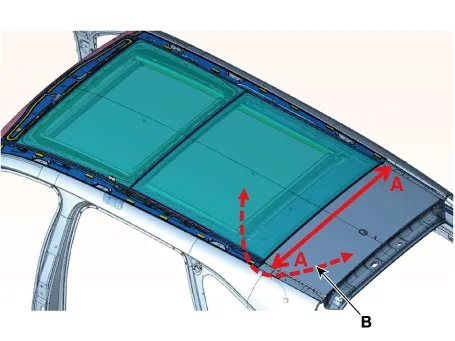
Cut sealant in edge side front (A) pulling wire (B) from left to right.
|
•
|
Put on gloves to prevent hand injuries.
|
|
•
|
Be careful not to burn hands as the excessive heat may be generated while using the wire.
|
|
•
|
Be careful to work caution may be cut off the wire.
|
|
|
•
|
When removing with a flat-tip screwdriver or remover, wrap the tools with protective tape
to prevent the component from damage.
|
|
•
|
Be careful not to damage the body surface.
|
|
|
When using the wires, work at least the two or more people together.
|
|
| 6. |
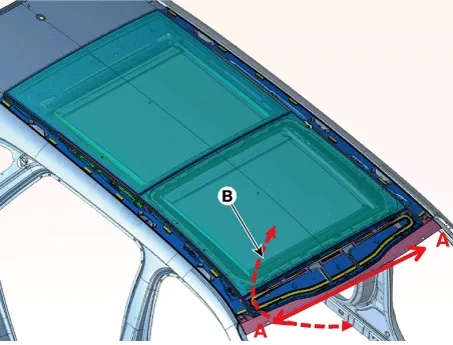
Cut sealant between edge side front (A-A) pulling wire (B) from left to right.
|
•
|
Put on gloves to prevent hand injuries.
|
|
•
|
Be careful not to burn hands as the excessive heat may be generated while using the wire.
|
|
•
|
Be careful to work caution may be cut off the wire.
|
|
|
•
|
Use protective tape when removing parts with screw driver or remover not to damage the
parts.
|
|
•
|
Be careful not to damage the body surface.
|
|
|
More than two people should work together when using wire.
|
|
| 7. |
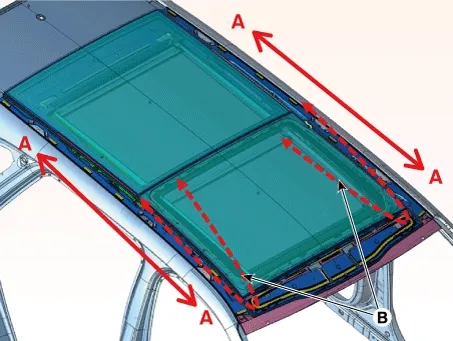
Cut sealant between edge side (A-A) pulling wire (B) from left to right.
|
•
|
Put on gloves to prevent hand injuries.
|
|
•
|
Be careful not to burn hands as the excessive heat may be generated while using the wire.
|
|
•
|
Be careful to work caution may be cut off the wire.
|
|
|
•
|
Use protective tape when removing parts with screw driver or remover not to damage the
parts.
|
|
•
|
Be careful not to damage the body surface.
|
|
|
More than two people should work together when using wire.
|
|
| 8. |
Cut sealant between edge side rear (A-A) pulling wire (B) from left to right.
|
•
|
Put on gloves to prevent hand injuries.
|
|
•
|
Be careful not to burn hands as the excessive heat may be generated while using the wire.
|
|
•
|
Be careful to work caution may be cut off the wire.
|
|
|
•
|
Use protective tape when removing parts with screw driver or remover not to damage the
parts.
|
|
•
|
Be careful not to damage the body surface.
|
|
|
More than two people should work together when using wire.
|
|
| 9. |
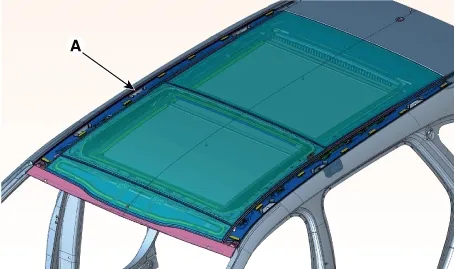
After every edge side sealant has been cut, remove panorama sunroof assembly (A).
|
When removing panorama sunroof, be careful not to damage.
|
|
| 10. |
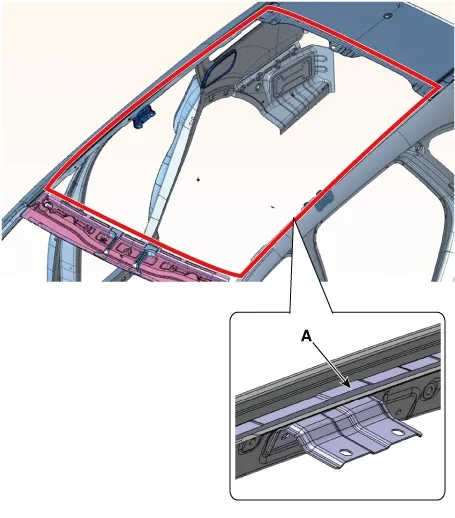
Use a blade to cut off residual sealant (A) around body panel.
|
•
|
Be careful not to damage the body painting surface.
|
|
•
|
If the body painting surface is damaged, apply the repair paint or anti-corrosion agent.
|
|
|
|
•
|
Use the tools shown in the figure below to install the panorama sunroof assembly.
[Tooling Diagram]
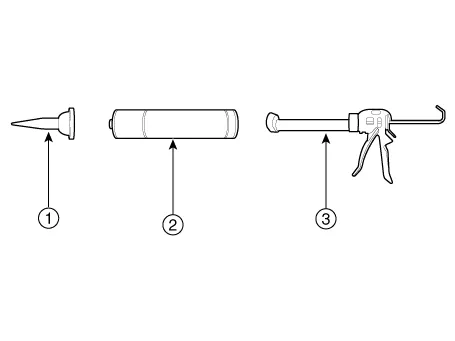
Sealant nozzle
Adhesive sealant only for glass 
Sealant gun |
|
| 1. |
Use alcohol or an air gun to clean up the edges of the body panel and the panorama sunroof.
|
| 2. |
Apply sealant (A) around the body panel using a sealant gun.
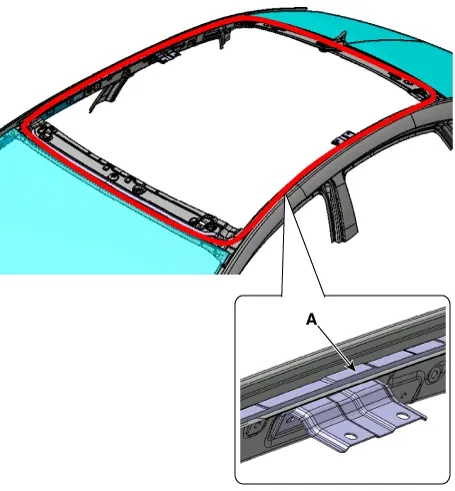
|
| 3. |
Align the guide pin (A) on the sunroof frame to the centering device hole of the body and carefully install
the panorama sunroof on the body flange surface
|
| 4. |
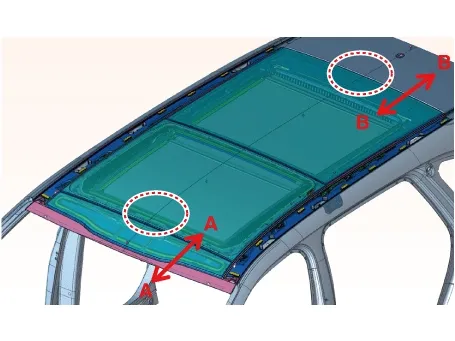
Check steps and gaps for every side after installing the panorama sunroof.
Item
|
Suction
|
Flush
|
Gap
|
Front
|
A - A
|
0.5 to 2.0
|
3.6 to 5.6
|
Rear
|
B - B
|
- 1 to 0.5
|
4 to 6
|
|
| 5. |
Install the panorama sunroof side bracket screws (A).
Tightening torque :
7.8 - 11.8 N·m (0.8 - 1.2 kgf·m, 5.8 - 8.7 lb·ft)
|
|
| 6. |
Install the panorama sunroof screws.
[Front]
[Rear]
|
| 7. |
Test for water leakage.
|
Avoid water flow to touch adhesive surface directly and let water flow to side of the glass.
|
|
| 8. |
If a water leak occurs, apply sealant to the water leak area.
|
•
|
After panorama sunroof is installed vehicle should be parked on flat place 4 hours at
least.
|
|
•
|
If the vehicle needs to be used, drive slowly at least for 8 hours.
|
|
•
|
Advise the driver to avoid aggressive driving or driving on rough roads for 2-3 days after
installing the vision roof frame assembly.
|
|
|
| 9. |
Install the roof rack.
(Refer to Body Side Molding - "Roof Rack")
|
| 10. |
Install the roof trim assembly.
(Refer to Roof Trim - "Roof Trim Assembly")
|
Removal
1.
Remove the mechanism assembly.
(Refer to Panorama Sunroof - "Mechanism Assembly")
2...
Removal
1.
Remove the roof trim.
(Refer to Roof Trim - "Roof Trim Assembly")
2.
...



 Roller Blinds Repair Procedures
 Mechanism Assembly Repair Procedures
