
 Kia Sorento: Jack and tools. Jacking instructions. Removing and storing the spare tire
Jack and tools. Jacking instructions
|
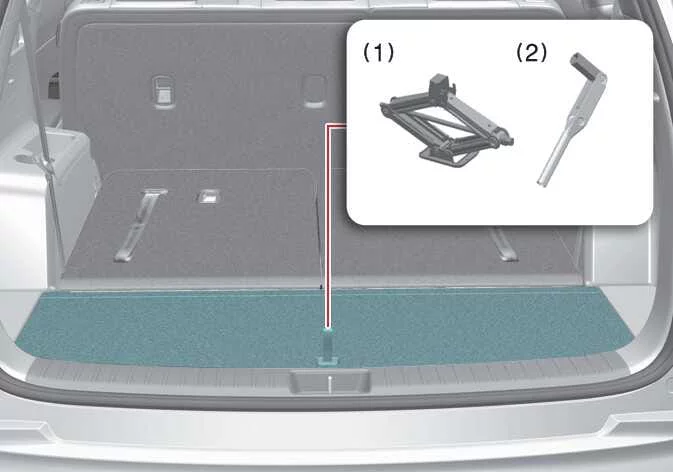
The emergency lifting jack, folding jack handle, and wheel lug nut wrench are securely stowed within dedicated foam slots in the rear luggage compartment.
Lift up the luggage compartment floor board to access this essential equipment:
-
Mechanical lifting jack
-
Wheel lug nut wrench
Jacking instructions
The mechanical jack provided with your Kia Sorento is engineered specifically for emergency tire changes in roadside situations.
-
Always store the lifting jack securely within its designated cargo compartment slot to prevent irritating rattles or shifting when your vehicle is in motion.
-
To reduce the possibility of personal injury, follow the provided jacking instructions.
WARNING
Changing tires
-
Never attempt vehicle repairs or wheel swaps in active traffic lanes of a public road or highway.
-
Always maneuver your Kia Sorento completely off the active roadway and onto a safe, stable shoulder before you attempt to change a flat tire. Position the jack exclusively on firm, level ground. If you cannot find a solid, flat location away from moving traffic, immediately call a professional towing service company for assistance.
-
Be sure to use the correct front and rear jacking positions designated for your specific vehicle frame. Never use the body bumpers, plastic side skirts, or any other structural component of your Kia Sorento for jacking support.
-
Your vehicle can roll off of the jack and cause serious injury or death.
-
Do not go underneath a vehicle supported by a jack.
-
Do not start or run the engine while the vehicle is on the jack.
-
Do not allow anyone to remain in the vehicle while it is on the jack.
-
Make sure any children present are in a secure place away from the road and the vehicle.
WARNING
Tire jack
Never put any part of your body under a Kia Sorento that is supported solely by an emergency mechanical jack, as the vehicle can easily shift or roll off. Always utilize professional vehicle support stands if secondary under-car access is required.
WARNING
Changing tires
Never attempt vehicle repairs in the active traffic lanes of a public road or highway under any circumstances.
WARNING
Running engine on jack
Do not start or run the engine while your Kia Sorento is elevated on the jack, as mechanical vibrations and exhaust pressure changes may cause the vehicle to fall off its support point.
-
Properly store the jack to keep it from rattling when your vehicle is in motion.
TIP
Retreaded tires
Substantial design variations, internal material fatigue, and the advanced age of a retreaded tire's casing structure can severely limit service life and negatively impact driving safety on your Kia Sorento.
Removing and storing the spare tire
|
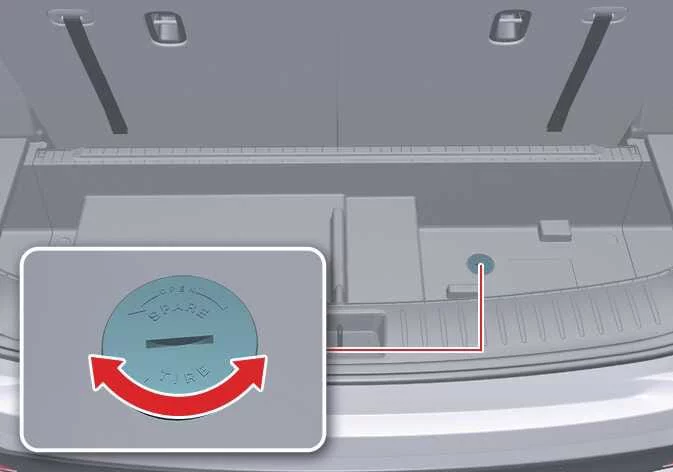
The spare tire on your Kia Sorento is securely mounted underneath the vehicle chassis directly below the rear cargo area.
To remove the spare tire from its underbody storage carrier, follow these step-by-step procedures:
- Open the rear liftgate fully to access the cargo floor.
- Find the spare tire fixing bolt cover and remove the cover.
If necessary, separate the tool case only after removing the retaining clamp.
- Connect the extension socket and wheel lug nut wrench securely.
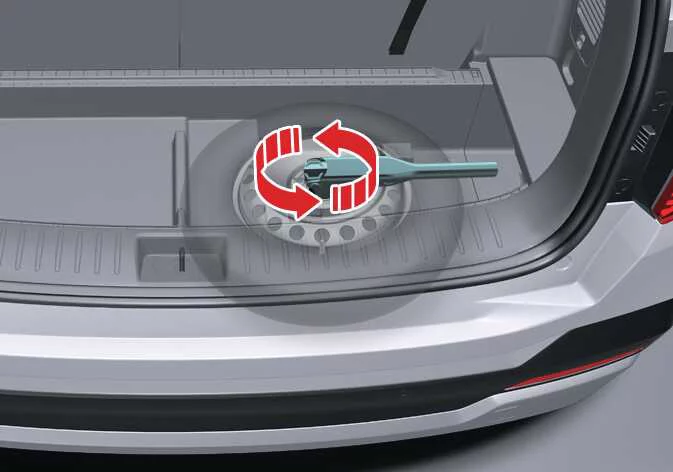
- Use the assembled wheel lug nut wrench to loosen the central lowering bolt enough to release the suspended spare tire.
- Turn the wrench counterclockwise until the spare tire lowers completely and rests flat on the ground.
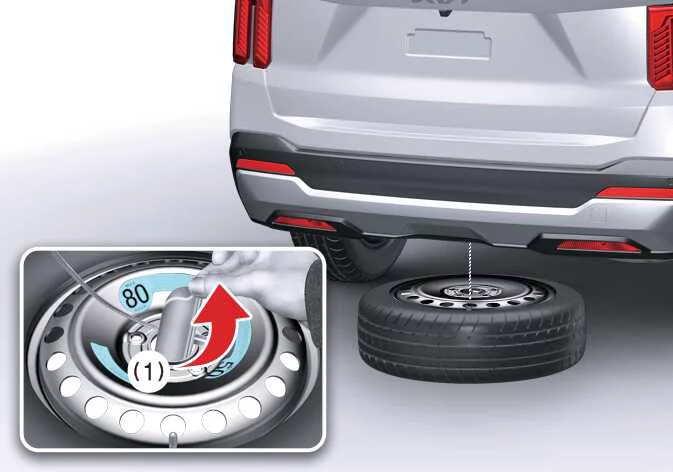
- After the spare tire reaches the ground, continue to turn the wrench counterclockwise and draw the spare tire out. Never rotate the wrench excessively beyond the tension limit, as this may damage the internal spare tire carrier cable mechanism.
- Remove the retainer (1) from the center hub of the spare tire. During tire removal and subsequent reinstallation, try to keep the retainer cable taut to prevent mechanical backlashing or cable binding.
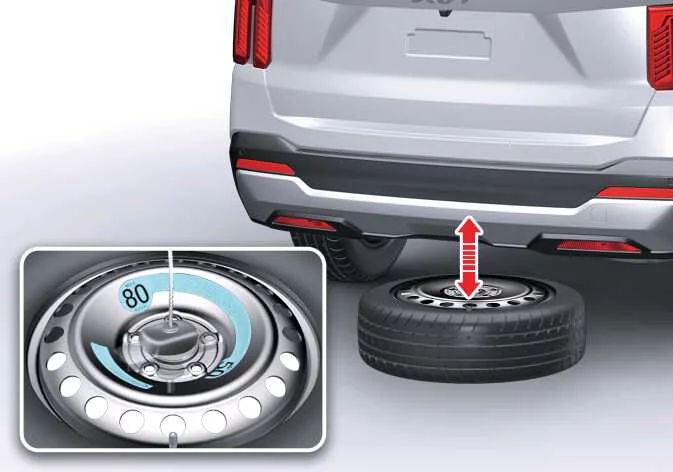
To store the spare tire back into its carrier, follow these steps:
-
Lay the tire flat on the ground with the valve stem facing upward.
-
Slide the wheel back under the vehicle frame and guide the retainer (1) securely through the wheel center opening.
-
Turn the wrench clockwise until you hear a distinct click indicating proper locking tension.
WARNING
Touching surface of the luggage compartment floor
Do not touch the exposed metal surfaces or components of the luggage compartment floor while the engine is running or immediately after driving, as intense residual heat could result in serious bodily burns.
Turn the engine OFF and wait until the exhaust and underbody components cool down completely, or wear protective heavy-duty gloves when accessing the spare tire area on your Kia Sorento.
-
 If you have a flat tire (with spare tire): (if equipped)
 Changing tires
See also:
IPM Description
IPM (Intelligent intergrated Platform Module) receives various
input switch signals ling time and alarm fuctions for fr washer interlocking
wiper, fr intermittent wiper, mist wiper, rea ...
Alternator Removal
1.
Disconnect the battery negative terminal.
2.
Disconnect the air compressor connector (A) and the alternator
connector (B), and remove th ...
EPB malfunction indicator. When the EPB is not released
EPB malfunction indicator
If you press the ENGINE START/STOP button in the ON position, and the engine turns OFF after approximately 3 seconds
while the system is operating normally, the followi ...
Manuals list
- Kia Sorento MQ4 2021-2026 Owners Manual
- Kia Sorento XM 2011-2015 Owners Manual
- Kia Sorento XM 2011-2015 Service Manual
