
 Kia Sorento: Changing tires
WARNING
Because a vehicle can slip or roll off a jack and cause serious injury or death to you or those nearby, you should take the following safety precautions when servicing your Kia Sorento:
-
Never put any part of your body under a vehicle that is only supported by a jack during emergency roadside repairs.
-
Never attempt to change a tire in an active traffic lane. Always move your Kia Sorento completely off of the road onto firm, level ground away from moving traffic before you try to change a tire. If you cannot find a firm, level place off of the road, call a professional towing services company for assistance.
-
Be sure to use the specific lifting jack provided with your vehicle.
-
Be sure to use the correct front and rear jacking positions designated for your Kia Sorento frame. Never use the bumpers or any other fragile structural part of the vehicle for jacking support.
-
Do not start or run the engine while the vehicle is elevated on the jack.
-
Do not allow anyone to remain inside the Kia Sorento while it is supported by the jack.
-
Make sure any children present are in a secure place safely away from the road and the vehicle.
- Park your Kia Sorento on a level, firm surface, fully apply the parking brake, and turn the engine OFF.
- Turn the hazard lights ON to alert other drivers.
- Remove the wheel lug nut wrench, jack, jack handle, and spare tire from their dedicated storage compartments in the vehicle.
- Block both sides of the wheel diagonally opposite the jack position to prevent any accidental rolling.
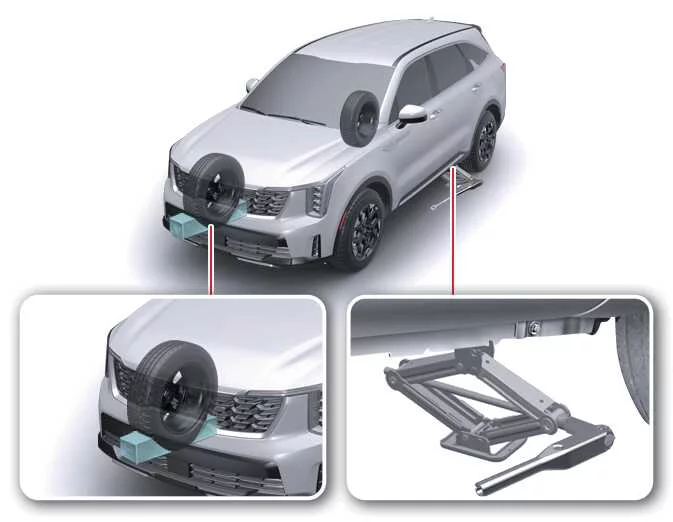
WARNING
Jack location
To reduce the possibility of injury, only use the jack provided with your vehicle in the correct jack position. Never use any other part of the vehicle body for jack support.
WARNING
Changing a tire
-
To prevent vehicle movement while changing a tire on your Kia Sorento, always fully apply the parking brake and block the wheel diagonally opposite the tire you are changing.
-
You should block securely all necessary wheels on the vehicle. No one should remain inside the Kia Sorento when you use the jack.
-
- Loosen the wheel lug nuts counterclockwise one full turn each, but do not remove any of the nuts until the tire is raised completely above the ground.
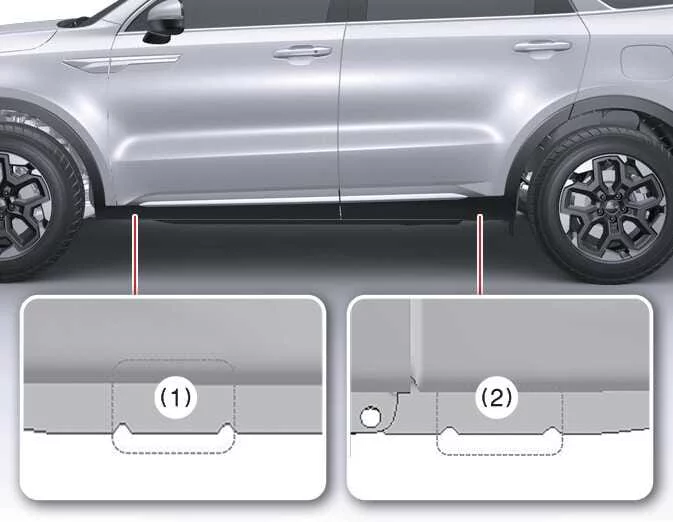
- Place the jack at the front (1) or rear (2) jacking position closest to the tire you are changing. Position the jack precisely at the designated locations under the frame of your Kia Sorento. The jacking positions are reinforced plates welded directly to the frame featuring two alignment tabs and a raised locator dot.
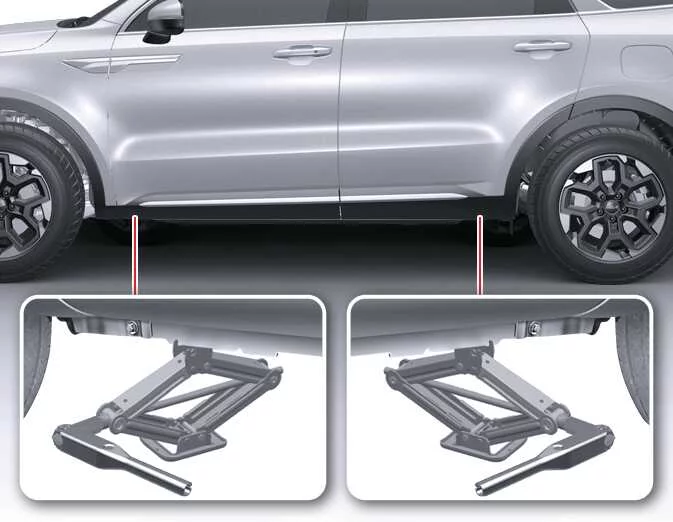
- Insert the jack handle into the mechanical jack mechanism and turn it clockwise, raising the vehicle smoothly until the flat tire just clears the ground (approximately 1.2 inches (30 mm)). Before removing the wheel lug nuts entirely, make sure your Kia Sorento is completely stable and there is no risk of shifting or slipping.
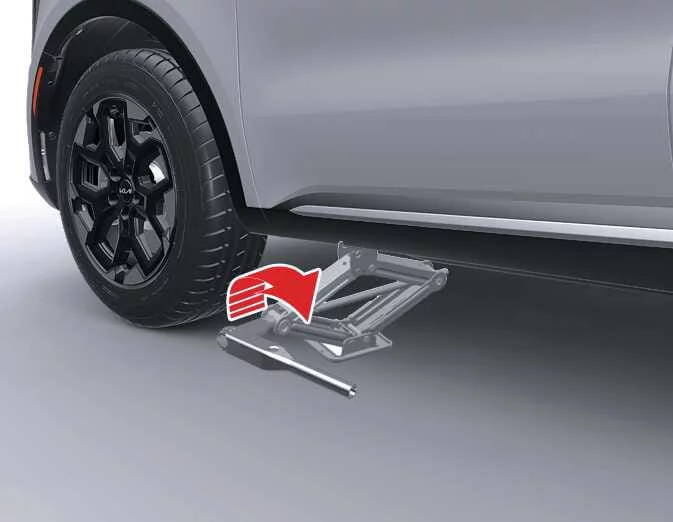
- Loosen the wheel lug nuts completely and remove them with your hands. Slide the flat wheel off the threaded studs and lay it flat on the pavement so it cannot roll away. To mount the replacement wheel, pick up the spare tire, align its bolt holes carefully with the hub studs, and slide the wheel straight into place.
If alignment proves difficult, tilt the wheel slightly and match the top hole in the wheel rim with the topmost stud first. Jiggle the wheel gently back and forth until you can slide it smoothly over the remaining studs.
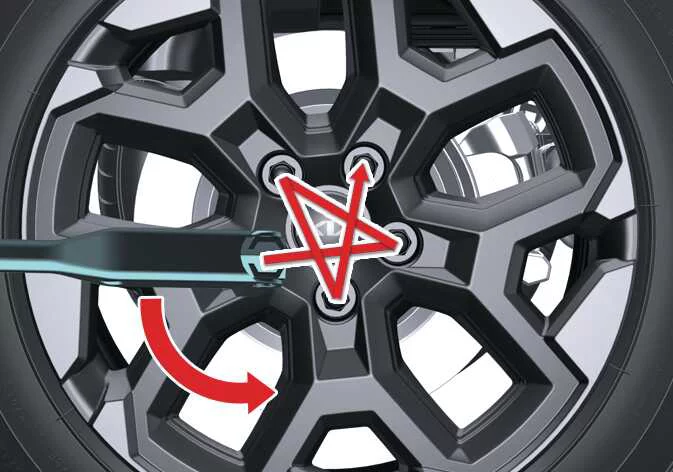
- To reinstall the wheel properly, hold it steady on the studs, thread the wheel lug nuts back on by hand, and turn them clockwise. Jiggle the tire to verify it is completely seated against the hub flange, then tighten the nuts firmly by hand as far as possible.
- To lower your Kia Sorento back down to the ground, turn the wheel nut wrench counterclockwise on the jack screw.
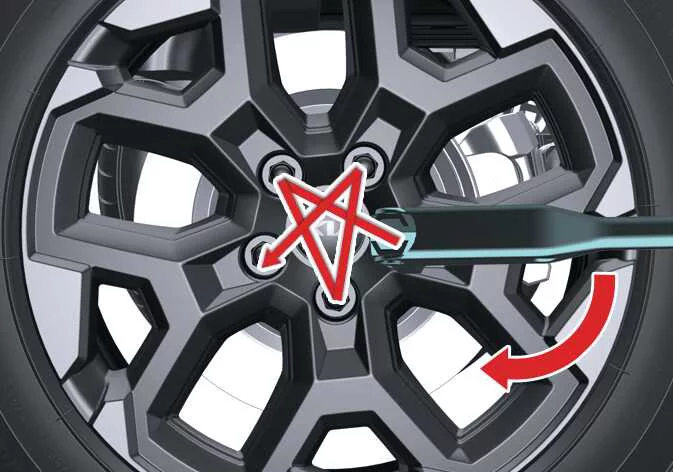
Position the wrench as shown in the illustration above and tighten the wheel nuts securely. Make sure the socket head is seated completely over each nut. Do not stand on the wrench handle or use an extension pipe for extra leverage over the wrench handle. Go in a star pattern around the wheel, tightening every nut systematically. Double check each individual nut to be sure it is fully torqued on the wheel. After you change a wheel on your Kia Sorento, have an authorized Kia service center check and tighten the wheel nuts to their proper factory torque specification as soon as possible.
WARNING
Installing a wheel
-
When you install a wheel on your Kia Sorento, be sure to remove any accumulated corrosion, dirt, road grime, or foreign materials present on the mounting surfaces of the wheel or the mating surface of the wheel hub, brake drum, or brake disc. Secure any retaining fasteners that attach the brake rotor to the hub so they do not interfere with the flat mounting surfaces on the wheel. Installing wheels without correct direct metal-to-metal contact at the wheel mounting interfaces can cause the wheel nuts to loosen and the wheel to detach while your vehicle is in motion. This catastrophic failure could result in sudden loss of vehicle control, severe personal injury, or death.
-
Make sure the replacement wheel makes complete, flush contact with the hub assembly when installed. If the contact of the mounting surface between the wheel and hub is insecure or uneven, the wheel nuts could back loose and cause the detachment of the wheel while driving your Kia Sorento.
-
Wheel nut tightening torque specifications for your Kia Sorento:
Steel wheel and aluminum alloy wheel:
79–94 lbf·ft (11–13 kgf·m)
If you have a portable tire pressure gauge available, remove the valve stem cap and check the current air pressure in the newly mounted tire. If the air pressure is lower than the manufacturer recommendation, drive slowly and carefully to the nearest service station to inflate your tires to the correct pressure level. If the pressure is higher than recommended, release air until it matches specifications. Always reinstall the valve cap securely after you finish checking or adjusting tire pressure on your Kia Sorento. If the protective cap is left off, slow air leakage may occur. If you happen to misplace a valve cap, purchase a replacement and install it promptly.
After you finish changing a wheel, always secure the removed flat tire safely in its designated underbody carrier and return the emergency jack and tools to their proper storage compartments.
NOTE
Reusing lug nuts
When you remove a wheel from your Kia Sorento, make sure the exact same lug nuts that were removed are reinstalled. If you are forced to replace a damaged nut, ensure the replacement component features correct metric threads and an identical chamfer configuration as the original factory hardware. Installing a lug nut lacking proper metric threads will fail to secure the wheel correctly and will permanently strip the wheel stud, requiring a complete stud replacement.
Note that most generic aftermarket lug nuts do not feature proper metric thread pitches. Exercise extreme caution and inspect the thread specifications carefully before installing aftermarket lug nuts or custom wheels on your Kia Sorento. If you have any doubts, consult an authorized Kia dealer for professional guidance.
WARNING
Wheel studs
If the threaded wheel studs are stripped, cracked, or otherwise damaged, they lose their structural ability to hold the wheels securely in place. This dangerous condition could lead to a detached wheel and a severe collision resulting in serious injuries.
WARNING
Never apply lubricating oil, grease, or anti-seize compound onto wheel bolts or lug nuts, as this can cause the fasteners to vibrate loose while driving your Kia Sorento, potentially leading to a detached wheel and a dangerous crash.
 Jack and tools. Jacking instructions. Removing and storing the spare tire
 Understanding the use of a compact spare tire in your Kia Sorento. Understanding your jack label
See also:
Trouble Symptom Charts
Trouble Symptom 1
Trouble Symptom 2
Trouble symptom
Probable cause
Remedy
The set vehicle speed varies greatly upward or downward
"Surgin ...
Evaporator Temperature Sensor Replacement
1.
Disconnect the negative (-) battery terminal.
2.
Remove the heater and blower assembly.
(Refer to Heater - "Heater Unit")
...
Component Replacement After Deployment
Before doing any SRS repairs, use the GDS Pro to check for DTCs.
Refer to the Diagnostic Trouble Code list for repairing ...
Manuals list
- Kia Sorento MQ4 2021-2026 Owners Manual
- Kia Sorento XM 2011-2015 Owners Manual
- Kia Sorento XM 2011-2015 Service Manual
