
 Kia Sorento: Components and Components Location. Water Jacket Insert Repair procedures
Kia Sorento (MQ4, 2021-2026) Service Manual / Engine Mechanical System / Cylinder Block / Components and Components Location. Water Jacket Insert Repair procedures
Components and Components Location
| Components |
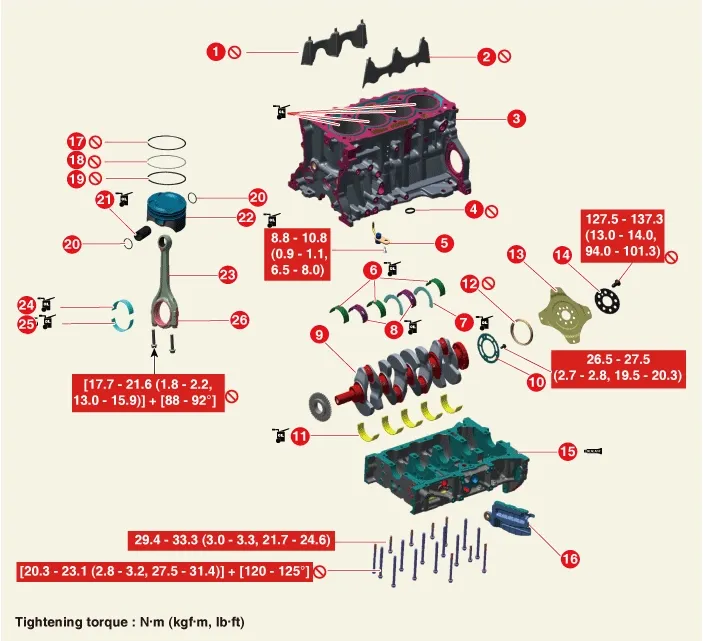
| 1. RH water jacket insert 2. LH water jacket insert 3. Cylinder block 4. O-ring 5. Piston cooling oil jet 6. Crankshaft upper bearing (No.1, 3, 5 journal) 7. Thrust bearing 8. Crankshaft upper bearing (No.2, 4 journal) 9. Crankshaft |
10. Crankshaft position sensor wheel 11. Crankshaft lower bearing 12. Rear oil seal 13. Drive plate 14. Drive plate adaptor 15. Lower crankcase 16. Access hole cover 17. Piston ring (Top ring) 18. Piston ring (2nd ring) |
19. Piston ring (Oil ring) 20. Snap ring 21. Piston pin 22. Piston 23. Connecting rod 24. Connecting rod upper bearing 25. Connecting rod lower bearing 26. Connecting rod bearing cap |
Water Jacket Insert Repair procedures
| Removal and installation |
| 1. |
Remove the cylinder head.
(Refer to Cylinder Head Assembly - "Cylinder Head")
|
| 2. |
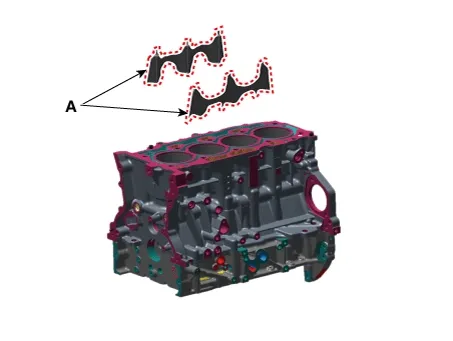
Remove the water jacket insert (A).
|

| 3. |
Install in the reverse order of removal.
|
...
 Cylinder Block
Removal and Installation
1.
Remove the automatic transaxle assembly.
(Refer to Automatic Transaxle System - "Automatic
Transa...
 Drive Plate Repair procedures
See also:
Direct Electro Hydraulic Actuator Coupling Removal
Coupling Maintenance Precautions
Maintain the coupling at a horizontal level.
...
Battery Sensor Description
Vehicles have many control units that use more electricity. These units
control their own system based on information from diverse sensors. It is important
to have a stable power supply as th ...
Windshield Glass Installtion
1.
With a knife, scrape the old adhesive smooth to a thickness of
about 2mm (0.08 in.) on the bonding surface around the entire windshield
opening flange :
...
Manuals list
- Kia Sorento MQ4 2021-2026 Owners Manual
- Kia Sorento XM 2011-2015 Owners Manual
- Kia Sorento XM 2011-2015 Service Manual

Copyright © www.ksmanual.com 2014-2026 - 0.0627