Kia Sorento: Battery Sensor Removal and Installation - Charging System - Engine Electrical SystemKia Sorento: Battery Sensor Removal and Installation

Kia Sorento (MQ4, 2021-2026) Service Manual / Engine Electrical System / Charging System / Battery Sensor Removal and Installation

Removal
1.
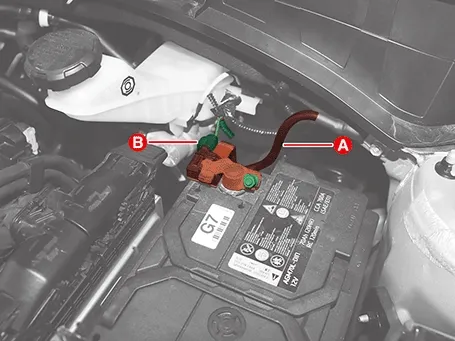
Disconnect the battery negative ( - ) terminal (A) by loosening the mounting nut after disconnecting the connector (B).

Tightening torque :
7.8 - 9.8 N·m (0.8 - 1.0 kgf·m, 5.8 - 7.2 lb·ft)

Engine Electrical System — Charging System / Battery Sensor / Removal and Installation / Removal illustration

2.
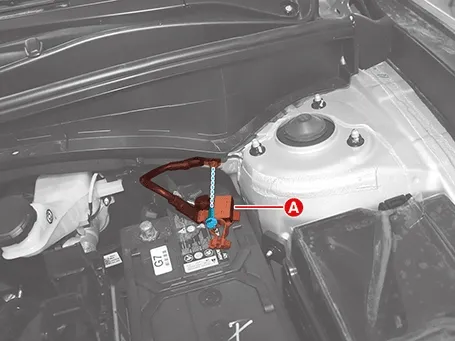
Remove the battery sensor (A) after removing the flange bolt.

Tightening torque :
26.5 - 32.4 N·m (2.7 - 3.3 kgf·m, 19.5 - 23.9 lb·ft)

Engine Electrical System — Charging System / Battery Sensor / Removal and Installation / Removal illustration

Installation
1.
Install in the reverse order of removal.
Note
•
Install battery sensor to the specified torque.
•
If the battery sensor is dropped, it may cause internal damage. (Do not reuse)
•
For the vehicle equipped with a battery sensor, be careful not to damage the battery sensor when the battery is replaced or recharged.
1)
When replacing the battery, it should be same one (type, capacity and brand) that is originally installed on your vehicle. If a battery of a different type is replaced, the battery sensor may recognize the battery to be abnormal.
2)
When installing the ground cable on the negative post of battery, tighten the clamp with specified torque. An excessive tightening torque can damage the PCB internal circuit and the battery terminal .
3)
When recharging the battery, ground the negative terminal of the booster battery to the vehicle body.
•
After reconnecting the battery negative cable, Idle stop & Go (ISG) function does not operates until the system is stabilized, about 4 hours.
Battery Sensor Description and Operation
Description • Vehicles have many control units that use more electricity. These units control their own system based on i...

Ignition System
...
See also:

Rear Assist Arm Inspection
1. Check the bushing for wear and deterioration. 2. Check the rear assist arm for deformation. ...

Clock Spring Installation
Installation 1. Set the clock spring in a neutral position before installation. ...

Passenger Airbag (PAB) Module Components
...

Copyright © www.ksmanual.com 2014-2026 - 0.0704