 Kia Sorento: Parking Brake Lever Assembly Installation
Second Generation XM (2011-2025) / Kia Sorento XM 2011-2025 Service Manual / Brake System / Parking Brake System / Parking Brake Lever Assembly Installation
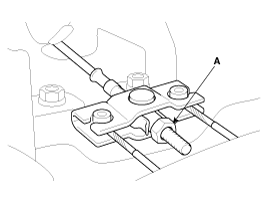
| 1. |
Install the parking brake lever assembly (A).
|
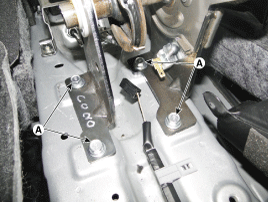
| 2. |
Install the parking brake cable (B) and tighten the adjusting
nut (A).
|
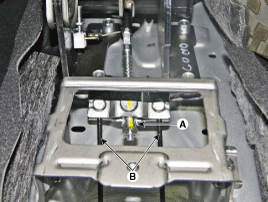
| 3. |
Apply a coating of the specified grease to each sliding parts
(A) of the ratchet plate or the ratchet pawl.
|
| 4. |
Install the parking brake cable adjuster, then adjust the parking
brake lever stroke by turning adjusting nut (A).
|

| 5. |
Release the parking brake lever fully, and check that parking
brakes do not drag when the rear wheels are turned. Readjust if necessary.
|
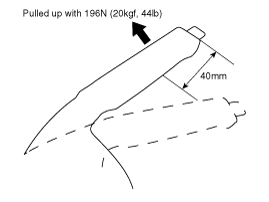
| 6. |
Make sure that the parking brakes are fully applied when the parking
brake lever is pulled up fully.
|
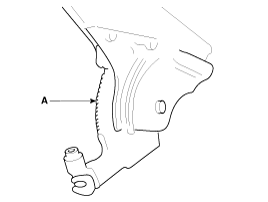
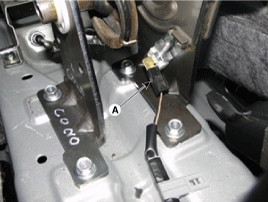
| 7. |
Reconnect the connector (A) of parking brake switch.
|
| 8. |
Install the floor console.
(Refer to Body - "Floor console")
|
 Parking Brake Lever Assembly Removal
The parking brake cables must not be bent or distorted. This will
lead to stiff operation and premature failure.
...
 Parking Brake Lever Assembly Adjustment
Parking Brake Lever Stroke Adjustment
1.
Remove the floor console.
(Refer to Body - "Floor console")
2.
Apply the brake p ...
See also:
Front Disc Brake Removal
1.
Remove the front wheel & tire.
Tightening torque:
88.3 ~107.9 N.m (9.0 ~11.0 kgf.m, 65.1 ~79.6 lb-ft)
...
IPM Trouble Diagnostics When Using GDS
1.
The IPM can be diagnosed by using the GDS. The BCM communicates
with the GDS which then displays inputs and outputs along with codes.
2.
...
Cylinder Head Installation
ŌĆó
Thoroughly clean all parts to be assembled.
ŌĆó
...
Categories
- Home
- First Generation
- Second Generation
- Kia Sorento XM 2011-2025 Owners Manual
- Kia Sorento XM 2011-2025 Service Manual

Copyright ® www.ksmanual.com 2014-2025