 Kia Sorento: Drive Plate Removal and Installation
Second Generation XM (2011-2025) / Kia Sorento XM 2011-2025 Service Manual / Engine Mechanical System / Cylinder Block / Drive Plate Removal and Installation
| 1. |
Remove the automatic transaxle .
(Refer to Automatic Transaxle System - "Automatic Transaxle")
|
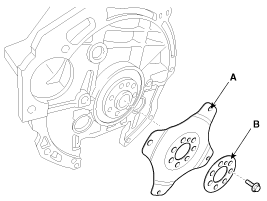
| 2. |
Remove the drive plate (A) and the adapter plate (B).
|

| 3. |
Install in the reverse order of removal.
|
 Components
1. Piston ring
2. Snap ring
3. Piston
4. Connecting rod
5. Connecting rod upper bearing
6. Piston pin
7. Connecting rod lower bearing
8. Connecting rod bearing cap ...
 Rear Oil Seal Removal
1.
Remove the automatic transaxle.
(Refer to Automatic Transaxle System - "Automatic Transaxle")
2.
Remove the drive plate.
...
See also:
Specification
Item
Specification
Coil Resistance (Ω)
0.5 [20┬░C(68┬░F)
...
IMS module Installation
1.
Install the IMS module after reconnecting the connector.
2.
Install the driver seat.
...
Thermostat Removal and Installation
Removal of the thermostat would have an adverse effect, causing a lowering
of cooling efficiency. Do not remove the ther ...
Categories
- Home
- First Generation
- Second Generation
- Kia Sorento XM 2011-2025 Owners Manual
- Kia Sorento XM 2011-2025 Service Manual

Copyright ® www.ksmanual.com 2014-2025