 Kia Sorento: Inside rearview mirror
Adjust the rearview mirror so that the center view through the rear window is seen. Make this adjustment before you start driving.
WARNING - Rear visibility
Do not place objects in the rear seat or cargo area which would interfere with your vision through the rear window.
WARNING
Do not adjust the rearview mirror while the vehicle is moving. This could result in loss of control, and an accident which could cause death, serious injury or property damage.
WARNING
Do not modify the inside mirror and donŌĆÖt install a wide mirror. It could result in injury, during an accident or deployment of the air bag.
Day/night rearview mirror (if equipped)
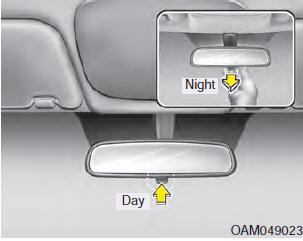 Make this adjustment
before you start driving and while the day/night lever is in the day position.
Pull the day/night lever toward you to reduce the glare from the headlights of the vehicles behind you during night driving.
Remember that you lose some rearview clarity in the night position.
Electric chromic mirror (ECM) with compass
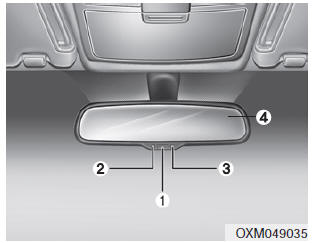
1. Feature Control Button
2. Status Indicator LED
3. Rear Light Sensor
4. Display Window
Automatic-Dimming Night Vision SafetyŌäó (NVS┬«) Mirror
The NVS® Mirror in your vehicle is the most advanced way to reduce annoying glare in the rearview mirror during any driving situation. For more information regarding NVS® mirrors and other applications, please refer to the Gentex website: www.gentex.com
CAUTION
The NVS® Mirror automatically reduces glare during driving conditions based upon light levels monitored in front of the vehicle and from the rear of the vehicle. These light sensors are visible through openings in the front and rear of the mirror case.Any object that would obstruct either light sensor will degrade the automatic dimming control feature.
Automatic-dimming function
Your mirror will automatically dim upon detecting glare from the vehicles traveling behind you. The autodimming function can be controlled by pushing the ON/OFF Button:
1. Pressing the button turns the autodimming function OFF which is indicated by the green Status Indicator LED turning off.
2. Pressing the button again turns the auto-dimming function ON which is indicated by the green Status Indicator LED turning on.
✽ NOTICE
The mirror defaults to the ON position each time the vehicle is started.
Z-NavŌäó Compass Display
The NVSŌäó Mirror in your vehicle is also equipped with a Z-NavŌäó Compass that shows the vehicle Compass heading in the Display Window using the 8 basic cardinal headings (N, NE, E, SE, etc.).
Compass function
The Compass can be turned ON and OFF and will remember the last state when the ignition is cycled. To turn the display feature ON/OFF:
1. Press and release the button to turn the display feature OFF.
2. Press and release the button again to turn the display back ON.
Additional options can be set with press and hold sequences of the button and are detailed below.
There is a difference between magnetic north and true north. The compass in the mirror can compensate for this difference when it knows the Magnetic Zone in which it is operating.
This is set either by the dealer or by the user. The operating Zone Numbers for North America are shown in the figure on the following section.
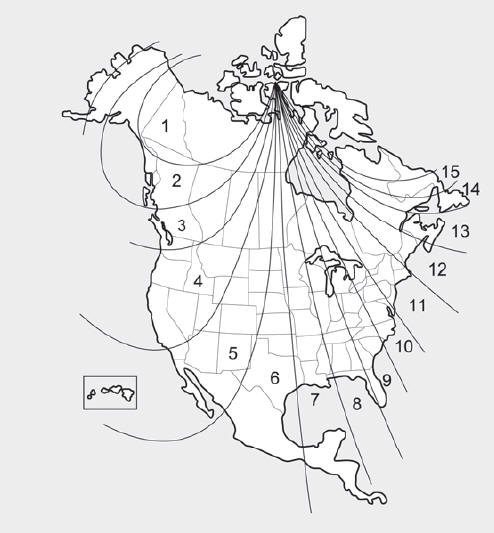
To adjust the Zone setting:
1. Determine the desired Zone Number based upon your current location on the Zone Map.
2. Press and hold the button for more than 3 but less than 6 seconds, the current Zone Number will appear on the display.
3. Pressing and holding the button again will cause the numbers to increment (Note: they will repeat ŌĆ”13, 14, 15, 1, 2, ŌĆ”). Releasing the button when the desired Zone Number appears on the display will set the new Zone.
4. Within about 5 seconds the compass will start displaying a compass heading again.
There are some conditions that can cause changes to the vehicle magnets, such as installing a ski rack or a CB antenna. Body repair work on the vehicle can also cause changes to the vehicle's magnetic field. In these situations, the compass will need to be re-calibrated to quickly correct for these changes. To re-calibrate the compass:
1. Press and hold the button for more than 6 seconds. When the compass memory is cleared a "C" will appear in the display.
2. To calibrate the compass, drive the vehicle in 2 complete circles at less than 5 mph (8 km/h).
Electrochromic mirror with HomeLink system (if equipped)
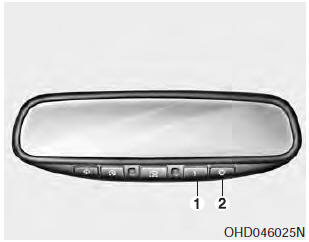
To operate the electric rearview mirror
Press the I button (1) to turn the automatic- dimming function on. The mirror indicator light will illuminate. Press the O button (2) to turn the automatic- dimming function off. The mirror indicator light will turn off.
HomeLink® Wireless Control System
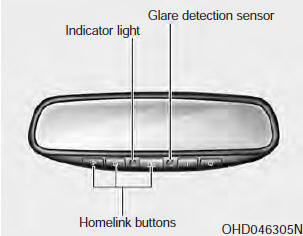
Your new mirror comes with an integrated HomeLink Universal Transceiver, which allows you to program the mirror to activate your garage door(s), estate gate, home lighting, etc. The mirror actually learns the codes from your various existing transmitters.
WARNING
- When programming the HomeLink® Wireless Control System, you may be operating a garage door or gate operator. Make sure that people and objects are out of the way of the moving door or gate to prevent potential harm or damage.
- Do not use HomeLink with any garage door opener that lacks the safety stop and reverse feature as required by federal safety standards. (This includes any garage door opener model manufactured before April 1, 1982.) A garage door opener which cannot detect an object, signaling the door to stop and reverse, does not meet current federal safety standards. Using a garage door opener without these features increases risk of serious injury or death. For more information, call 1-800-355-3515 or on the internet at www.homelink.com.
Retain the original transmitter for future programming procedures (i.e., new vehicle purchase). It is also suggested that upon the sale of the vehicle, the programmed HomeLink buttons be erased for security purposes (follow step 1 in the ŌĆ£ProgrammingŌĆØ portion of this text).
Programming
Your vehicle may require the ignition switch to be turned to the ACC position for programming and/or operation of HomeLink. It is also recommended that a new battery be replaced in the hand-held transmitter of the device being programmed to HomeLink for quicker training and accurate transmission of the radiofrequency.
Follow these steps to train your HomeLink mirror:
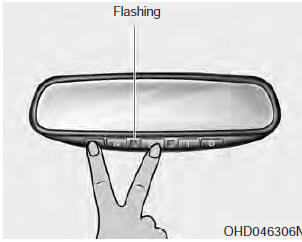
1. When programming the buttons for the first time, press and hold the left and
center buttons (
 ,
,
 ) simultaneously
until the indicator light begins to flash after approximately 20 seconds. (This
procedure erases the factory-set default codes. Do not perform this step when programming
the additional HomeLink buttons.)
✽ NOTICE
For non rolling code garage door openers, follow steps 2 - 3. For rolling code garage door openers, follow steps 2 - 6. For Canadian Programming, please follow the Canadian Programming section. For help with determining whether your garage door opener is nonrolling code or rolling code, please refer to the garage door openers ownerŌĆÖs manual or contact HomeLink customer service at 1- 800-355-3515.
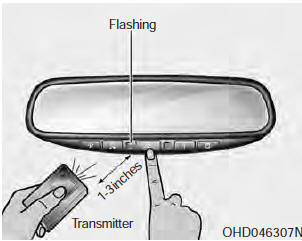
2. Press and hold the button on the HomeLink system you wish to train and the button on the transmitter while the transmitter is approximately 2-8 cm (1 to 3 inches) away from the mirror. Do not release the buttons until step 3 has been completed.
3. The HomeLink indicator light will flash, first slowly and then rapidly. When the indicator light flashes rapidly, both buttons may be released. (The rapid flashing light indicates successful programming of the new frequency signal.)
✽ NOTICE
Some gate and garage door openers may require you to replace step #3 with the ŌĆ£cyclingŌĆØ procedure noted in the ŌĆ£Canadian ProgrammingŌĆØ section of this document.
Rolling code programming
To train a garage door opener (or other rolling code equipped devices) with the rolling code feature, follow these instructions after completing the ŌĆ£ProgrammingŌĆØ portion of this text. (A second person may make the following training procedures quicker & easier.)
4. Locate the ŌĆ£learnŌĆØ or ŌĆ£smartŌĆØ button on the deviceŌĆÖs motor head unit. Exact location and color of the button may vary by product brand. If there is difficulty locating the ŌĆ£learnŌĆØ or ŌĆ£smartŌĆØ button, reference the deviceŌĆÖs ownerŌĆÖs manual or contact HomeLink at 1-800- 355-3515 or on the internet at www.homelink.com.
5. Press and release the ŌĆ£learnŌĆØ or ŌĆ£smartŌĆØ button on the deviceŌĆÖs motor head unit.You have 30 seconds to complete step number 6.
6. Return to the vehicle and firmly press and release the programmed HomeLink button up to three times. The rolling code equipped device should now recognize the HomeLink signal and activate when the HomeLink button is pressed. The remaining two buttons may now be programmed if this has not previously been done. Refer to the ŌĆ£ProgrammingŌĆØ portion of this text.
Operating HomeLink
To operate, simply press the programmed HomeLink button.
Activation will now occur for the trained product (garage door, security system, entry door lock, estate gate, or home or office lighting). For convenience, the hand-held transmitter of the device may also be used at any time. The HomeLink Wireless Controls System (once programmed) or the original hand-held transmitter may be used to activate the device (e.g. garage door, entry door lock, etc.). In the event that there are still programming difficulties, contact HomeLink at 1-800-355-3515 or on the internet at www.homelink.com.
 Mirrors
...
 Erasing programmed HomeLink buttons
To erase the three programmed buttons (individual buttons cannot be erased):
Press and hold the left and center buttons simultaneously, until the indicator
light begins to flash (approximately 20 ...
See also:
Cruise Control Switch Inspection
Measuring Resistance
1.
Disconnect the cruise control switch connector from the control
switch.
2.
Measure resistance between t ...
Anti-Pinch Strip Installation
1.
Install the tailgate anti-pinch strip.
2.
Install the tailgate side trim.
3.
Connect the negative (-) batter ...
Rear Bumper Replacement
ŌĆó
Pry the trim off using a plastic trim tool and apply protective
tape around the rela ...
Categories
- Home
- First Generation
- Second Generation
- Kia Sorento XM 2011-2026 Owners Manual
- Kia Sorento XM 2011-2026 Service Manual
