 Kia Sorento: SRS Control Module (SRSCM) Installation
Second Generation XM (2011-2026) / Kia Sorento XM 2011-2026 Service Manual / Restraint / SRSCM / SRS Control Module (SRSCM) Installation
| 1. |
Remove the ignition key from the vehicle.
|
| 2. |
Disconnect the battery negative cable and wait for at least three
minutes before beginning work.
|
| 3. |
Install the SRSCM with the SRSCM mounting bolts.
|
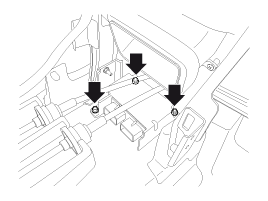

| 4. |
Connect the SRSCM harness connector.
|
| 5. |
Install the rear air vent duct and floor console.
(Refer to Body - "Floor console")
|
| 6. |
Reconnect the battery negative cable.
|
| 7. |
After installing the SRSCM, confirm proper system operation:
|

 SRS Control Module (SRSCM) Removal
1.
Remove the ignition key from the vehicle.
2.
Disconnect the battery negative cable and wait for at least three
minutes before beginning ...
 SRS Control Module (SRSCM) Variant coding
After replacing the SRSCM with a new one, MUST perform the ŌĆ£Variant CodingŌĆØ
procedure.
1.
...
See also:
Installation
1.
Install in the reverse order of removal.
Accelerator pedal module installation
nut:
16.7 ~ 25.5 N.m (1.7 ~ 2.6 kgf.m, 12.3 ~ 18 ...
Specifications
Description
Specifications
Limit
General
Type
In-line, DOHC
Number of cylinders
4
...
Removal
1.
Turn the ignition switch OFF and disconnect the battery negative
(-) cable.
2.
Lift the vehicle.
3.
Dis ...
Categories
- Home
- First Generation
- Second Generation
- Kia Sorento XM 2011-2026 Owners Manual
- Kia Sorento XM 2011-2026 Service Manual

Copyright ® www.ksmanual.com 2014-2026