 Kia Sorento: Direct Electro Hydraulic Actuator Coupling Removal
Second Generation XM (2011-2026) / Kia Sorento XM 2011-2026 Service Manual / 4 Wheel Drive (4WD) System / Coupling Assembly / Direct Electro Hydraulic Actuator Coupling Removal
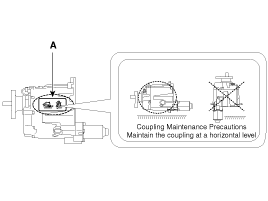
Coupling Maintenance Precautions
Maintain the coupling at a horizontal level.
|

| 1. |
Remove the 4WD coupling assembly bolts (A-3ea) mounted to the
rear propeller shaft (B).
|
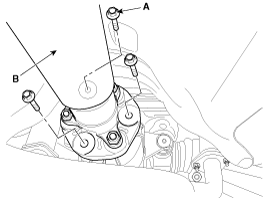
| 2. |
Using a flat tool, separate the propellar shaft from 4WD coupling
assembly.
|
| 3. |
Disconnect the pressure sensor connector (A) and Oil hydraulic
Motor connector (B).
|
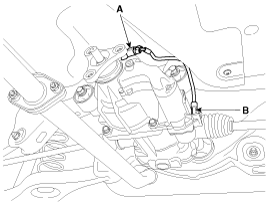
| 4. |
Loosen the coupling assembly mounting bolts (A-4ea).
|

| 5. |
Using a flat tool, separate the 4WD coupling assembly from the
rear differential carrier assembly.
|
 Direct Electro Hydraulic Actuator Coupling Inspection
All units are filled up with coupling fluid (ultra-low viscosity
ATF) prior to shipping. Inspection, fill-up, and replac ...
 Direct Electro Hydraulic Actuator Coupling Installation
1.
Install in the reverse order of removal.
ŌĆó
...
See also:
Signal Waveform
...
Exterior overview
1. Hood
2. Head lamp
3. Fog lamp
4. Wheel and tire
5. Outside rearview mirror
6. Panorama sunroof
7. Front windshield wiper blades
8. Windows
9. Door locks
10. Fuel filler lid
11. Rear c ...
Inspection
1.
Turn ignition switch OFF.
2.
Remove the air duct.
(Refer to Engine Mechanical System - "Air cleaner")
...
Categories
- Home
- First Generation
- Second Generation
- Kia Sorento XM 2011-2026 Owners Manual
- Kia Sorento XM 2011-2026 Service Manual

Copyright ® www.ksmanual.com 2014-2026