 Kia Sorento: Front Wiper Motor Installation
Second Generation XM (2011-2026) / Kia Sorento XM 2011-2026 Service Manual / Body Electrical System / Windshield Wiper/Washer / Front Wiper Motor Installation
| 1. |
Install the wiper motor.
|
| 2. |
Install the crank arm.
|

| 3. |
Install the lower and upper linkage to the wiper motor crank arm.
|
| 4. |
Install the wiper motor and linkage assembly and then connect
the wiper motor connector.
|
| 5. |
Install the cowl top cover.
|
| 6. |
Install the windshield wiper arm and blade.
|

| 7. |
Install the wiper arm and blade to the specified position.
|
| 8. |
Set the cowl top cover on the specified spray position.
|
 Front Wiper Motor Removal
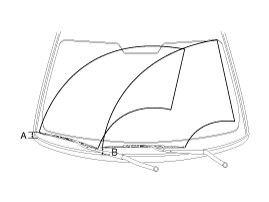
1.
Remove the windshield wiper arm and blade after removing a nut
(B) and wiper cap (A).
2.
Remove the windshield wiper arm and bla ...
 Front Wiper Motor Inspection
Speed Operation Check
1.
Remove the connector (A) from the wiper motor.
2.
Attach the positive (+) lead from the battery to terminal ...
See also:
Fender Replacement
ŌĆó
When removing and installing the hood, an assistant is
necessary.
...
Specifications
ON/OFF Solenoid Valve(SS-A)
▷ Control type : Normal low type
Control pressure kpa
(kgf/cm², psi)
490.33 (5.0, 71.12)
Internal resistance(Ω)
...
Removal
1.
Remove the engine cover.
(Refer to Engine Mechanical System - "Engine cover")
2.
Remove the air cleaner assembly and air du ...
Categories
- Home
- First Generation
- Second Generation
- Kia Sorento XM 2011-2026 Owners Manual
- Kia Sorento XM 2011-2026 Service Manual

Copyright ® www.ksmanual.com 2014-2026