 Kia Sorento: Power Door Lock Actuators Inspection
Second Generation XM (2011-2024) / Kia Sorento XM 2011-2024 Service Manual / Body Electrical System / Power Door Locks / Power Door Lock Actuators Inspection
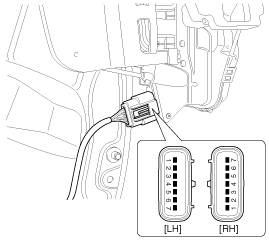
Front Door Lock Actuator
| 1. |
Remove the front door trim.
(Refer to Body - "Front door")
|
| 2. |
Remove the front door module.
(Refer to Body - "Front door")
|
| 3. |
Disconnect the connectors from the actuator.
|
| 4. |
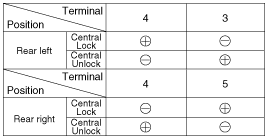
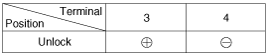
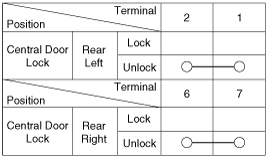
Check actuator operation by connecting power and ground according
to the table. To prevent damage to the actuator, apply battery voltage
only momentarily.
|

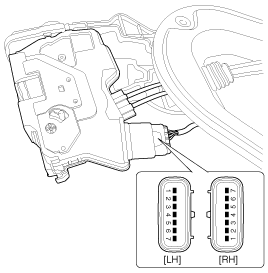
Rear Door Lock Actuator
| 1. |
Remove the rear door trim.
(Refer to Body - "Rear door")
|
| 2. |
Remove the rear door module.
(Refer to Body - "Rear door")
|
| 3. |
Disconnect the connectors from the actuator.
|
| 4. |
Check actuator operation by connecting power and ground according
to the table. To prevent damage to the actuator, apply battery voltage
only momentarily.
|
Tailgate Lock Actuator Inspection
| 1. |
Remove the tailgate trim.
(Refer to Body - "Tailgate")
|
| 2. |
Disconnect the 4P connector from the actuator.
|
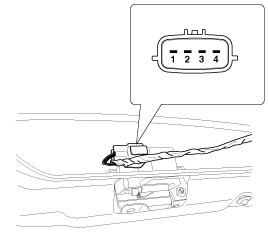
| 3. |
Check actuator operation by connecting power and ground according
to the table. To prevent damage to the actuator, apply battery voltage
only momentarily.
|
Front Door Lock Switch
| 1. |
Remove the front door trim.
(Refer to Body - "Front door")
|
| 2. |
Remove the front door module.
(Refer to Body - "Front door")
|
| 3. |
Disconnect the connectors from the actuator.
|
| 4. |
Check for continuity between the terminals in each switch position
when inserting the key into the door according to the table.
|

Rear Door Lock Switch
| 1. |
Remove the rear door trim.
(Refer to Body - "Rear door")
|
| 2. |
Remove the rear door module.
(Refer to Body - "Rear door")
|
| 3. |
Disconnect the connectors from the actuator.
|
| 4. |
Check for continuity between the terminals in each switch position
according to the table.
|
Tailgate Switch
| 1. |
Remove the tailgate trim.
(Refer to Body - "Tailgate")
|
| 2. |
Disconnect the 4P connector from the actuator.
|
| 3. |
Check for continuity between the terminals in each switch position
according to the table.
|

 Component Location
1. Driver power window main switch
2. Passenger window switch
3. IPM (Intalligent intergrated Platform Module)
4. Door lock switch
5. Tailgate lock actuator & switch
...
 Power Door Lock Switch Removal
Driver Power Window Main Switch
1.
Disconnect the negative battery terminal.
2.
Remove the front door trim.
(Refer to Body - "F ...
See also:
Auto Light Switch Inspection
Operate the auto light switch, then check for continuity between terminals
of multi-function switch connector.
...
Seat Belt Pretensioner (BPT) Installation
1.
Remove the ignition key from the vehicle.
2.
Disconnect the battery negative cable and wait for at least thirty
seconds.
...
Head Lamps Component (2)
1. Head lamp assembly
2. Head lamp high beam bulb
3. Head lamp low beam bulb (HID & ignitor)
4. Dust cap
5. Turn signal lamp socket & bulb
...
Copyright © www.ksmanual.com 2014-2024