 Kia Sorento: Intake Actuator Inspection
Second Generation XM (2011-2024) / Kia Sorento XM 2011-2024 Service Manual / Heating,Ventilation And Air Conditioning / Blower / Intake Actuator Inspection
| 1. |
Turn the ignition switch OFF.
|
| 2. |
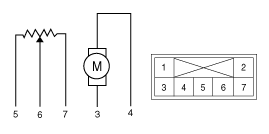
Disconnect the intake actuator connector.
|
| 3. |
Verify that the intake actuator operates to the fresh position
when connecting 12V to terminal 3 and grounding terminal 4.
Verify that the intake actuator operates to the recirculation
position when connected in reverse.
|
| 4. |
Connect the intake actuator connector.
|
| 5. |
Turn the ignition switch ON.
|
| 6. |
Check the voltage between terminal 6 and 7.
Specification
It will feedback the current position of the actuator to controls.
|
| 7. |
If the intake actuator does not operate well, substitute with
a known-good intake actuator and check for proper operation.
|
| 8. |
Replace the intake actuator if it is proved that there is a problem
with it.
|
 Intake Actuator Description
The intake actuator is located at the blower unit. It regulates the intake
door by a signal from the control unit. Pressing the intake selection switch
will shift between recirculation and fr ...
 Intake Actuator Replacement
1.
Disconnect the negative (-) battery terminal.
2.
Remove the cowl side trim.
(Refer to Body - "Crash Pad")
...
See also:
Engine Room Under Cover Components
1. Under Cover
2. Side Cover (RH)
3. Side Cover (LH)
...
Windshield wipers
Operates as follows when the ignition switch is turned ON.
MIST/ :
For a single wiping cycle, move the lever to this (MIST/ ) position andrelease
it. The wipers will operate continuously if the l ...
SRS Control Module (SRSCM) Removal
1.
Remove the ignition key from the vehicle.
2.
Disconnect the battery negative cable and wait for at least three
minutes before beginning ...
Copyright © www.ksmanual.com 2014-2024