 Kia Sorento: Front Wiper Motor Installation
Second Generation XM (2011-2024) / Kia Sorento XM 2011-2024 Service Manual / Body Electrical System / Windshield Wiper/Washer / Front Wiper Motor Installation
| 1. |
Install the wiper motor.
|
| 2. |
Install the crank arm.
|

| 3. |
Install the lower and upper linkage to the wiper motor crank arm.
|
| 4. |
Install the wiper motor and linkage assembly and then connect
the wiper motor connector.
|
| 5. |
Install the cowl top cover.
|
| 6. |
Install the windshield wiper arm and blade.
|

| 7. |
Install the wiper arm and blade to the specified position.
|
| 8. |
Set the cowl top cover on the specified spray position.
|
 Front Wiper Motor Removal
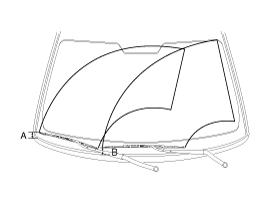
1.
Remove the windshield wiper arm and blade after removing a nut
(B) and wiper cap (A).
2.
Remove the windshield wiper arm and bla ...
 Front Wiper Motor Inspection
Speed Operation Check
1.
Remove the connector (A) from the wiper motor.
2.
Attach the positive (+) lead from the battery to terminal ...
See also:
Timing Chain Cover Removal
•
Use fender covers to avoid damaging painted surfaces.
•
...
Adjustment
Description
The friction material inside the coupling will degrade over time. Therefore,
corresponding compensation values must be referenced and entered after replacing
the cont ...
Fuse/relay panel description
Inside the fuse/relay panel covers, you can find the fuse/relay label describing
fuse/relay name and capacity.
✽ NOTICE
Not all fuse panel descriptions in this manual may be applicable to ...
Copyright © www.ksmanual.com 2014-2024