 Kia Sorento: Dynamic Damper Removal
Second Generation XM (2011-2024) / Kia Sorento XM 2011-2024 Service Manual / Driveshaft and axle / Driveshaft Assembly / Dynamic Damper Removal
| 1. |
Remove the front driveshaft.
(Refer to Driveshaft Assembly - “Front Driveshaft”)
|
| 2. |
Remove the TJ joint assembly.
(Refer to Driveshaft Assembly - “TJ Joint”)
|
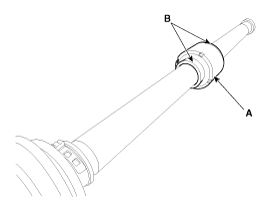
| 3. |
Remove the remove the both side of band (B) of the dynamic damper
(A).
|
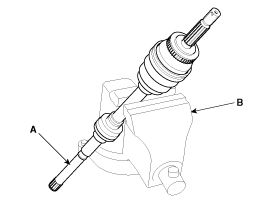
| 4. |
Fix the driveshaft (A) with a vice (B) as illustrated.
|
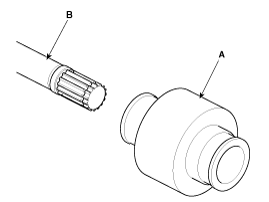
| 5. |
Apply soap powder on the shaft to prevent being damaged between
the shaft spline and the dynamic damper when the dynamic damper is removed.
|
| 6. |
Seperate the dynamic damper (A) from the shaft (B) carefully.
|
 Dynamic Damper Components
1. BJ assembly
2. BJ circlip
3. BJ boot band
4. BJ boot
5. Dynamic damper band
6. Dynamic damper
7. Shaft
8. TJ boot band
9. TJ boot
10. Spider assembly
...
 Dynamic Damper Installation
1.
Apply soap powder on the shaft to prevent being damaged between
the shaft spline and the dynamic damper.
2.
Install the dynamic damper.
...
See also:
Balance Shaft & Oil Pump Installation
BSM(Balance Shaft Module) Chain System
1.
The key of crankshaft should be aligned with the mating face of main
bearing cap. As a result of this, the piston of No.1 cylinde ...
Evaporator Temperature Sensor Replacement
1.
Disconnect the negative (-) battery terminal.
2.
Remove the heater and blower assembly.
(Refer to Heater - "Heater Unit")
...
Auto Defogging Sensor Description
The auto defogging sensor is installed on the front window glass. The
sensor judges and sends signal if moisture occurs to blow out wind for defogging.
The air conditioner control module rece ...
Copyright © www.ksmanual.com 2014-2024