 Kia Sorento: Inspection
| 1. |
Remove the front door trim.
(Refer to Body - "Front door")
|
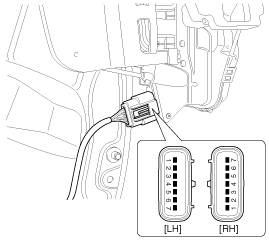
| 2. |
Remove the front door module.
(Refer to Body - "Front door")
|
| 3. |
Disconnect the connectors from the actuator.
|
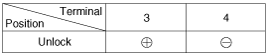
| 4. |
Check actuator operation by connecting power and ground according
to the table. To prevent damage to the actuator, apply battery voltage
only momentarily.
|

| 1. |
Remove the rear door trim.
(Refer to Body - "Rear door")
|
| 2. |
Remove the rear door module.
(Refer to Body - "Rear door")
|
| 3. |
Disconnect the connectors from the actuator.
|
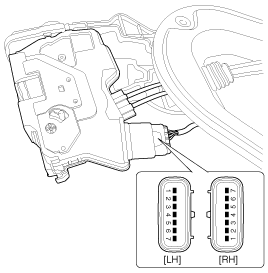
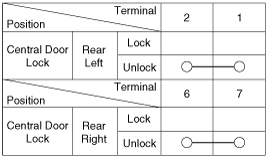
| 4. |
Check actuator operation by connecting power and ground according
to the table. To prevent damage to the actuator, apply battery voltage
only momentarily.
|
| 1. |
Remove the tailgate trim.
(Refer to Body - "Tailgate")
|
| 2. |
Disconnect the 4P connector from the actuator.
|
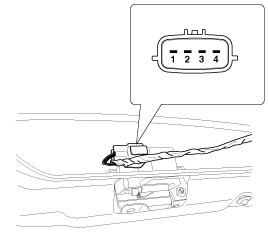
| 3. |
Check actuator operation by connecting power and ground according
to the table. To prevent damage to the actuator, apply battery voltage
only momentarily.
|
| 1. |
Remove the front door trim.
(Refer to Body - "Front door")
|
| 2. |
Remove the front door module.
(Refer to Body - "Front door")
|
| 3. |
Disconnect the connectors from the actuator.
|
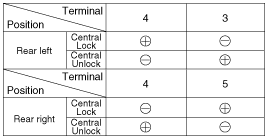
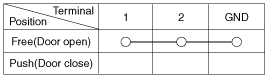
| 4. |
Check for continuity between the terminals in each switch position
when inserting the key into the door according to the table.
|

| 1. |
Remove the rear door trim.
(Refer to Body - "Rear door")
|
| 2. |
Remove the rear door module.
(Refer to Body - "Rear door")
|
| 3. |
Disconnect the connectors from the actuator.
|
| 4. |
Check for continuity between the terminals in each switch position
according to the table.
|
| 1. |
Remove the tailgate trim.
(Refer to Body - "Tailgate")
|
| 2. |
Disconnect the 4P connector from the actuator.
|
| 3. |
Check for continuity between the terminals in each switch position
according to the table.
|

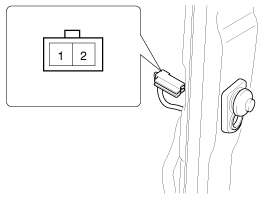
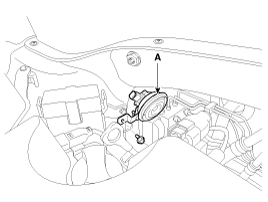
| 1. |
Disconnect the connector (A) and bolt from the hood switch.
|
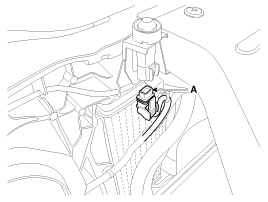
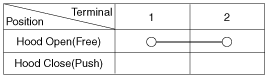
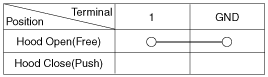
| 2. |
Check for continuity between the terminals and ground according
to the table.
[2P Connector]
[1P Connector]
|
| 1. |
Remove the burglar horn after removing a bolt and disconnect the
2P connector from the burglar horn.
|
| 2. |
Test the burglar horn by connecting battery power to the terminal
1 and ground the terminal 2.
|
| 3. |
The burglar horn should make a sound. If the burglar horn fails
to make a sound replace it.
|
 Description
Burglar Alarm State [B/A State]
B/A State
Description
DISARM
1.
In "DISARM" state, no vehicle start inhibition. So, whe ...
 Transmitter Inspection
1.
Check that the red light flickers when the door lock or unlock
button is pressed on the transmitter.
2.
Remove the battery (A) and check ...
See also:
Seat warmer (if equipped)
The seat warmer is provided to warm the front seats during cold weather.
With the ignition switch in the ON position, push either of the switches to warm
the driver's seat or the front passeng ...
ECM Problem Inspection Procedure
1.
TEST ECM GROUND CIRCUIT: Measure resistance between ECM and chassis
ground using the backside of ECM harness connector as ECM side check
point. If the problem is fo ...
Vehicle break-in process
No special break-in period is needed. By following a few simple precautions for
the first 600 miles (1,000 km) you may add to the performance, economy and life
of your vehicle.
Do not race the e ...