Kia Sorento: Rear Brake Caliper Repair procedures - Brake System - Brake SystemKia Sorento: Rear Brake Caliper Repair procedures

Kia Sorento (MQ4, 2021-2026) Service Manual / Brake System / Brake System / Rear Brake Caliper Repair procedures

Removal
1.
Release the parking brake.
•
EPB Apply : Perform the order below with the KDS.
(S/W Management → ABSESP - Braking Control → Brake Pad Change Mode)
Information
Refer to the KDS screen for operating conditions and details
•
EPB None Apply : Release the parking brake pedal and parking brake cable is loose.
2.
Disconnect the (-) battery terminal.
3.
Remove the rear wheel and tire.
(Refer to Suspension System - "Wheel")
4.
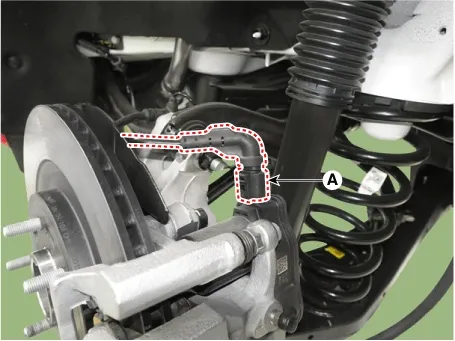
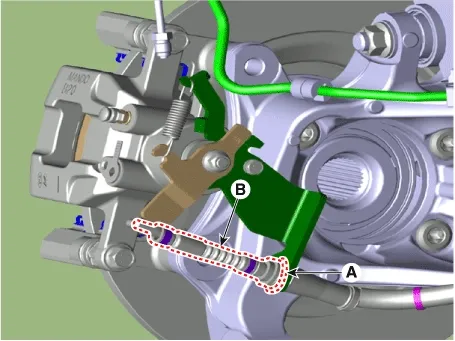
Disconnect the EPB connector or parking brake cable.
•
EPB Apply : Disconnect the EPB connector (A).

Brake System — Brake System / Rear Brake Caliper / Repair procedures / Removal illustration

•
EPB None Apply : Remove the parking brake cable (B), after removing the clip (A).

Brake System — Brake System / Rear Brake Caliper / Repair procedures / Removal illustration

5.
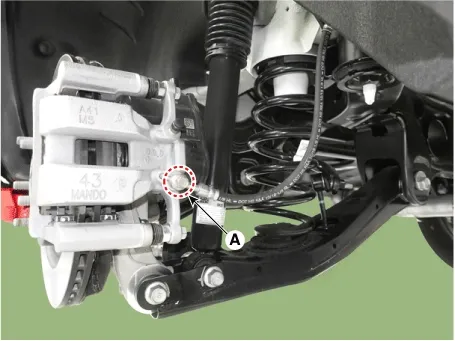
Disconnect the brake hose from the caliper by removing the bolt (A).

Tightening torque :
24.5 - 29.4 N·m (2.5 - 3.0 kgf·m, 18.1 - 21.7 lb·ft)

Brake System — Brake System / Rear Brake Caliper / Repair procedures / Removal illustration

Note
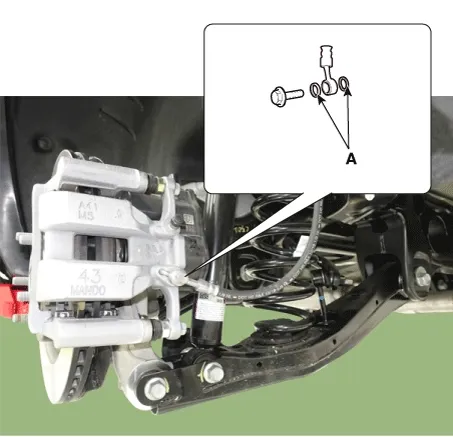
Do not reuse the brake hose washer (A).

Brake System — Brake System / Rear Brake Caliper / Repair procedures / Removal illustration

6.
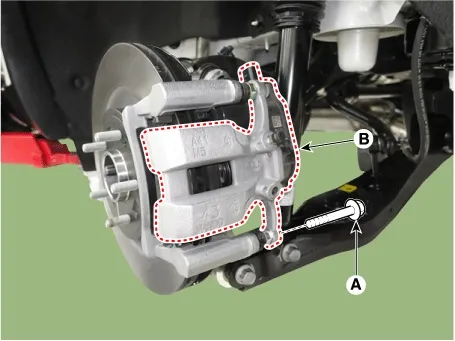
Remove the guide rod bolt (A) and then pivot the caliper body (B) up out of the way.

Tightening torque :
37.2 - 41.1 N·m (3.8 - 4.2 kgf·m, 27.4 - 30.3 lb·ft)

Brake System — Brake System / Rear Brake Caliper / Repair procedures / Removal illustration

7.
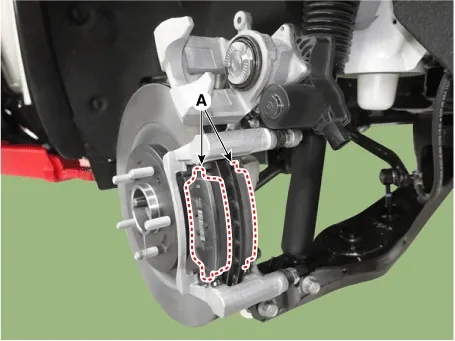
Remove the brake pad (A).

Brake System — Brake System / Rear Brake Caliper / Repair procedures / Removal illustration

8.
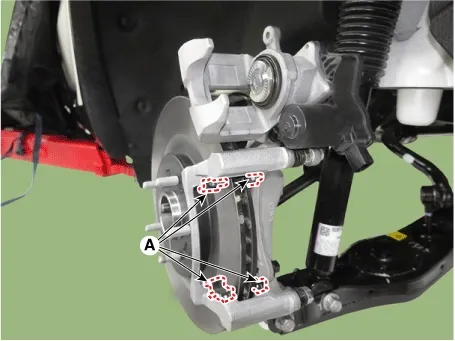
Remove the pad retainer (A).

Brake System — Brake System / Rear Brake Caliper / Repair procedures / Removal illustration

9.
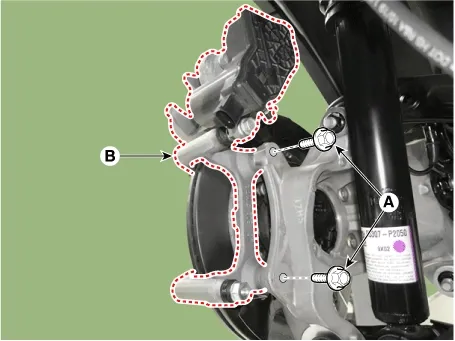
Remove the caliper carrier (B) by removing the flange bolts (A).

Tightening torque :
98.1 - 117.6 N·m (10.0 - 12.0 kgf·m, 72.3 - 86.8 lb·ft)

Brake System — Brake System / Rear Brake Caliper / Repair procedures / Removal illustration

Note
Do not reuse the flange bolts.
Installation
1.
Install in the reverse order of removal.
Note
•
Be careful not to tilt the piston when inserting the piston.
•
Press the piston by rotating it clockwise. [EPB Apply]
•
Press the piston clockwise using a SST (09580-0U000). [EPB None Apply]
•
Do not apply excessive force when inserting the piston.
•
Rotate the piston slowly to prevent damage to the piston boot.
•
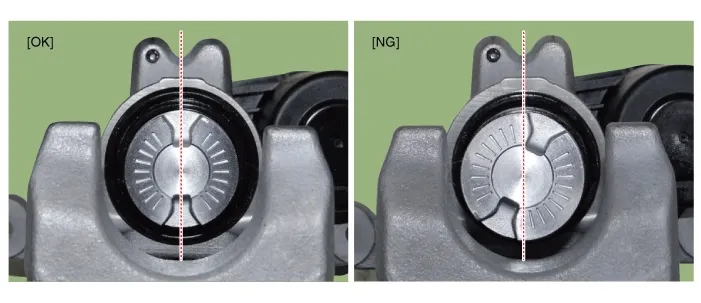
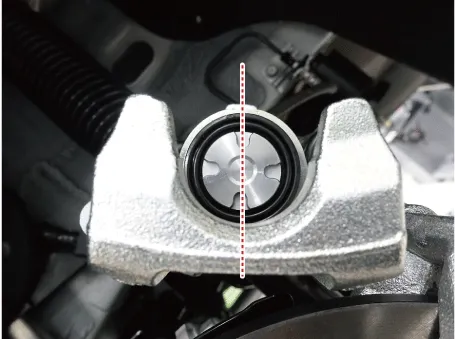
Before installing the caliper body, check the position of the piston groove.
[EPB Apply]

Brake System — Brake System / Rear Brake Caliper / Repair procedures / Installation illustration

[EPB None Apply]

Brake System — Brake System / Rear Brake Caliper / Repair procedures / Installation illustration

2.
After filling the brake reservoir with brake fluid, bleed the brake system.
(Refer to Brake system - "Brake Bleeding Procedures")
3.
After installing the rear caliper, perform “Brake Pad Replacement Mode” using the KDS.
Note
•
EPB Apply : Perform the order below with the KDS.
(S/W Management → ABSESP - Braking Control → Brake Pad Change Mode)
Information
Refer to the KDS screen for operating conditions and details
•
EPB None Apply : After disassembling/assembling the caliper body or replacing the brake caliper, parking brake cable or brake disc, re-adjust the parking brake.
(Refer to Parking Brake System - "Parking Brake Pedal Assembly")
4.
Apply the parking brake several times and check for normal operation.
5.
Check for spilled brake oil and quickly clean to prevent surface damage.
6.
Check if the parking brake is operating normally.
Rear Brake Caliper Components and Components Location
Components [EPB Apply] 1. EPB Actuator screw2. EPB Actuator3. Guide rod bolt4. Bleed screw5. Caliper body6. Guide rod pin7. G...

Rear Brake Disc Components and Components Location
Components [EPB Apply] 1. Rear brake disc2. Rear hub carrier 3. Rear brake caliper [EPB None Apply] 1. Rear brake disc2. ...

See also:

Special Service Tools
Tool (Number and name) Illustration Use Crankshaft front oil seal installer (09214-2W100) (09231-H1100) Installation of the front oil sea ...

Specification
Item Specification Ultrasonic sensor Voltage rating DC 12 V Detecting range 30 cm ~ 120 cm Operation voltage DC 9 ~ 16 ...

Radiator Removal and Installation
1. Disconnect the battery terminals. 2. Remove the air cleaner assembly. (Refer to Intake And Exhaust System - "Air Cleaner" ...

Copyright © www.ksmanual.com 2014-2026 - 0.0426