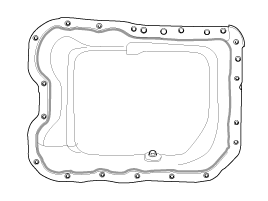
 Kia Sorento: Oil Pan Installation
Second Generation XM (2011-2026) / Kia Sorento XM 2011-2026 Service Manual / Engine Mechanical System / Lubrication System / Oil Pan Installation
| 1. |
Install the oil pan.
|

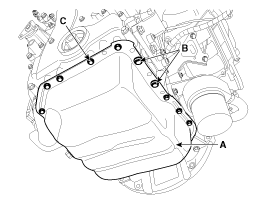

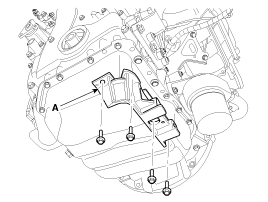
| 2. |
Install the A/C compressor bracket (A).
|
| 3. |
Install the A/C compressor lower bolts.
(Refer to Heating, Ventilation, Air Conditioning - "Compressor")
|
| 4. |
Refill engine with engine oil.
|
 Oil Pan Removal
1.
Remove the drive belt.
(Refer to Timing System - "Drive Belt")
2.
Remove the A/C compressor.
(Refer to Heating, Ve ...
 Balance Shaft & Oil Pump Components
1. Balance shaft & oil pump assembly
2. Balance shaft chain tensioner
3. Balance shaft chain
4. Balance shaft chain sprocket
5. Balance shaft chain guide
6. Balance shaft ...
See also:
Rear Air Conditioner Unit Replacement
1.
Disconnect the negative (-) battery terminal.
2.
Recover the refrigerant with a recover/recycling/charging station.
3.
...
Trunk Trim Replacement
Luggage Side Trim Replacement [7 seats]
ŌĆó
Put on gloves to protect your hands.
...
Canister Close Valve (CCV)
Canister Close Valve (CCV) is installed on the canister ventilation line.
It seals evaporative emission control system by shutting the canister from the
atmosphere when leakage detecting syst ...
Categories
- Home
- First Generation
- Second Generation
- Kia Sorento XM 2011-2026 Owners Manual
- Kia Sorento XM 2011-2026 Service Manual

Copyright ® www.ksmanual.com 2014-2026