 Kia Sorento: Line Pressure Control Solenoid Valve (LINE_VFS) Installation
| 1. |
Install in the reverse order of removal.
|
The existing valve body cover gasket (A) must be replaced with a new one (do not reuse).
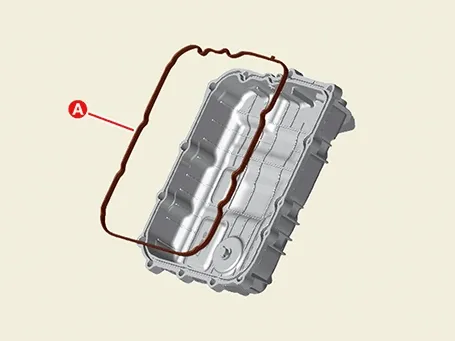
|
|
| 2. |
Perform the procedures below after installing.
| (1)
|
Refill the automatic transaxle with fluid.
(Refer to Hydraulic System - "Fluid")
|
After ATF injection and level check, clean ATF outside the automatic transaxle.
(Wipe off the residual ATF, especially between the automatic transaxle case and the valve
body cover.)
|
|
| (2)
|
Refill the engine coolant.
(Refer to Engine Mechanical System - "Coolant")
|
| (3)
|
Clear the diagnostic trouble codes (DTC) using the KDS. Disconnecting the battery negative
terminal will not clear the DTCs. Clear DTCs using the KDS at all times.
|
| (4)
|
Perform the resetting automatic transaxle adaptive values using the KDS.
(S/W Management → Automatic Transaxle → Resetting Auto T/A Values)
|
Refer to the KDS screen for operating conditions and details.
|
|
| (5)
|
Perform the TCM adaptive values learning procedure.
(Refer to Automatic Transaxle Control System -
"Adjustment")
|
| (6)
|
After installing, check for leakage of fluid from hose connection during engine starting and
running.
|
|
SS-A Solenoid Valve (SS-A_ON/OFF) Specifications
Specification
Item
Specification
Control type
ON/OFF
...
See also:
ECM Problem Inspection Procedure
1.
TEST ECM GROUND CIRCUIT: Measure resistance between ECM and chassis
ground using the backside of ECM harness connector as ECM side check
point. If the problem is fo ...
Installation
1.
Install the mirror making sure the mounting bracket not to be
damaged.
2.
Install the mirror wiring cover after reconnecting the connect ...
Component Location (2)
...



 Line Pressure Control Solenoid Valve (LINE_VFS) Removal
 SS-A Solenoid Valve (SS-A_ON/OFF) Specifications. SS-A Solenoid Valve (SS-A_ON/OFF) Components and Components Location
