 Kia Sorento: Description and Operation
The tire pressure monitoring system continuously monitors the pressure and temperature inside the tire to warn of
changes in the pressure inside the tire that may affect the driving conditions of the vehicle. The TPMS control module
analyzes information from the Wheel Electronic (WE) sensor mounted inside the wheel, determines the tire condition,
and outputs a signal necessary for controlling the warning lamp.
Tire Low Pressure Light
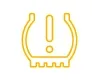
TPMS light ON/OFF conditions
| 1. |
Lamp ON Conditions
|
•
|
The lamp turns ON when the tire pressure decreases below the standard level.
|
|
| 2. |
Lamp OFF
|
•
|
Low pneumatic pressure: The warning lamp turns OFF when the tire pressure exceeds the pressure
required to turn off the lamp.
|
|
TPMS Fault Warning Lamp
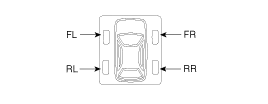
| 1. |
Lamp ON Conditions
|
•
|
It on simultaneously with the tread lamp.
|
|
•
|
It Indicates the position of tires with low pressure and air leaks.
|
|
| 2. |
Lamp OFF
|
•
|
OFF simultaneously with the tread lamp.
|
|
If the wheel position changes while driving, the system assumes the previous state, but the warning
light illuminates correctly when the current driving position is determined.
|
|
•
|
Tread warning lights and wheel position warning lights may light up due to sudden changes
in the outside temperature (especially in winter) and influences from driving.
|
|
•
|
When the warning lamp turns on, check the inflation pressure and then inflate it to the
specified tire pressure.
|
|
|
TPMS Warning Light
| 1. |
Warning Conditions and Display
|
•
|
When the system detects a fault outside the receiver or sensor, it blinks for about 1 minute and
then turns on.
|
|
•
|
When the system detects a receiver fault, it blinks for about 1 minute and then turns on.
|
|
•
|
When the system detects a sensor fault, it blinks for about 1 minute and then turns on.
|
|
| 2. |
Lamp OFF
|
•
|
When the DTC is resolved, the warning light turns off, and the DTC is saved as a past fault.
|
|
•
|
If this happens while driving, even if the DTC has been resolved, it should be checked
again.
(IG OFF and ON, then check the warning light again)
|
|
•
|
The warning lamp turns off once the DTC is resolved. The warning lamp stays on until you
complete the check necessary to resolve the DTC.
|
|
•
|
If the DTC is resolved, the warning lamp turns OFF during the same ignition cycle.
|
|
|
If the vehicle starts within 19 minutes after the replacement of the wheel of the stopped vehicle,
the TPMS Malfunction Indicator on the instrument cluster illuminates.
|
–
|
The above symptom is due to communication failure between the BCM and the replaced TPMS ID.
|
|
–
|
This communication failure indicator turns off in 19 minutes after the vehicle stops
through the BCM’s automatic learning process of TPMS ID.
(When driving the vehicle after stopping for over 19 minutes, the indicator turns off
automatically.)
|
|
|
System fault
| 1. |
General Function
|
•
|
The system detects many input elements to identify potential defects.
|
|
•
|
The priority of a defect depends on its cause.
|
|
•
|
Certain defects are not diagnosed as DTCs.
|
The following are major defects:
| a. |
In order to diagnose more symptoms of the fault when the ignition line malfunctions, you must check
the warning lamp when you turn the ignition on.
|
| b. |
Check whether the warning lamp turns on and then off.
|
|
Components
1. Body Domain Control Unit
2. Tire Pressure Monitoring System (TPMS) Sensor...
Description
TPMS monitors the pressure and temperature of tires to warn of pressure changes that may affect driving conditions.
The messages calculated from the processed data are show...
See also:
Removal
1.
Remove the air duct.
(Refer to Engine Mechanical System - "Air cleaner")
2.
Remove the battery and the battery tray.
...
Brake Booster Brake Booster Operating Test
For simple checking of the brake booster operation, carry out the following
tests.
1.
Run the engine for one or two minutes, and then stop it. If the
pedal depresses ...
Compressor Disassembly
1.
Remove the engine room under cover by loosening the mounting clip
(A) and bolts (B).
2.
Separate the front portion of the front ...



 Components and Components Location
 TPMS Receiver Description and Operation
