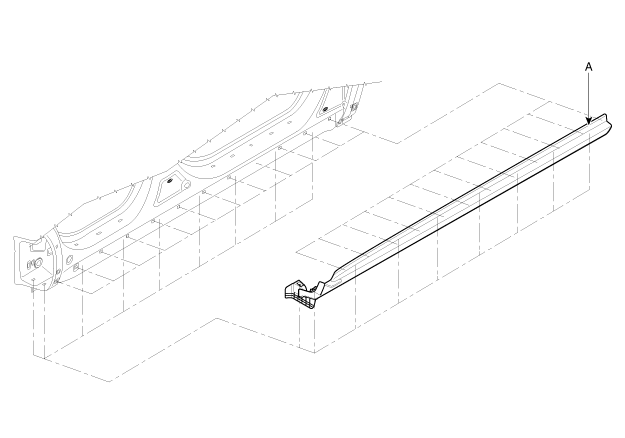
 Kia Sorento: Body Side Moulding Replacement
Roof mouldingmoulding mouldingReplacement
| ŌĆó
|
Pry the trim off using a plastic trim tool and apply protective
tape around the related parts, to prevent damage.
|
| ŌĆó
|
Put on gloves to protect your hands.
|
| ŌĆó
|
Take care not to scratch the body surface.
|
|
|
1. |
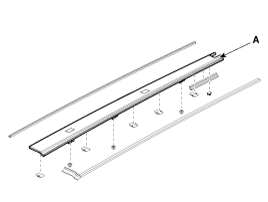
Remove the roof rack front cover (A) and roof rack rear cover
(B).
|
|
2. |
Remove the roof rack center cover (C).
|
|
3. |
After loosening the mounting nuts, then remove the roof rack assembly
(D).
|
|
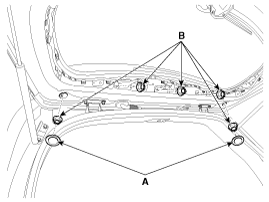
4. |
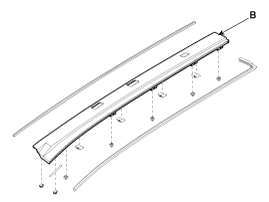
Remove the roof front moulding (E) and roof rear moulding (F).
|
|
5. |
Using a screwdriver or remover, remove the roof moulding (G).
|
|
6. |
Install in the reverse order of removal.
|
ŌĆó |
Replace any damaged clips.
|
|
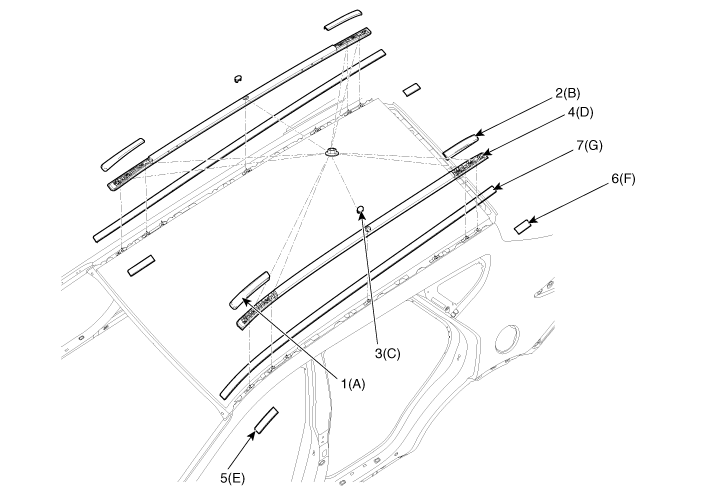
1. Roof rack front cover
2. Roof rack rear cover
3. Roof rack center cover
4. Roof rack assembly
|
5. Roof front moulding
6. Roof rear moulding
7. Roof ddddddddddddddddddmoulding
|
|
| ŌĆó
|
Pry the trim off using a plastic trim tool and apply protective
tape around the related parts, to prevent damage.
|
| ŌĆó
|
Put on gloves to protect your hands.
|
| ŌĆó
|
Take care not to scratch the body surface.
|
|
|
1. |
Remove the roof rack front cover (A) and roof rack rear cover
(B).
|
|
2. |
Remove the roof rack center cover (C).
|
|
3. |
After loosening the mounting nuts, then remove the roof rack assembly
(D).
|
|
4. |
Using a screwdriver or remover, remove the roof moulding (E).
|
ŌĆó |
Replace any damaged clips.
|
|
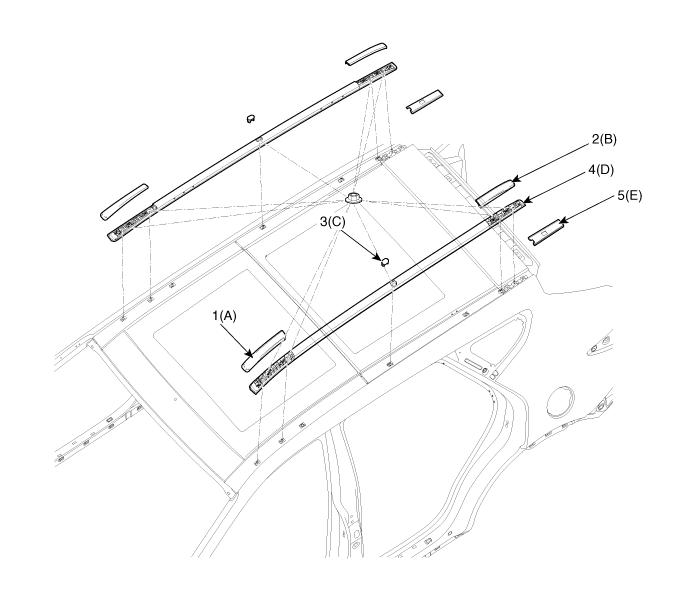
1. Roof rack front cover
2. Roof rack rear cover
3. Roof rack center cover
|
4. Roof rack assembly
5. Roof moulding
|
|
|
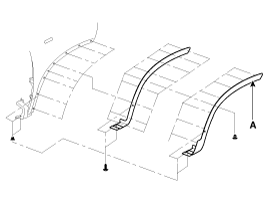
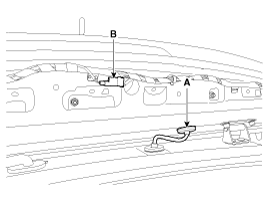
5. |
Using a screwdriver or remover remove the rear roof moulding (A)
and the front roof moulding (B).
|
ŌĆó |
Relplace the roof moulding to a new one.
|
|
[Rear]
[Front]
|
|
6. |
Install in the reverse order of removal.
|
ŌĆó |
Replace any damaged clips.
|
|
|
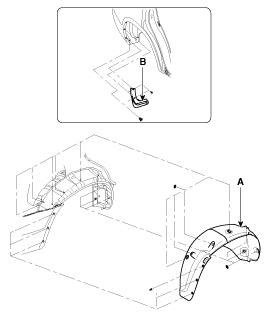
Front Wheel Guard And Mud Guard Replacement
| ŌĆó
|
When prying with a flat-tipped screwdriver, wrap it with
protective tape, and apply protective tape around the related
parts, to prevent damaged.
|
| ŌĆó
|
Put on gloves to protect your hands.
|
| ŌĆó
|
Take care not to scratch the body surface.
|
|
|
1. |
Remove the front tire.
|
|
2. |
After loosening the mounting clips and screws, then remove the
front wheel guard (A), mud guard (B).

|
|
3. |
Install in the reverse order of removal.
|
Rear Wheel Guard And Mud Guard Replacement
| ŌĆó
|
When prying with a flat-tipped screwdriver, wrap it with
protective tape, and apply protective tape around the related
parts, to prevent damaged.
|
| ŌĆó
|
Put on gloves to protect your hands.
|
| ŌĆó
|
Take care not to scratch the body surface.
|
|
|
2. |
After loosening the mounting clips and screws,then remove the
rear wheel guard (A) and mud guard (B)
|
|
3. |
Install in the reverse order of removal.
|
Door Garnish Replacement
| ŌĆó
|
When prying with a flat-tipped screwdriver, wrap it with
protective tape, and apply protective tape around the related
parts, to prevent damaged.
|
| ŌĆó
|
Put on gloves to protect your hands.
|
| ŌĆó
|
Take care not to scratch the body surface
|
|
|
1. |
Using a screwdriver or remover, remove the front door garnish
(A).
|
|
2. |
After loosening the mounting nut, remove the rear door garnish
(B).
|
|
3. |
Install in the reverse order of removal.
|
ŌĆó |
Replace any damage clips.
|
|
|
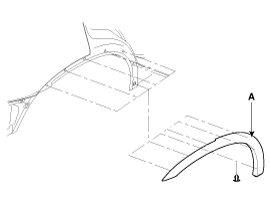
Fender Garnish Replacement
| ŌĆó
|
When prying with a flat-tipped screwdriver, wrap it with
protective tape, and apply protective tape around the related
parts, to prevent damaged.
|
| ŌĆó
|
Put on gloves to protect your hands.
|
| ŌĆó
|
Take care not to scratch the body surface.
|
|
|
1. |
Using a screwdriver or remover, remove the fender garnish (A).
|
|
2. |
Install in the reverse order of removal.
|
ŌĆó |
Replace any damage clips.
|
|
|
Quarter Garnish Replacement
| ŌĆó
|
When prying with a flat-tipped screwdriver, wrap it with
protective tape, and apply protective tape around the related
parts, to prevent damaged.
|
| ŌĆó
|
Put on gloves to protect your hands.
|
| ŌĆó
|
Take care not to scratch the body surface
|
|
|
1. |
Using a screwdriver or remover, remove the quarter garnish (A).
|
|
2. |
Install in the reverse order of removal.
|
ŌĆó |
Replace any damage clips
|
|
|
Rear Spoiler Replacement
| ŌĆó
|
Pry the trim off using a plastic trim tool and apply protective
tape around the related parts, to prevent damage.
|
| ŌĆó
|
Put on gloves to protect your hands.
|
| ŌĆó
|
Take care not to scratch the body surface.
|
|
|
1. |
Remove the tail gate upper trim.
|
|
2. |
Disconnect the washer nozzle (A) and high mounted stop lamp connector
(B).
|
|
4. |
Loosen the rear spoiler mounting nuts (B).
Tightening torque :
5.9 ~ 6.4 N.m (0.6 ~ 0.65 kgf.m, 4.3 ~ 4.7 lb-ft)
|
|
|
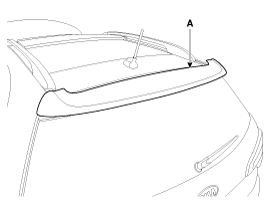
5. |
Remove the rear spoiler (A).
|
|
6. |
Install in the reverse order of removal.
|
ŌĆó |
Make sure the connector is plugged in properly.
|
|
ŌĆó |
Replace any damaged clips.
|
|
|
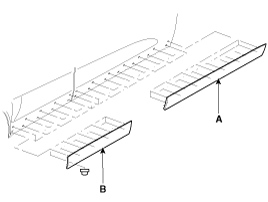
Side Sill Moulding Replacement
| ŌĆó
|
When prying with a flat-tipped screwdriver, wrap it with
protective tape, and apply protective tape around the related
parts, to prevent damaged.
|
| ŌĆó
|
Put on gloves to protect your hands.
|
| ŌĆó
|
Take care not to scratch the body surface
|
|
|
1. |
Using a screwdriver or remover, remove the side sill moulding
(A).
|
|
2. |
Install in the reverse order of removal.
|
ŌĆó |
Replace any damage clips
|
|
|
Glass Adjustment
ŌĆó
Check the glass run channel for damage or deterioration,
and re ...
1. Roof side moulding [LH]
2. Roof side moulding [RH]
3. Movable glass
4. Slide
5. Cover base
6. Wind deflector
7. Panorama sunroof frame assembly
8. Mechanism rai ...

 Rear Door Adjustment
 Panorama Sunroof Components