 Kia Sorento: Rear Driveshaft Disassembly
Second Generation XM (2011-2024) / Kia Sorento XM 2011-2024 Service Manual / Driveshaft and axle / Rear Driveshaft Assembly / Rear Driveshaft Disassembly
|

| 1. |
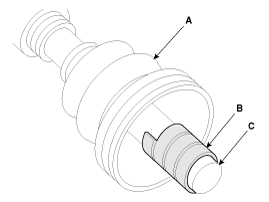
Remove the TJ boot bands and pull the TJ boot from the TJ outer
race.
|
| 2. |
Pull out the driveshaft from the TJ outer race.
|
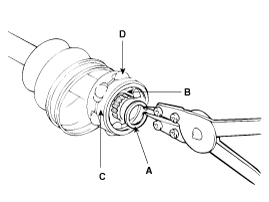
| 3. |
Remove the snap ring (A) and take out the inner race(B), cage(C)
and balls(D) as an assembly.
|
| 4. |
Clean the inner race, cage and balls without disassembling.
|
| 5. |
Remove the BJ boot bands and pull out the TJ boot and BJ boot.
|
 Rear Driveshaft Inspection
1.
Check the driveshaft boots for damage and deterioration.
2.
Check the ball joint for wear and damage.
3.
Che ...
 Rear Driveshaft Reassembly
1.
Wrap tape around the driveshaft splines (TJ side ) to prevent
damage to the boots.
2.
Apply grease to the driveshaft and install the boo ...
See also:
Inspection
1.
Turn the ignition switch OFF.
2.
Disconnect the HO2S connector.
3.
Measure resistance between the HO2S termi ...
Direct Electro Hydraulic Actuator Coupling Components
1. Coupling assembly
2. Input shaft
3. Pressure sensor
4. Extension wiring
5. Oil hydraulic Motor(Actuator)
...
Oil hydraulic Motor(Actuator) Removal
1.
Remove the coupling assembly.
(Refer to Coupling Assembly - "Direct Electro Hydraulic Actuator
Coupling")
2.
Keep goin ...
Copyright © www.ksmanual.com 2014-2024