 Kia Sorento: Piston and Connecting Rod Reassembly
| ŌĆó |
Thoroughly clean all parts to be assembled.
|
| ŌĆó |
Before installing the parts, apply fresh engine oil to all sliding
and rotating surfaces.
|
| ŌĆó |
Replace all gaskets, O-rings and oil seals with new parts.
|
|
|
1. |
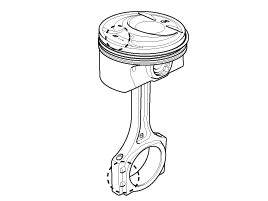
Assemble the piston and connecting rod.
|
(1) |
The piston front mark and the connecting rod front mark must
face the timing chain side of the engine.
|
|
(2) |
Before pressing the piston pin, apply a coat of lubricant oil
to the piston pin outer and connecting rod.
|
ŌĆó |
Take care that piston pin is not damaged during
reassemble .
|
|
ŌĆó |
When replace the piston pin, check the piston
pin outer diameter and connecting rod small
end inner diameter as below.
Piston pin outer diameter : 21.997 ~ 22.000
mm (0.8660 ~ 0.8661 in)
Piston pin hole inner diameter : 22.003 ~ 22.007
mm (0.8662 ~ 0.8664 in)
Connecting rod small end inner diameter : 22.005
~ 22.011 mm (0.8663 ~ 0.8665 in)
Interference : -0.014 ~ -0.005 mm (0.0006 ~
0.0002 in)
|
|
|
|
(3) |
Set the snap ring in one side of piston pin hole and insert
the piston pin into the piston pin hole & the small end bore
of connecting rod while meeting the front mark of connecting
rod & piston.
|
Be sure to keep the small end bore, pistonpin hole &
piston pin from being damaged and scratched when inserting
the piston pin.
|
|
Assembling condition
Temperature : piston side 70 to 80C , connecting rod
& pin is to be normal room temperature.
|
|
|
(4) |
After inserting the piston pin, set the snap ring of the other
side.
|
Set the snap ring so that it contacts completely with
the groove of the piston pin hole.
The snap ring must not be deformed from the installation
tooling method.
|
|
|
|
2. |
Install the piston rings .
|
(1) |
Install the oil ring with coil spring by hand.
|
|
(2) |
Using a piston ring expander, install the 2 compression rings
with the code mark facing upward.
|
|
(3) |
Position the piston rings so that the ring ends are as shown.
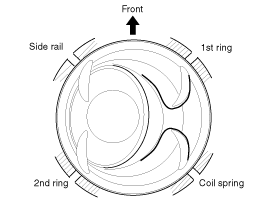
|
|
|
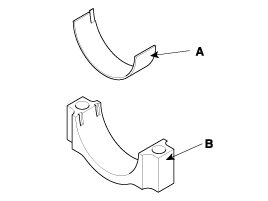
3. |
Install the connecting rod bearings.
|
(1) |
Align the bearing claw with the groove of the connecting rod
or connecting rod cap.
|
|
(2) |
Install the bearings(A) in the connecting rod and connecting
rod cap(B).
|
|
|
4. |
Remove the crankshaft.
(Refer to Cylinder Block - "Crandshaft")
|
|
5. |
Install piston and connecting rod assemblies.
|
Before installing the pistons, apply a coat of engine oil to
the ring grooves and cylinder bores.
|
|
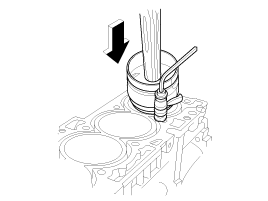
(1) |
Remove the connecting rod caps, and slip short sections of rubber
hose over the threaded ends of the connecting rod bolts.
|
|
(2) |
Install the ring compressor, check that the bearing is securely
in place, then position the piston in the cylinder, and tap
it in using the wooden handle of a hammer.
|
|
(3) |
Stop after the ring compressor pops free, and check the connecting
rod-to-check journal alignment before pushing the piston into
place.
|
|
(4) |
Apply engine oil to the bolt threads. Using the SST (09221-4A000),
install the rod caps with bearings, and torque the bolts.
Tightening torque
17.7 ~ 21.6 N.m (1.8 ~ 2.2 kgf.m, 13.0 ~ 15.9 lb-ft)
+ 78 ~ 82┬░
|
|
Always use new connecting rod cap bolts. Connecting
rod cap bolts are toque-to-yield bolts designed to be
permanently elongated beyond the state of elasticity
when torqued, so if the bolts are removed and reused,
it may cause the bolts to break or fail to maintain
clamping force.
|
|
Maintain downward force on the ring compressor to prevent
the rings from expanding before entering the cylinder
bore.
|
|
|
Connecting Rod
1.
Check the connecting rod end play.
Using a feeler gauge, measure the end play while moving the connecting
rod back and forth.
...
1. Crankshaft upper bearing
2. Thrust bearing
3. Crankshaft
4. Crankshaft lower bearing
5. Main bearing cap
...
See also:
Roof rack (if equipped)
If the vehicle has a roof rack, you can load cargo on top of your vehicle.
✽ NOTICE
If the vehicle is equipped with a sunroof, be sure not to position cargo onto
the roof rack in such a wa ...
ATF Warmer Component Location
1. ATF Warmar
2. Bypass valve
3. ATF hose & pipe
4. Coolant hose & pipe
...
Battery Description
1.
The MF(Maintenance Free) battery is, as the name implies, totally
maintenance free and has no removable battery cell caps.
2.
The MF(Mai ...


 Piston and Connecting Rod Inspection
 Crankshaft Components